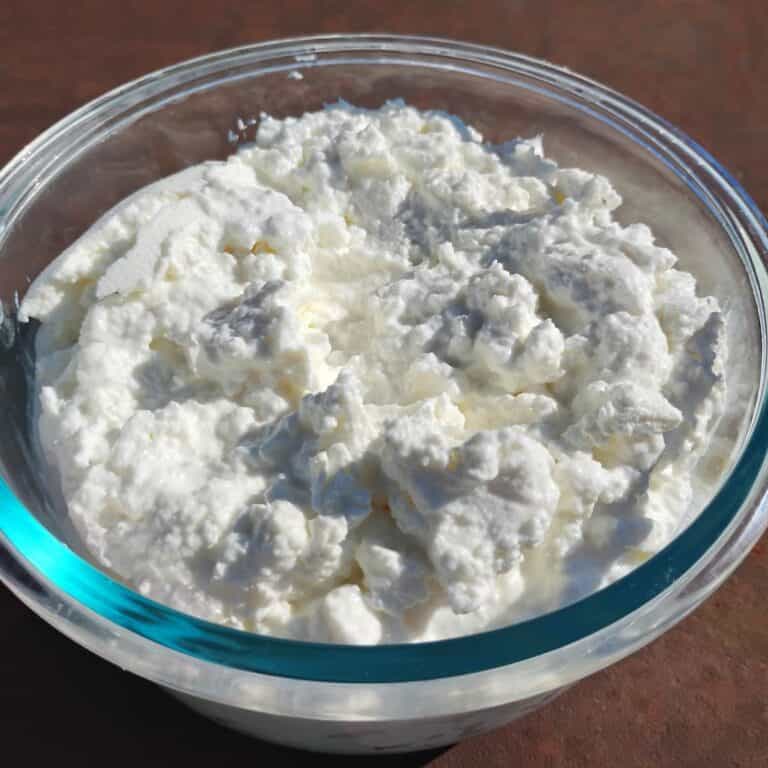
Queso fresco cheese recipe, also called Queso Blanco or Paneer. This wonderful cheese is quick and perfect for stir-fries, dips, and fruit!
This post contains affiliate links, which means I make a small commission at no extra cost to you if you click through and make a purchase. See my full disclosure here.
The quickest, easiest cheese you’ll ever make. 2 ingredients and about 30 minutes of prep time will give you a versatile homemade cream cheese. A healthy alternative to grocery store cream cheese, and a substitute for quark, tofu, feta, ricotta, or paneer.
Make a topping, filling, dip, or spread. Hang or press the curds for a while, and you can use queso fresco diced in stir-fries, curries, and Mexican dishes. Once you make it, you won’t want to stop making it and you’ll wonder how you ever did without.
If you like easy cheese recipes, you’ll love German Quark Cheese, or make Chevre from goat’s milk. And make one ingredient ancient Clabber Cheese from raw milk. And try Sirene (Bulgarian Feta), a brine-aged white cheese.
Try these cheese desserts: An awesome Quark Cheese Mousse dessert with queso fresco cream cheese as a substitute for quark. Blackberry Cheesecake Streusel Bars – A must make dessert for blackberry season. Creamy, easy, and berry delicious! And you need to try Classic German Cheesecake (Käsekuchen), an incredibly delicious German cheesecake you can make with blended Queso Fresco, as well as Lemon Blueberry Cheesecake Bars!
- The Quickest, Easiest Cheese I Know
- Now This Is So Confusing!
- Make A Big Batch Of This Homemade Queso Fresco Cheese Recipe
- Equipment To Make Queso Fresco Cheese
- Ingredients For Queso Fresco Cheese
- Make Queso Fresco Cheese In A Few Simple Steps
- Uses For The Queso Fresco Cheese Recipe
- Storing Your Homemade Queso Fresco Cheese
- Cleanup
- What to do with all the whey
- What to read next
- Pin This Post
- Shop this post
The Quickest, Easiest Cheese I Know

If there is an easier cheese you can make, I haven’t heard about it. Queso Fresco comes together so quickly! This is the kind of cheese where you can decide late in the afternoon that you want some for dinner and you can have it for dinner an hour later. There are not many cheeses you can do that with.
Queso Fresco is a mild cheese that is super adaptable for so many recipes as you will find out below. Similar cheeses are Paneer and Queso Panela. And it can be substituted for Tofu.
It is also similar to Ricotta, except that Ricotta is usually made by heating whey, which you get after making a Mozzarella cheese for example. But the process is the same and the taste is similar. The two can be used interchangeably in many recipes.
This easy acid based cheese recipe yields a fresh cheese. Unlike cultured and aged cheeses, it will not keep longer than a week refrigerated, but it can be frozen for longer storage.
Now This Is So Confusing!
A quick divergence into exploring the name of the cheese is in order. Queso Fresco and Queso Blanco are two different cheeses, but the names are used interchangeably depending on who you listen to. This makes it a little confusing to know which one of these Mexican cheeses a person is referring to.
One type of cheese is very similar to chevre, made with a starter culture or clabber and rennet. And it needs culturing time to turn into a creamy, spreadable cheese. It usually gets hung in a bag or drained in a basket. And some people call it Queso Fresco and others call this version Queso Blanco.
And this is where it gets confusing. Another cheese, which is also called Queso Fresco by some and Queso Blanco by others, is what I’m introducing here. In this recipe we heat the milk and get it to curdle by using an acidifier of some kind.
This is a quick way of making cheese and yields a cheese that can be spreadable if you blend it in a blender or it can be firm and cut into cubes for cooking. It does not melt and acts much like tofu in a stir fry, both in texture and it’s ability to absorb the flavor of the dish. But I think it tastes much better than tofu with its delicious creaminess.
So call it Queso Fresco or Queso Blanco and you’re right in the eyes of some and wrong in the eyes of some others in either case. But in both cases we’re referring to a fresh cheese that is also a white cheese, so I suppose either name is appropriate for either cheese.
Make A Big Batch Of This Homemade Queso Fresco Cheese Recipe

I find that making any cheese is not worth it unless you start with at least a gallon of milk. One reason is, you only get about two cups of cheese from a gallon of whole milk, the rest will be whey. Another reason is that it makes the trouble and clean-up more worth it. And this cheese freezes well, so make a double recipe and stick half of it in the freezer ready for another meal.
There are so many uses for this, I doubt that you will find it hard to come up with ways to use a big batch and find yourself wanting to make it again. This is why my recipe calls for 2 gallons of milk. But if you want to use just 1 gallon, go ahead and cut the acidifier and salt in half as well. That’s all.
Equipment To Make Queso Fresco Cheese

Large 10-12 quart stock pot, preferably with a heavy bottom
Use this to heat the milk. The pot needs to be big enough to fit the amount of milk you want to work with. Use a smaller pot if you have just a gallon of milk. A heavy bottom will lessen your chances of scorching the cheese.
Cheese cloth approximately 30 x 30 inch, heavy duty
Not the loosely woven kind you find in the grocery store. Those are not meant for cheese. They do not work and I find it annoying that they call them cheesecloth. It makes it necessary for me to explain why not to use it every time, 😜. So it is a good idea to use a strong woven cotton or linen cloth. I prefer flour sack towels or even better, unbleached, organic flour sack towels, which have a hundred uses in my kitchen and around the homestead. Admittedly, I can’t have enough of them. Try to get one that is at least 28 x 28 inches. Most shrink a little in the wash too.
You can also buy a specific cheese cloth that is meant for the purpose, it is often called butter muslin. I like the larger size of these and curds tend to drain a little quicker in the looser weave. A tea towel works too. Other items that work well are a clean old bed sheet, pillow case, shirt, nut milk bag, or brewery straining bag. Personally, I do not like to use bags, because the seams are hard to clean.
Thermometer
This thermometer will be used to read the temperature of the milk while it’s heating. If you don’t have a cooking thermometer, you can also just heat the milk to before it starts to simmer. This will be hotter than required, and it will work.
Long-handled spoon or skimmer
For stirring your milk while it is heating and for stirring in the acidifier. The skimmer is really handy for fishing the curds out of the whey to help with the transfer later. Pouring it can get messy.
Large pot or bowl to catch the whey
Your catchment vessel must be big enough to hold 2 gallons if that is how much milk you’re starting with. If you choose to go with 1 gallon, then a 6 qt stockpot would suffice.
A colander
Line the colander with your cheesecloth and suspend over the whey catchment pot or bowl. It catches the curds and you can salt them easier this way before hanging the curds to drain. If you don’t salt your curds this is optional.
Optional: a hook to hang the bag from, or a dowel
I like to hook into the knot and hang my bag from a rope, tied to the rafters in the yurt. This is probably not an option for most of you. But you can hang it from a cabinet knob, the sink faucet or suspended from between two tall objects. Just stick a dowel through the bag openings under the knot and lay that dowel across the top of the tall objects, placing the catchment bowl underneath. You could use two tall pots, two chairs or whatever else comes to mind.
If you use the sink faucet, technically you don’t need a catchment vessel. However, I suggest saving the whey, it’s full of nutrients and can be used in many recipes in place of water.
Ingredients For Queso Fresco Cheese

2 gallons of Milk
Use any dairy type of whole milk you like, except ultra-pasteurized, which is denatured and will not work for any cheese. The milk will get heated to fairly high temperatures and so using raw milk is not so much of a benefit in this recipe, but if that is what you have, by all means use it. I use raw goat milk.
1 or 2 percent milk or skim milk will work too, but you’ll get a less rich and less flavorful cheese.
As always, I do advise using organic or grass fed milk for a healthier choice. Most large stores carry the Organic Valley line which is a cooperative of small organic family farms. They make processing facilities available to those who are not big enough operations to afford commercial equipment that will satisfy the USDA.
You can also check for organic dairy farms in your area. Try asking a feed store who sells organic feed or check their pin board. Many organic dairies sell raw milk for pets or for people if the state allows it. In any case, you’ll be able to see the operation and pick a grass-fed dairy to get your milk from, if possible.
Optional: Heavy Cream
I don’t add heavy cream, but it is sometimes used to make a richer cheese. If your milk is not full fat, you can also add some cream to make it more like whole milk. Just add a cup or two of cream to the recipe before heating.
1 cup +/- Acidifier, such as Vinegar or Lemon juice
Queso Fresco is in the class of acid-set cheeses. What we go for is curdled milk and we use an acidifier to get the warm milk molecules to coagulate and form curds. I have used apple cider vinegar, other fruit vinegar and lemon juice in the past for this Queso Fresco cheese recipe. I’ve also used cheap white vinegar before I learned about GMOs many years ago.
Vinegar
When I make a Queso Fresco cheese recipe now, I always use apple cider vinegar. And since most of the time it’s homemade, sometimes I need a little more, because it is not always as strong as the commercial kind. Sometimes I need less when my vinegar turned out super strong. I like the subtle flavor that natural organic raw apple cider vinegar imparts to the cheese and think it matches it well.
Be aware that commercial white vinegar is usually made from GMO ingredients. It does make a great cheap cleaner, though. If you prefer to choose healthy ingredients in a food recipe I would suggest organic apple cider vinegar or organic white vinegar.
Lemon or Lime Juice
Lemon juice can be freshly squeezed or you can get it bottled. I do not like the flavor as much but some people prefer it. But I do think lemon juice works best for use in sweet recipes.
You could also use Lime juice, but I find that it has too strong of a flavor for this use except maybe if you want to make a lime cheese cake. But I absolutely love to use the lime juice for a sprinkle over the top of the finished dish. In either case, if you squeeze your own fresh juice, the acidity may vary and you’ll need to adjust the amount necessary to make your milk curdle.
Whey, Buttermilk or Yogurt
Another acidifying option is whey, if you have any from making other cheeses. Depending on how acidic your whey is, it can take a lot more than a cup. In India yogurt is one of the traditional choice acidifiers used for making Paneer, the same cheese with a different name. But in this case too, it takes quite a bit to make your batch of milk curdle.
Citric Acid
Here is a word about citric acid, which some recipes call for, and you can totally use it to make Queso Fresco. But be aware that it is rarely made from fruits like you would assume, seeing all the pictures of lemons on the packaging. This is a substance which is grown in a lab on mold with the help of molasses.
So unless it says no-GMO, it likely contains GMO ingredients and it can cause problems for people with mold allergies. I do think it is a great product for cleaning. For food use however, and for this Queso fresco cheese recipe, I prefer real organic lemon juice if I want the citrus flavor.
Salt
Salt is optional. If you want to use it, the best kind of salt is pure sea salt or pure pink salt. Both add micro-nutrients to your cheese. Use 2 tablespoons for a fully salted 2 gallon recipe. It is a good idea to add salt, if you want to increase shelf-life in the refrigerator. If you choose to add salt, do so after you strain the curds in a cheesecloth lined colander and before hanging the cheese.
If you want to keep your whey sweet, store it away now and hang your bag of salted curds over a fresh catchment container to collect the salted whey. This too can be used in recipes like a seasoning, instead of adding salt to a soup for example. It will keep for a while in the fridge.
Don’t use salt if you plan to use your cheese in sweet recipes. You also don’t need salt if you use it just like tofu. I don’t salt mine, it absorbs the flavors of my recipes and it’s very good just plain I think.
Make Queso Fresco Cheese In A Few Simple Steps
Step 1: Heat the milk

Pour the milk into a large stock pot. Warm milk on medium-low heat to a temperature of 165-190 degrees. I prefer heating it to 190 when I want to use it for cheese cubes in stir-fries. In my experience, they hold their shape better in the end, when heated to higher temperature.
If you go over the 190 degrees, nothing is lost, even if it ends up boiling it’ll be OK. The important thing you need to watch for is that it doesn’t scorch. So keep stirring while it heats. If a skin forms on the surface of the milk, that is OK too. It will blend in with the curds later.
Step 2: Add acidifier

Turn off the heat or take the pot off the burner if it’s electric. Slowly add your acidifier at this point while stirring. Watch for curdling. And don’t worry, you won’t miss it when it does. When it starts to curdle, quit adding more acidifier. Stir it for a few more seconds. There should be a good separation of curds and whey. The whey will look greenish and should be clear. If it’s cloudy, it needs a little more acid.
Step 3: Let the milk curdle

Now let it rest in the pot for about 5-10 minutes. This will allow all the solids to curdle and settle into a mass.
Step 4: Prepare draining station

While your curds and whey are resting, prepare your catchment pot. Line with a cheesecloth. Alternatively you can put a colander over the pot and line that with the cheese cloth. I hate extra dishes so I don’t usually do that. But if you want to salt the cheese this is the best way to do it.
Step 5: Collect the curds in the cheesecloth

Carefully pour your curds and whey into the lined catchment pot or colander. It likes to splash, so be really careful. One thing that helps, is to lift the curds out of the whey with the skimmer first and then pour the rest of the whey into the catchment pot, so you catch all the bits and get a clear whey.
Step 6: Salt the curds – optional
If you want to salt the curds now, drain in a cheese cloth lined colander. Save the sweet whey in a separate pot before salting. Use a fresh, empty pot to catch the salted whey. Now mix the salt with the curds.
Step 6: Hang the curds

Take 3 ends of the cheesecloth in one hand and loop the fourth around the other three. When you come around, make a knot by pushing the corner through the loop from underneath. After pulling it tight, I usually take the corner and make another knot with one of the other corners, just to make it more secure so it doesn’t come undone when I go to hang it on a hook.
Slide a hook into that knot and carefully test it to make sure it won’t come undone and splash hot liquid all over. Then hang the other end of the hook on a looped rope that is suspended from a shelf, rafter or cabinet knob. Or slide the whole thing over your faucet in the sink.
Step 7: Let curds drain

Let it drip for an hour or so. For soft, blended cheese you can take it off a little sooner.
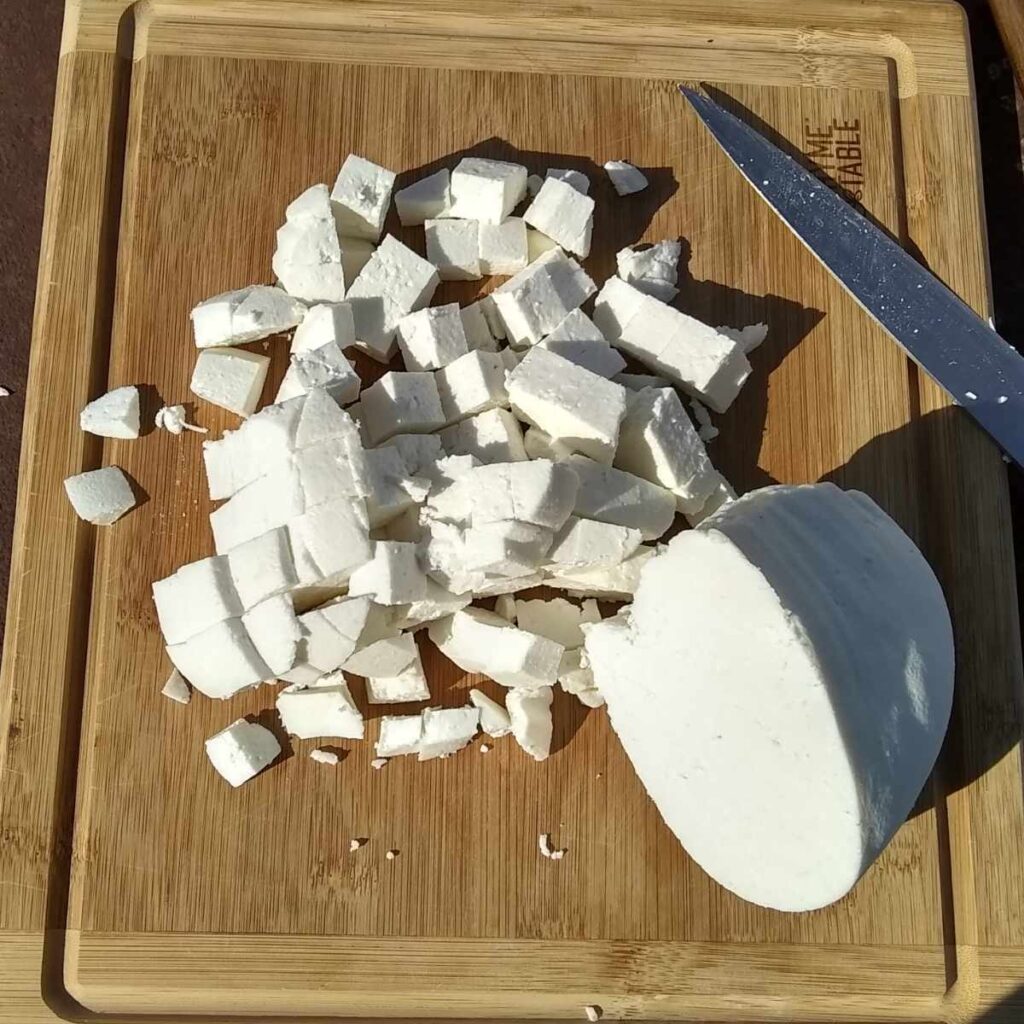
Step 8: Cut the cheese to use in recipes, blend it, or press to make a firmer cheese

It is now ready to use or it can be pressed to yield a firmer cheese.
Optional: Blend the cheese to make cream cheese

Use a food processor, blender, hand mixer, stick blender or potato masher to blend the curds into a smooth cream cheese. This can be mixed with savory or sweet ingredients or used as cream cheese, ricotta filling or sour cream in recipes. If you omitted the salting earlier, you can add it now if you like.
How To Press The Queso Fresco Cheese Recipe

The reason for pressing this cheese would be to increase the curd firmness. This step is optional after the cheese has drained for an hour. If you own cheese making equipment, you can use a cheese press, but it is not necessary. The simplest way to press it is by keeping it in the cloth bag. Twist it tight and lay it in a colander that’s perched over a catchment bowl or on a board inside a cookie tray.
Put another board or plate on it and add some weight on top. A few rocks or cans of food work. Keep it somewhere where nothing gets damaged in case the weights slide off. Press for another hour or so. It will be nice and firm for slicing and dicing.

Uses For The Queso Fresco Cheese Recipe
Now here is where things get exciting. There are so many ways you can use this easy to make, delicious cheese, and that is why I make it very often.
The resulting semi-soft cheese has a crumbly texture when it’s not pressed and so it is great to crumble over a dish. But you can also cut it into cubes. It is normally firm enough without pressing, but pressing makes it more firm and the cubes will hold their shape better.
If you want to salt the curds, do so before you hang the cheese. This is optional if you want to use it in savory dishes or eat it plain. I usually don’t, but it will keep a little longer if it’s salted and for certain uses it will need to be salted.
So you can just hang it and use it both ways listed below. Or press it after hanging, to make a more firm cheese. I usually don’t, but it does hold its shape better that way when you fry or stir-fry cubes of it later or if you want to slice it. If you use it in place of paneer in Indian dishes, you would typically press it.
Hang the cheese then chop or crumble it. Press it if you like it firmer.
- Use the cubes in stir-fries in place of tofu
- Use in Indian recipes just like paneer, such as deep-fried cheese cubes
- Use the cubes in curries for a meat-free protein
- Crumble over Mexican recipes, such as tacos or enchiladas
- Use in many Latin-American dishes where you don’t want the cheese to melt.
- Crumble over a salad
- Use the cubes and marinate in olive oil based salad dressing with herbs. This needs to marinate in the refrigerator to prevent botulism
- Slice and eat it on toast with some smoked meat
- Salt the crumbs well and use as a substitute for Feta cheese
- Use the crumbs in Italian dishes that call for Ricotta cheese.
Hang the cheese to drain, then blend it to make cream cheese.
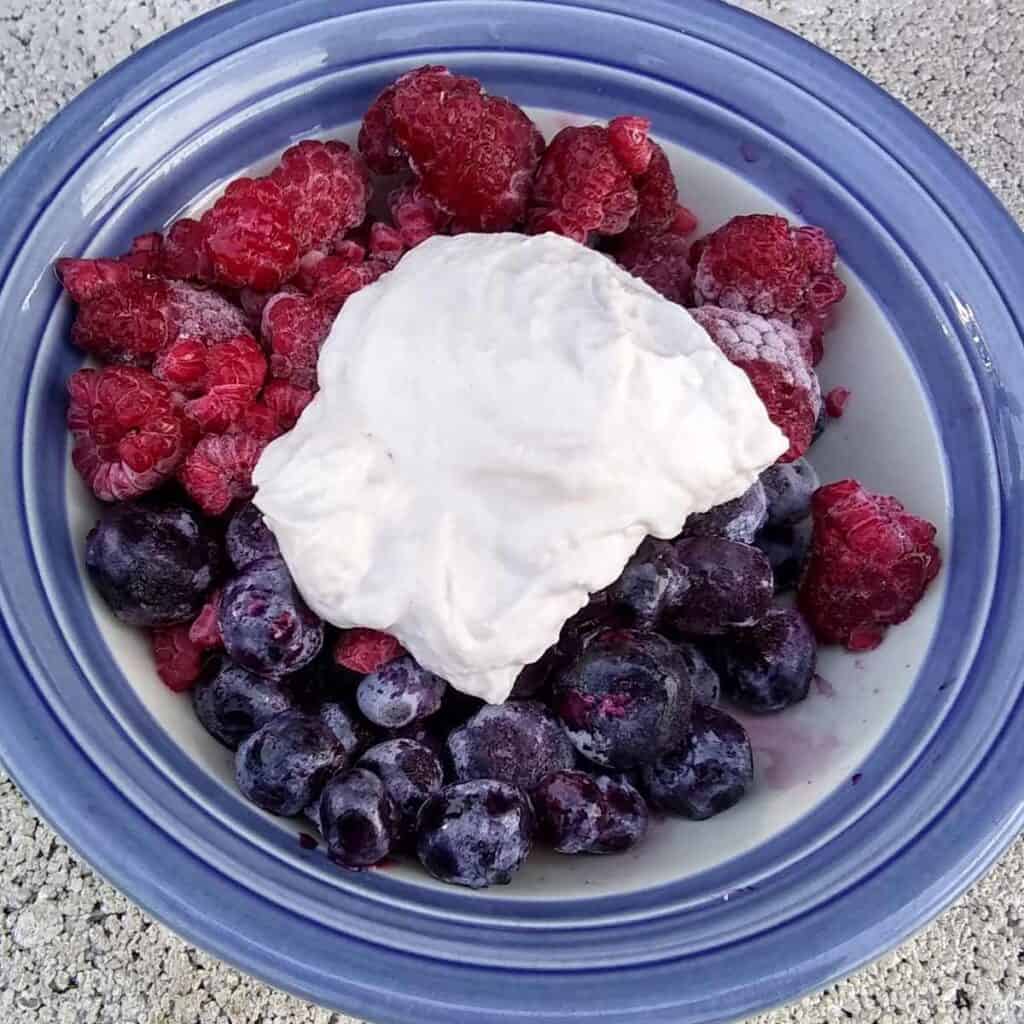
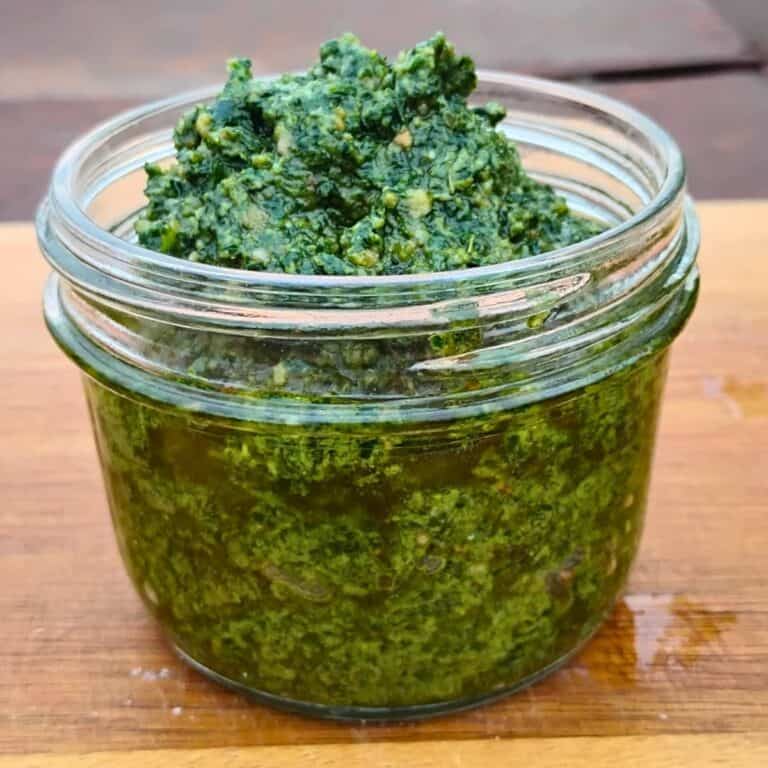
- Use it as a spread on toast or bagels. Use it plain or flavor the cheese either sweet by adding some sweetener or jam or make it savory by blending in some wild greens pesto!
- Mix with herbs to make a dip for crackers.
- Mix with honey to make a sweet spread.
- Use in place of yogurt in fruity or savory shakes.
- Use in place of ricotta or cream cheese as a sweet or savory filling.
- Make a queso dip with Mexican seasonings for tortilla chips. Great for cinco de mayo or football game day parties.
- Use in German recipe as a substitute for quark.
- Try these fantastic Lemon Blueberry Cheesecake Bars – Creamy, with a buttery crust, perfect for summer gatherings, or any sweet cravings!
- Here is a great holiday dessert: my fantastic Maple Walnut Cranberry Apple Pie Cheesecake Bars.
- Make a Classic German Cheesecake (Käsekuchen). You must try this!😍
- Make a cheesecake or filling for Danish pastry.
- Mix with honey and fruit or preserves to make a German style “Orangen Quark Speise“, a cream cheese dessert or cake filling. Or try Strawberry Quark Cheese Mousse, a delicious German quark dessert with pureed strawberries, and Lemon Cheesecake Mousse, a decadent, delicious, super healthy lemon dessert made with honey and lemon curd..
- Make a creamy sauce. Savory for a vegetable dish or to top fish or meat. Or sweetened with honey or maple syrup, to pour over a fruit salad.
- Use in place of sour cream in any dish, like baked potato or casserole or any dishes from the Mexican cuisine.
- Use to add creaminess to soups, such as tortilla soup, Russian Borscht, or German pancake soup.
- Let your imagination run wild and use it for all sorts of things. Once you make it and taste it, you’re bound to be inspired!
Storing Your Homemade Queso Fresco Cheese
You can store this cheese in the refrigerator for about a week. Keep it in an airtight container. If you need to store it longer, freeze it. Just cut or crumble it and keep it in a freezer bag with much of the air removed or in a freezer container. I usually cube it and keep it in a container or bag. This is a great way to have it ready to throw into a stir fry without defrosting first, especially if you flash freeze the cubes before packaging.
Cleanup
Here is a quick tip for cleaning up cheese making messes. This cheese in particular, turns to cement in your cooking pot very quickly if you don’t rinse it right away. As soon as the bag of cheese hangs, I head to the sink and rinse that pot. If I don’t do that I regret it later every time.
Cleaning the cloth can be a little challenging too, since bits of cheese get caught in the fibers. Best way to deal with that is to soak the cloth in some warm soapy water for a little bit. Then I work it to dislodge the bits. Rinse and repeat. A couple of these washings should be enough. I then rinse again till the water runs clear and hang the cloth in the sun to dry. Now it’s good to use for next time.
After several times of use, if it starts to smell not so fresh, I boil it in some baking soda for a few minutes, rinse it and hang it in the sun to dry.
What to do with all the whey
Always save the whey. I keep my sweet whey separate from the salted whey. Check out my post that is dedicated to Uses For Whey.
The sweet whey can be used for many things. It won’t keep as long as the salted whey, so use it soon or keep it in the freezer to add to recipes later. Use it for
- feeding animals
- watering acid loving plants (diluted!)
- as a foliar spray
- mixing up bread dough. It makes bread softer and more flavorful if used in place of water
- baking instead of water or buttermilk
- cooking instead of water in a soup or stew
- a drink with some blended fruit, or just plain, well chilled
Salty whey can be used in many recipes, just don’t forget to account for the extra salt. Salted whey will keep for a while in the fridge. The salt is a preservative.
- Use in baking any savory dishes in place of salt in a recipe
- Use to bake bread and omit or adjust the salt in the recipe
- Use in cooking, as your salt ingredient
- Use it in any recipe as seasoning, where salt and liquid is needed, like salad dressing, dip etc.
My very favorite way to use this easy cheese is in summer stir-fries.

This queso is one of my favorite things to add to summer meals. Here is how I like to use this homemade recipe of Queso Fresco all summer long. I just gather whatever I can find in the garden: potatoes, tomatoes, kale, broccoli, tomatillos, peppers, zucchini, snow peas or green peas, beans, beets, chard, mushrooms, wild greens. Anything goes.
I chop everything and stir fry it all with some homemade bacon in some homemade lard. Then I sprinkle cut up Queso Fresco cheese cubes over the top, put a little water, pepper and organic soy-sauce in it and put the lid on. I cook it all till it’s softish and the potatoes are done. Then I mix it all and savor the flavor! Super awesome!
If you have leftovers:
I usually make enough for leftovers and the next day I turn it into a Frittata:
First I put my leftovers into a greased cast iron skillet, then sprinkle some homemade Cheddar or Bel Paese cheese over the top. Now I make a simple custard by mixing some fresh eggs with a little milk and pepper and pour that over the top. Stick it into my BBQ “oven” and bake it till it’s firm and golden brown on top. Even more delicious!
I would love to hear about it if you give this a try. It is so easy to make this homemade cheese and only takes about 1-2 hours from start to finish. Hands-on-time is about 25 minutes. Please let me know in the comments below how it turned out and how you used it. And if you like it, I’d love your 5 star rating.
What to read next
Homemade Apple Cider Vinegar – This lovely vinegar is made from apple scraps, not the actual apple cider. But it is just as effective, easier to make and uses all those leftover apple scraps or ugly apples.
How To Make Sirene (Bulgarian Feta) -Try making your own feta-style cheese. Learn all about this wonderful and easy to make cheese and get the recipe!
Lemon Blueberry Cheesecake Bars – Creamy, with a buttery crust, this cheesecake dessert is bright, tangy, easy, and perfect for summer gatherings, or any sweet cravings!
Maple Walnut Cranberry Apple Cheesecake Bars – Fantastic flavor, wholesome ingredients, great holiday dessert.
Classic German Cheesecake (Käsekuchen) – How to make an incredibly delicious German cheesecake using Queso Fresco. Must try this!
Blackberry Cheesecake Streusel Bars – A must make dessert for blackberry season. Creamy, easy, and berry delicious!
Lemon Cheesecake Mousse – A decadent, delicious, super healthy lemon dessert made with honey & lemon curd.
Creamy Quark Dessert With Oranges – Use unsalted queso fresco in place of quark cheese a delicious German dessert, a creamy, luxurious mousse, healthy enough for every day desserts, but fancy enough for special occasions.
Awesome Strawberry Quark Cheese Mousse – A delicious German quark dessert with pureed strawberries.
Make creamy chevre from scratch – How to make your own soft, spreadable cultured cheese for fresh use or aged
Make German Quark cheese – Make authentic German Quark, also called Topfen. A versatile fresh, soft cheese that is a staple in German cooking.
Sweet Potato Bread Recipe – A delicious spiced sweet bread that’s great for breakfast, tea time, a snack or as a side at dinner. It’s scrumptious slathered with real butter or queso fresco cream cheese!
Awesome Uses For Whey – Save the whey! And use it in dozens of ways. You’ll find something to do with whey for every single drop. It’s nutritious, versatile, healthy, and makes great fizzy sodas!
Natural cheesemaking process – Make your own starter culture from scratch. Use it to make soft cheeses, hard cheeses, sourcream, buttermilk or yogurt.
Cajeta – Make this ultra-delicious, uniquely flavored, goat’s milk based Mexican caramel to use as a topping for ice cream, pancakes, cheese cake, waffels and more. Or use to stuff sandwich cookies, or make frosting!
How to make your own sourdough starter – This forms the basis for any sourdough bread. Once you get a starter going, you can keep it going for a hundred years or more. Just feed it occasionally and use it to bake whenever you like. Transforms a hard to digest bread into bread that your gut will be happy about.
Make an ancient grain sourdough bread – The easiest sourdough sandwich style bread you can imagine. No kneading required and it bakes up nicely airy and chewy and tastes amazing.

Queso Fresco Cheese Recipe
Equipment
- 1 large 12 quart stock pot, preferably with a heavy bottom. – to heat the milk
- 1 approximately 30 x 30 inch heavy duty cheese cloth, flour sack towel or butter muslin – for draining the curds
- 1 long-handled spoon or skimmer – to stir the cheese while cooking and for skimming the curds out of the hot whey
- 1 thermometer – optional
- 1 colander – optional
- 1 large pot or bowl to catch the whey – at least 2 gallon size if you use 2 gallons of milk
- 1 a hook to hang the bag from, or a dowel – optional for hanging the cloth bag
Ingredients
- 2 gal milk
- 1 cup acidifier, such as Vinegar or Lemon juice
- 2 Tbsp sea salt
- 1-2 cups cream – optional. Use if you desire a richer, creamier cheese,
Instructions
- Pour the milk into your large stock pot.
- Warm milk on medium-low heat to a temperature of at least 165 degrees. If you go over even to the point of boiling, it'll be OK. Watch that it doesn't scorch. So keep stirring while it heats.
- Turn off the heat or take the pot off the burner if it's electric. Slowly add your acidifier at this point while stirring. Watch for curdling. When it starts to curdle, quit adding more acidifier. Stir it for a few more seconds. There should be a good separation of curds and whey. The whey will look greenish and should be clear. If it's milky it needs a little more acid.
- Now let it rest in the pot for about 5-10 minutes.
- While your curds and whey are resting, prepare your catchment pot. Line with a cheesecloth. Alternatively you can put a colander over the pot and line that with the cheese cloth. I hate extra dishes so I don't usually do that. But if you want to salt the cheese this is the best way to do it. Mix the salt into the curds before hanging.
- Carefully pour your curds and whey into the lined catchment pot or colander. It might splash, so be really careful. You can also use your skimmer to take the curds out first and then pour the rest of the whey in it to catch all the bits. I prefer that.
- Now take 3 ends of the cheesecloth in one hand and wrap the fourth around the other three. When you come around, slide the corner through the loop from underneath and make a knot. After that I usually take the corner and make another knot with one of the other corners, just to keep from having it unravel when I hang it on a hook.
- Slide a hook into that knot and carefully test it to make sure it won't come undone and splash hot liquid all over. Then hang on a looped rope that is suspended from a rafter or cabinet knob. Or slide the whole thing over your faucet in the sink.
- Let it drip for an hour or so. Less is OK if you are going to blend it.
- It is now ready to use for chopping or blending or it can be pressed to yield a firmer cheese.
- To blend the cheese, use a food processor, blender, hand mixer, stick blender or potato masher to blend the curds into a smooth cream cheese. This can be mixed with savory or sweet ingredients or use as cream cheese, ricotta or sour cream in recipes. If you omitted the salt earlier, you can add it now if you like.
- Optional step, pressing the cheese: The reason for pressing this cheese would be to increase the curd firmness. This step is optional after the cheese has drained for an hour. If you own cheese making equipment, you can use a cheese press, but it is not necessary. The simplest way to press it is by keeping it in the cloth bag. Twist it tight and lay it in a colander that's perched over a catchment bowl or put the bag on a board inside a cookie tray. Not much liquid will seep out. Put another board on top and add some weight on top of that. A few rocks, cast iron pan, or cans of food work. Keep it somewhere where nothing gets damaged in case the weights slide off. Press for another hour or so. It will be nice and firm for slicing and dicing.
Notes
Pin This Post

Shop this post
Colander
Flour sack towels
Organic flour sack towels
Cheesecloth
Organic apple cider vinegar
Organic white vinegar


This looks delish!
Thank you! It’s a great recipe!
Hello Stephanie! Thank you so much for stopping by my page here and commenting and I’m glad you like the recipe!
This I could actually achieve. I’m not very experienced at making cheese, but this seems like a good one to try. Such thorough information is helpful.
I like flour sack towels for lots of uses, too!
Thank you so much for stopping by. Yes, I use flour sack towels every day, they are great. Have fun trying this cheese. It is super easy, just remember to clean the pot right away! 😁
Hi! Do you think this will work with additive free soy milk?
Hi Michelle! I have not ever tried it with non-dairy milk and I do not think that it works in this recipe.