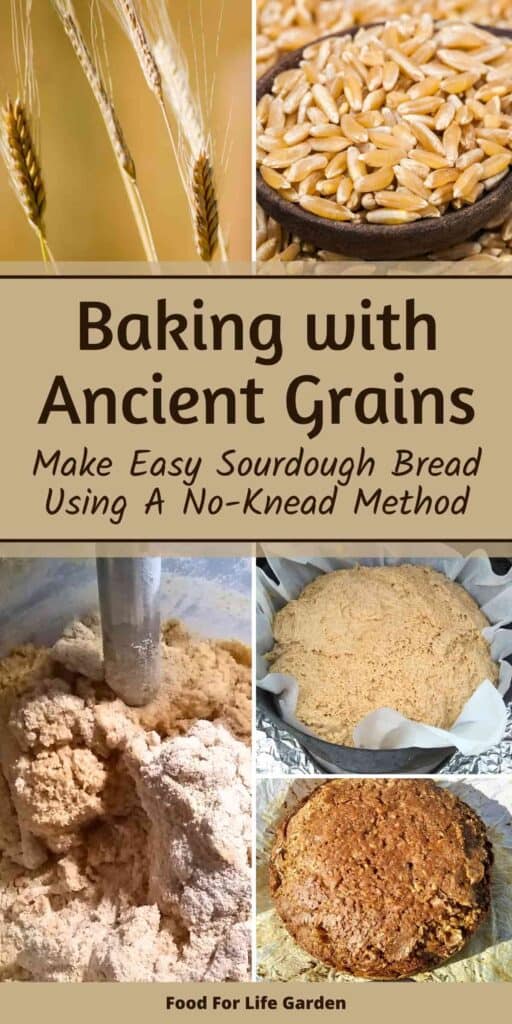
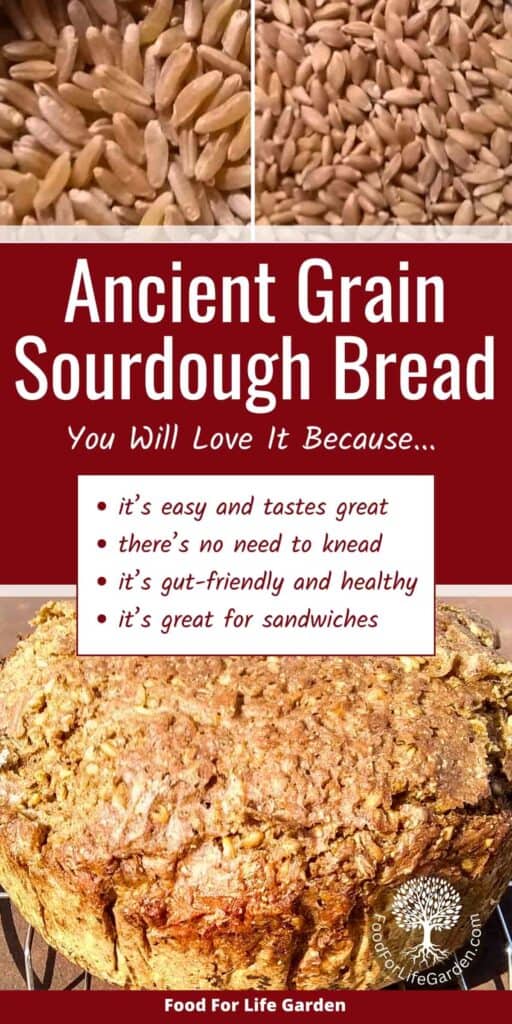
Kamut sourdough bread recipe the lazy way. Using fresh milled grains and a 2-3-day cold proof, it requires no kneading and tastes amazing.

This post contains affiliate links, which means I make a small commission at no extra cost to you if you click through and make a purchase. See my full disclosure here.
There are so many grains available for all sorts of purposes. The grain that we use most for bread baking in the United States is modern hard red winter wheat. It is high in protein and strong gluten, which helps the bread rise and creates a really nice structure in the interior of the bread, which many prefer. However, more and more people seem to have problems associated with modern wheat protein and wheat gluten.
Here you’ll find this problem addressed and then we’ll be making a great tasting bread, that does not use modern wheat and we’ll make it with sourdough to further help with digestibility.
Here is how to make your own Sourdough Starter Culture from scratch! If you like rye bread, you’ll love my easy, lazy way Sourdough Rye Bread recipe and you need to try this Sourdough Seeded Rye Bread. And check out my Sourdough Pumpkin Cake With Apple Streusel and Sourdough Pumpkin and Apple Muffins.
Make A Kamut and Einkorn Sourdough Bread
Those people who have gluten and wheat sensitivities, might find that they can tolerate ancient grains and might be able to reintroduce bread into their diets.
Einkorn, The Most Ancient Wheat Known
The most ancient, earliest wheat type grain that we know today is Einkorn, triticum monococcum. It is a simple grass that has never hybridized and has just two pairs of chromosomes or 14 total, compared with 42 in conventional wheat. It has a low gluten content and a high protein level. And it contains large amounts of nutrients that are missing in modern wheat.
Einkorn lacks the D chromosome and the types of proteins that many people can’t tolerate and which very often is the cause for sensitivity to wheat. For that reason Einkorn is often tolerable for people with wheat or gluten intolerance. Einkorn has gained in popularity because of this reason.
Even if you don’t have to worry about gluten, I think it’s just plain awesome that we have access to a grain that has been cultivated in monolithic times. Einkorn is the first grain that we know of that was cultivated by early farmers.
It was found in the stomach of Ötzi, the ancient hunter who was found frozen in the Italian Alps. This is how far back we can trace the origin of this grain. What is not cool about that? Einkorn is one of my favorite grains these days with all its benefits and its historic ties.
Enter Kamut®

Note how large the Kamut grains are!
Kamut® wheat is an ancient grain that is actually Khorasan wheat, a type of durum wheat, which has been trademarked. Khorasan wheat stems from ancient Iran. Khorasan contains 30% higher protein than modern wheat, with high amounts of amino acids. It is a rich source of antioxidants and minerals such as magnesium, potassium, and zinc. It has high levels of Vitamin E, as well as many micronutrients.
Khorasan wheat does contain high gluten, but it has a weak, fragile structure and most people have no adverse reaction to this ancient version of gluten even if they cannot tolerate modern wheat gluten. While Khorasan wheat is available for growing as anyone wishes. Kamut® is not. And therein lies its appeal.
Khorasan grain can be grown by any method and with the use of chemicals and pesticides, while Kamut® is always grown organically and regeneratively. And that is why I prefer the brand name Kamut® over other ancient grains. And the main reason why it is the basis for this Kamut® sourdough bread recipe.
The trademark ® guarantee
The trademark on Kamut® makes the grain more pricey than others but if you can afford it, know that you are not just buying any old grain. With the trademark comes the assurance from one of the original developers of the brand, Bob Quinn, that it will not be hybridized and is always grown organically and regeneratively.
Whenever I refer to Kamut in this Kamut sourdough bread recipe post, I refer to the trademarked version of Khorasan wheat.
The problem with modern wheat
Modern wheat is hybridized and most often genetically modified. Which is one reason that many people cannot tolerate eating modern wheat. It has been altered sufficiently in the pursuit of ease of harvest and high yields, that it no longer contains the nutrients, health benefits, and digestibility of the ancient grains.
Because of breeding for efficient harvest and greater yield, wheat has also lost its resistance to pests and diseases. The hulls of the modern wheat are easier to thresh, but are not protecting the grain as do the hulls of ancient wheat. This leads to increased use of pesticides to keep the modern wheat free from calamities.
Modern wheat is a triploid with 3 sets of chromosomes for a total of 42 AABBDD. It also contains the D chromosome, which makes it hard to digest for many people and appears to be accountable for a large percentage of wheat intolerance cases.
Another side effect of modern wheat breeding is the loss of many nutrients that are present in ancient grains. Add to it that it is most often grown in mono-cultures on depleted, chemically fed soil and gets dowsed with glyphosate pesticide at harvest in order to facilitate fast drying.
I don’t believe that this is what God had in mind when he created wheat for us to eat. This calamity is born of human greed and the general distancing from the natural ways.
Why I endorse Kamut®
Here is where I feel Kamut® should be given preference if you can afford it. It is an ancient, non-hybridized grain that is, by trademark, protected from being genetically altered or hybridized. And at the same time, the trademark assures us of regenerative and organic growing methods.
Bob Quinn states in his book, Grain by Grain, that none of the farms who contract to produce the trademarked Kamut® are allowed to employ mono-culture as a farming practice. And they have to use organic farming methods. This ensures top quality, highly nutritious grains grown on fertile soil.
Sometimes a trademark can be a seal of assurance for a healthy product, and I like to use Kamut® as much as possible in my baking and cooking. It is why I highlight it in this Kamut Sourdough Bread Recipe.
If you ever looked at Kamut berries, they are beautiful large grains that lend themselves well to making pilaffs and as a replacement for rice in stews, casseroles and other dishes too. And because it is a durum wheat, Khorasan and Kamut are also famous for making superior pasta.
While Einkorn is the ‘granddaddy’ of them all, Kamut®, or Khorasan, along with Emmer are one step higher in grain development. This is due to simple grass cross pollination of Einkorn, which occurred in ancient times.
This produced Kamut or Khorasan, which contains two pairs of chromosomes, AABB, for a total of 28. That is still a far cry away in development, from what is modern wheat, which was created by select hybridization and genetic altering.
Kamut® is the only grain that has been protected by trademark, to remain true to its heritage and to always be produced by organic and regenerative methods.
Kamut® and Einkorn is a great mix for making a healthy, well tolerated bread
Kamut is a hard wheat, Einkorn is a soft wheat. On their own they have very different characteristics. I like to combine the two in baking, to get the creamy texture and flavor of Einkorn and the more robust nature of khorasan durum wheat.
In my Kamut sourdough bread recipe, this gives me a really nice textured bread that has the ‘toothsome’ character that I like and it has a nicely dense but still airy crumb. This combination produces a bread structure that I prefer, while having all the benefits that ancient grains offer.
What about Spelt?
One grain that is similar in character to Kamut® or Khorasan wheat for purposes of bread making, is Spelt or Dinkel grain. While similar to Khorasan, it has hybridized (crossbred) twice back in ancient times. This resulted in what is still considered an ancient grain but with 3 pairs of chromosomes, AABBDD.
Where that matters to you is that Spelt might be ok if you have trouble tolerating modern wheat, but it might also trigger some of your symptoms because of the added D chromosome. So I would use it with caution if you have wheat allergies.
Another problem with Spelt is that it may have been altered by humans over time. There is much conflicting information in different science and anecdotal texts. You might come across an ancient strain of Spelt, but you may end up with an altered strain, not genetically modified, but possibly hybridized.
It is still much superior to modern wheat, because it has stayed out of the loop for commercial development. The gluten in Spelt is often tolerated by many who have been diagnosed with a gluten intolerance. Its gluten is much more fragile than that of modern grains. It is also full of vitamins and minerals and positive health benefits and it is a popular ‘health food’ grain all over the world. I use it in cooking and baking quite often.
However, if you have trouble tolerating wheat, you can give Spelt a try, but your best bet is to stick with Kamut or Khorasan, Emmer, and Einkorn at this time.
A Kamut Sourdough Bread Recipe
Alright, now that you know the scoop on Kamut® and Einkorn, it’s time to use it in your kitchen! While both have a gazillion uses in as many recipes, my preferred way to use these grains is in a nice, dense, toothsome and ultra-flavorful sourdough bread. The kind I remember from my growing-up-days in Germany.
If you don’t have a sourdough starter yet, go to my page How Does Sourdough Starter Work. I’ll explain my love of sourdough and why it’s so good for you. And you will get detailed instructions on how to make a sourdough starter from scratch and how to care for it.
You will need a starter to make this Kamut sourdough bread and it will take at least a week for the starter to develop enough strength for bread making, but most often you should plan on 2-4 weeks to get a strong starter. So be sure you plan on adding that time. This is only necessary once! After the initial time of creating your sourdough starter, this new creature will be eager to make your bread rise whenever you want to bake one.
Read more about my sourdough adventures, how to make sourdough from scratch, and how sourdough works.
Let’s make some ancient grain sourdough bread!
I will post here my easiest recipe, that I make regularly, because I’m often too busy to get fancy and it always tastes great. It is also arthritis and tendonitis friendly, in case that is something that matters to you.
There are so many recipes that you can make with sourdough, and I will start posting more as I keep adding new content. Get my newsletter for updates! But for starters, let’s make some ancient grain sourdough bread!
Tools You Need To Make The Kamut Sourdough Bread Recipe
A large non-reactive mixing bowl

While I try to limit my use of plastic, I do like to use a 6 qt Cambro plastic bucket with a lid for mixing and proofing the dough. It’s the perfect size and shape. Plus it is see-through, so I can easily see when it is proofed enough.
It could also be stainless steel, but be aware that some low quality stainless steel can react with the sourdough acid. Glass is probably the safest to use, but I find it too heavy and awkward for getting it in and out of the fridge and taking the dough out of it for baking.
A dough whisk or large heavy duty wooden spoon
My favorite is the Danish dough whisk. I love this tool! It is so handy for any kind of mixing, even things like zucchini or pumpkin bread, and it’s heavy duty. It’s my favorite tool for any non-electric mixing.
I found that when living outside and cooking in an outdoor kitchen, in the damp weather of fall, winter and spring in WA state, wooden tools would get moldy if I didn’t use them every few days. So I used them as firewood and started to replace them with non wooden tools, such as stainless steel and, yes, plastic. But my first choice has always been wooden tools and now that my kitchen storage is crammed into my little yurt and not outside, I am starting to get wooden tools and wooden boards again for cooking.
Optional: A Stiff silicone spatula
This is for scraping the finished dough out of your container. Or you can use wet hands.
Optional: A Grain Mill
Here is the thing: If you bake regularly and you opt to use whole grains, I believe it is so worth investing in a grain mill that is ready to use whenever you want to bake. I know they are expensive, I get that. I have to pinch pennies, and thought about it for a long time.
But the taste of bread made with fresh ground flour is so superior when compared with bread from purchased flour. And it is always fresher. No rancid or bitter after taste and no worry about the limited shelf-life of flour.
Think of it this way, if you can buy grains in bulk you’ll save money over buying small amounts of flour frequently. Maybe that will go a little way towards justifying a grain mill purchase. And if it’s easy and quick, you might be baking more often, which will save money too.
Manual vs. Electric
I just recently bought a counter top electric grain mill and it has made a huge difference in my wanting to actually use it. My old Country Living grain mill is beautiful, but it takes up too much room in my small yurt, so it has to live in the workshop. And it is hard work to grind enough flour for a whole big loaf, unless you set it very coarse. You could hook it up to a motor though and I almost did that, but decided that I wanted a smaller one that fits in my living space, that I can use daily if I want. The non-electric one is a great option though for off-grid and I’m keeping it for that reason.

Enter the Mockmill. This grain mill has a fairly small footprint on my counter and is ready to grind away at the push of a button. It makes no mess and does not heat the flour excessively like some others do. I keep my buckets of grain right next to it and can have fresh ground flour, coarse or very fine, within minutes. It’s a total game changer. And yes, I’m in love!
A 5-qt or 7-qt Dutch oven with lid
This Kamut sourdough bread recipe makes enough dough to fill a 5-qt dutch oven nicely. It will work in a 7-qt too, although it’ll be a little flat. If you don’t own a dutch oven, you can use a 5 qt deep casserole dish with lid, or a crock pot insert if it has a glass lid or a wide stainless steel pot.
Three rectangular bread pans would work as well with a piece of aluminum foil on top. I have also used a stainless steel mixing bowl with a pot lid that fits it. This particular recipe is too soft for a free form loaf. It would work, but it would end up pretty flat. A dutch oven is preferred.
Be aware that anything other than the dutch oven should probably not be preheated. Glass and ceramic can crack and stainless steel can buckle. So only preheat if you have a cast iron or other cast metal dutch oven. I don’t own an Instapot, but I would think that it might work too.
Cooling Rack, Tea Towel, Long Serrated Bread Knife
Use a large cooling rack to fit your bread after you wrap it in a clean tea towel or similar. Next day you’ll need to cut it and will need a serious tool of the trade, for cutting your handsome sourdough bread loaf.
Ingredients To Make The Kamut Sourdough Bread Recipe:
Sourdough

You’ll need about 1½ cups of active sourdough starter. That is a starter which has been set out at room temperature and was fed several hours earlier. It needs to be bubbling happily.
You will get a good feel for the right time to use it after you’ve worked with sourdough for a while. It will let you know when it’s ready. So remember to take your starter out of the fridge at least 4-6 hours before baking and give it a feeding. Check here if you want to learn when your starter is ready for baking.
Kamut and Einkorn flour or berries

This Kamut sourdough bread recipe works with pretty much any combination of grains but today I’m using half Kamut and half Einkorn.
I prefer a mix because whenever you add diversity, you’re also adding a more diverse nutrient content and your little sourdough critters can also become more diverse if you add more than one type of grain. I embrace diversity in everything, something I’ve learned from watching nature.
We’ll use about 6 cups each of whole grain Kamut and Einkorn flour for this Kamut sourdough bread recipe. Or use about 3-4 cups each of Kamut and Einkorn berries if you grind your own.
But you can substitute any whole wheat, all-purpose or white flour as well if you prefer that. However, if you do, the ratio of flour to water may need to be adjusted, and it is best if you use unbleached flour. The bleach in flour may kill or at least debilitate your sourdough critters.
If you can only get Khorasan or Spelt, rather than Kamut® flour, you can use that too, of course. Organic Khorasan is a good alternative for Kamut® and it is cheaper.
As you will experience when baking a lot of bread, no measurements are exact even if you weigh out everything. I don’t and so you won’t see weights here.
It’s as much an art as it is a science and even if you weigh things out your end result can differ from one time to the next due to how fine your grind, what mix of grains you use, how hot or cold it is in your kitchen, how wet your sourdough is, and so much more. Besides, you’re working with living organisms.
Sources:
I’ve included a list of sources for the Kamut sourdough bread recipe flours and wheat berries. They are listed at the end of this post.
Water
How much water you need is variable, since much depends on what grain you use, and whether it’s 100 percent whole grain and how coarse it is. When I make this recipe, I use a little over 4 cups of water.
While it is possible to make sourdough bread with tap water, you should let it sit out uncovered for 24 hours, so the chlorine can escape. It’s better if you can catch some rainwater, get it from a well or spring, or use some bottled or filtered water.
If you have whey from cheese making, by all means, replace some or all of the water with it! It will only improve an already awesome bread.
Salt
The essence of all life and you’ll want some salt in your bread! Even if you are on low-salt, your body needs some and your bread will need some as well. However, do not over-salt, because too much of it will kill the yeast. As is best with all things, practice moderation!
- Salt strengthens the gluten and helps the bread to retain more air, resulting in a lighter loaf. It will be necessary to achieve a good oven spring.
- It also checks the sourdough fermentation action, slowing down the little critters that are in your sourdough bread dough. It keeps the dough from over-fermenting as it develops over a few days’ time.
- Salt also very much makes bread taste better!
Kamut Sourdough Bread Recipe

The best ambient temperature for making sourdough bread is around 75 °F. Although you can get great results at 65 °F, it just may take a little longer, or if it’s 85°F, it might take less time to get a good rise.
Mix the ingredients:
Step 1: Add your sourdough starter to the mixing bowl

Pour the 1½ cups of sourdough in the bottom of your container.
Step 2: Add water and salt

Have your water at room temperature. And add about 2 cups of it to the starter. Stir it well with your dough whisk or wooden spoon. Then add 1½ Tablespoons of salt. Mix everything well before adding the flour.
Step 3: Add the flour and the rest of the water

Put your 12 cups of whole grain flour mix on top of the sour dough starter mix. Then add another 2 cups of water
Step 4: Mix all the ingredients

Stir again to incorporate all ingredients. Once you start mixing all of the ingredients, it will get a little heavy. Stir them as well as you can and stop when all the ingredients are incorporated or when your arm gets too tired.
You should have a soft dough, but it should not be runny. It is a little softer than when you hand knead, but that’s OK. It does need to hold together though. If it is too runny, add more flour. If it feels really stiff and dry, add a little more water. Clean the stuck-on dough off your Whisk into the container and close the lid.
Step 5: Let the bread dough rise
Set the bread dough in a warm-ish spot for about 4 hours. At regular room temperature, around 72 to 78 degrees F that is. Do keep an eye on it. If it’s a really hot day, you can either leave it to rise in a water bath, set at about 75 degrees or just cut the rising time down to 1-2 hours. If it’s a cold day, you can put it in an oven with the pilot light on or set it in a warm water bath or a cooler with some warm water in it. Alternatively, you can just let it rise longer.
This is a good time to give your sourdough starter another feeding and put it in the fridge if you’re not using it for several days or weeks. If you plan to use your starter again soon, you can keep it on the counter, just be sure to feed it every day. Read my guide to making and caring for your sourdough in how sourdough works.
Step 6: Time to cold-proof the dough and let it develop flavor and structure

Keep an eye on the dough. When it starts to get very bubbly and is not quite double in size, it’s time to put it into the refrigerator or root cellar. Don’t let it go too long, it will continue to rise in the fridge for some time due to the latent heat in the dough. Wait too long for cold proofing and you risk over fermentation. If that should happen to you, see my troubleshooting guide below.
Now you have some lee-way about when to bake with it. You’ll need to let the dough rest for at least 24 hours in the cold fridge, so it can develop flavor and structure. But it is fine to keep it in the fridge for up to a week. After that it will not be bad, but it will get pretty sour. My preference is about 2-4 days in the refrigerator. I like it a bit tart and so I usually try to plan far enough ahead that I can give it 3-4 days if possible.
Root Cellar cold proofing option
If you want to cold-proof your bread dough in the root cellar instead, that is ok too, but if your root cellar is warmer than 45 degrees, don’t let your bread dough rise on the counter for more than an hour or two.
Just give it a good start on rising and then put it into the root cellar. It will continue to rise slowly at that higher temperature. You’re just slowing down the process. Also keep an eye on it in a root cellar.
You may need to bake with it sooner depending on the temperature down there. If it looks well developed and double the original size, it’s best to get it in the oven soon. I’ve put it for several days in the root cellar before baking, but the bread does get pretty sour and eventually it may over-proof.
Your Kamut Sourdough Bread Recipe is ready for Baking

You’re ready to bake your loaf of sourdough bread. Here are a few things to consider: If you own a cast metal dutch oven with a lid, you can preheat it. It will help your dough get a good oven spring. Any other materials don’t lend themselves to preheating.
If you want to prevent a dark bottom crust, put a sheet of aluminum foil with the shiny side down on the bottom rack of your oven or on the main rack in your barbecue grill if you’re cooking outside.
On the bbq, I put a cake ring on top of the foil and place my dutch oven on that, to keep the pot a little higher off the flame to prevent burning. This foil can be used over and over many times, so be careful handling, to not waste it.
Step 6: Preheat the oven
Set the dutch oven on the cake-ring in your bbq and turn all the burners on. Or place it on the lower middle shelf in your oven and set the temperature on high. You’ll be preheating at a high temperature of about 450 degrees F.
If you have a container that cannot be preheated, just turn your oven on and preheat it without the container to 450 degrees F.
Step 7: Prepare your dough for baking

While the oven is preheating, take your bread dough out of the fridge. Inspect it and make sure it looks about double in size and bubbly.
Then prepare a parchment paper to place the dough on. You can place a wooden cutting board on your work surface and cover that with the parchment to support the dough when taking it to the oven.
You can also grease your pan well instead of using parchment, and just place the dough in it. But the parchment makes it easier, especially when you use the preheated dutch oven. And if you’re careful, you can reuse the parchment several times.

Now take your spatula and scrape the dough off the walls all around the container. Go around it once and try to get the spatula under the bottom as well.
Then turn your container over so the dough can start coming out and drop onto the parchment paper. This can be a little tricky. Keep your spatula handy to help it along if necessary. You could also use wet hands for this process.

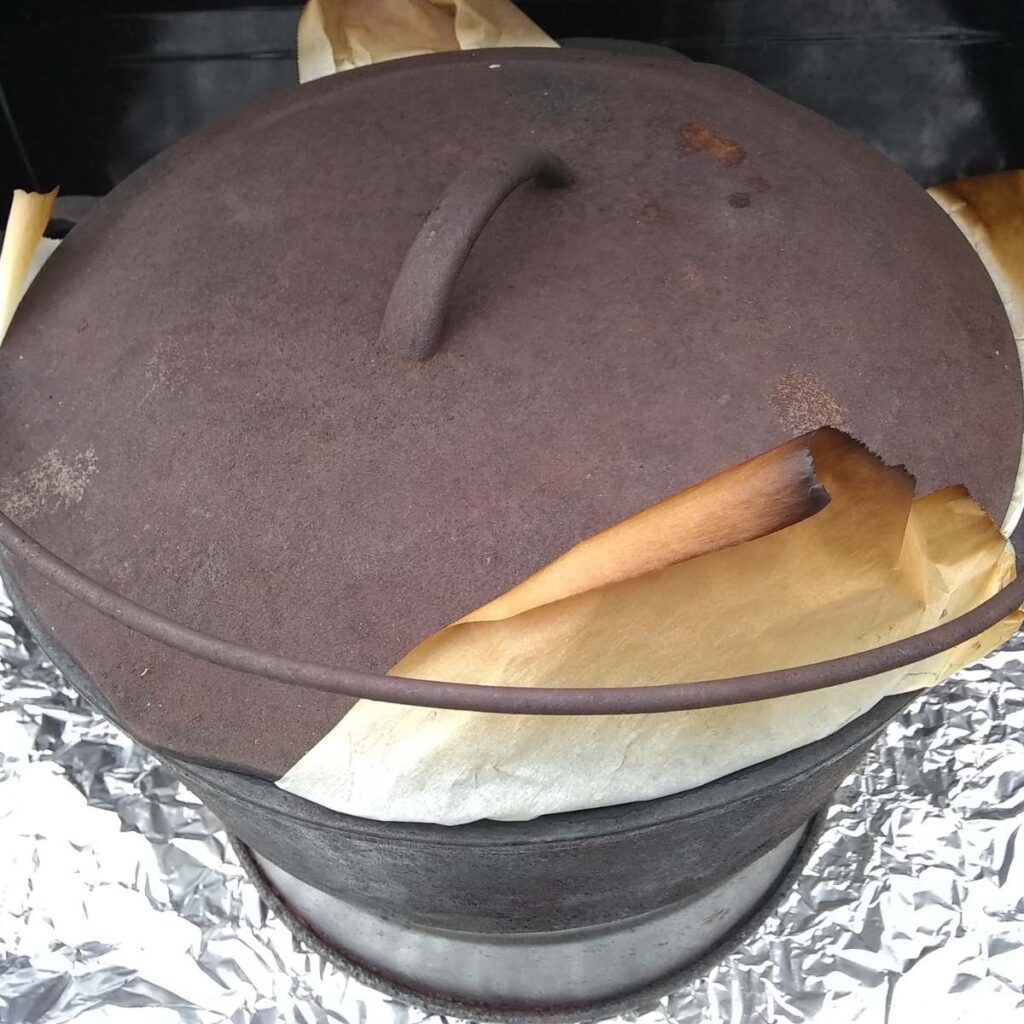
Step 8: Place your dough into the baking pot

Once the dough is on the parchment, take the cutting board with the parchment and dough to the oven and carefully take the hot dutch oven out of the oven.
Using a potholder, take off the lid. Grab the parchment on all 4 corners and place it with the dough into the dutch oven. I like to tuck on the parchment to flatten the sides a little and keep creases minimal.
Step 9: Sprinkle with water, cover and bake it
Sprinkle a little water over the top and replace the lid, using a pot holder. Check out my tips below if you like a soft crust for an optional step before baking!
If you use rectangular shape bread pans, you can cut the dough in 2-3 pieces with a dough scraper and just place it into the greased bread pan. No need to shape them, except lay it in so they sort of conform to the bread pan shape, but don’t press on them. Sprinkle with a little water and Cover them tightly with oiled aluminum foil to keep the steam from escaping.
Step 10: Baking the Kamut sourdough bread recipe
Place the Dutch oven back into the hot oven, on the lower middle shelf and bake at 450 degrees F for about 15 minutes, then turn the heat down to 325 degrees F and bake it for another 1½ hours.
If you’re baking on the BBQ, keep all the burners on for the first 15 minutes. Then turn off the middle 2 burners, (the ones under your bread), but keep the outside burners going. If your grill has a thermostat in the lid, check that it reads 300 to 350 degrees F. This will prevent the bottom of the bread from scorching.
If you’re baking on the BBQ, you’ll also want to rotate your Dutch oven after about an hour half way around to ensure even baking. It can be a little tricky on the BBQ to get the even baking that you get in an oven. But it keeps the house cool and it’s more fun, lol!
If you use bread pans, they will be done way sooner. Test after about 35 minutes at 325 degrees F.
Step 11: Test for done-ness
Careful when lifting the lid off the pot. Open it with a pot holder and away from you so you don’t get burnt by the steam. By now, the bread should be golden brown.
To test for done-ness, stick a knife into the center. If it comes out with gooey dough stuck on it, bake a while longer. If you have a thermometer, and this is by far my preferred method, you’ll want a temperature of 195 deg F in the center.
It took most of my life for me to start using a thermometer for checking bread, and I ended up with several pasty loaves. That’s disappointing after all the work that went into making it. Now I will not ever rely on my best feelings or knocking on the crust again. The thermometer method is the way to go in my book for a big heavy loaf like this!

Replace lid and bake some more if it’s not done. Check again in another 20 minutes or so.
When it’s done, replace the lid, and leave the bread alone for another 10 minutes or so.
Step 12: Cooling the Bread

Now take off the lid, grab the parchment paper by the corners and carefully lift the bread onto a cooling rack. Peel off the parchment and leave the bread to cool.
Step 13: Wrap your bread

I recommend you wrap the bread in a tea towel or flour sack towel. You’ll want to wrap it to keep flies and other possible snackers off it. I like to use a wet towel (very damp but not dripping) to keep the bread moist and the crust softer.
Step 14: Cutting the bread

It’s best to not cut into it until the next day. But at least, be sure it’s completely cool before you do. It continues to bake even after it’s out of the oven for a while. If you cut it too early, you’ll lose a lot of steam, which gives the bread moisture, and it will gum up and get pasty where you cut it.
The bread will have a fairly well developed crust. Be careful when cutting it, so your knife won’t slip and cut you!
This Kamut sourdough bread recipe will make a large loaf. It takes me a couple of weeks or more to eat it, and it doesn’t have a very long shelf life because it is quite moist.
I slice up the whole loaf the day after baking and usually keep a few slices out on the counter then I put the rest of the slices into the freezer and I can just take a few out every few days as needed. It keeps well in the freezer for a couple of months.
If you vacuum seal it, it will probably keep longer. If you freeze the loaf whole, it will also keep much longer.

Now enjoy your awesome no-knead sourdough bread. It will have a great nutty flavor. It will be moist and somewhat dense, and it’s amazing toasted and topped with butter, salted goose fat (Gänseschmalz), hard cheese, soft cheese, smoked meat, herbed olive oil or some raw nut butter. Yumm!
Troubleshooting The Kamut Sourdough Bread Recipe:
Here are some tips to help with common problems when baking bread:
What if I don’t like a hard crust?
There are a few things you can do to avoid a hard crust. I took out a tooth once eating crusty artisan bread. Not fun! Since then I prefer to have a soft crust on my bread. I miss the nice crunchy artisan bread crusts, but don’t like to take the chance anymore.
Here is what you can do to soften a bread crust:
Some people advise rubbing butter all over the bread while it’s hot from the oven, but I didn’t find that to be effective on these kinds of bread and don’t want to waste the butter. So I don’t do this anymore. But go ahead and try it if you want, and let me know in the comments below if that worked for you! It does give the crust a pretty shine and a great scent.
Here is what I do:
When your bread is finished baking, take it out of the parchment and place it on the cooling rack. Immediately take a wet, clean tea towel or flour sack towel and wrap it around the dough. Placing it directly on the counter after wrapping will be even more effective. This is one step that I find works to an extent, but in addition I use my secret, effective bread softening technique.
This is the most effective of all the things that I’ve tried. I actually just recently did it this way for the first time. So truthfully, I’ve only tried it a couple of times, but it worked both times so far really well.
My personal secret to soft bread crust!

- Cut a round piece of parchment to fit the top of the bread and lay it over the bread dough after first placing it into the hot dutch oven.
- Then take a small cotton rag, cut up a flour sack towel or cotton wash cloth or some such. This will get ruined, so don’t use your best and keep it as your dedicated crust softening rag! Wet it well and place it over the parchment. This ensures more even moisture during baking and keeps moisture in there longer and more evenly.
- Keep a jug with water next to the oven and after the first hour or so, open up the pot for just a moment and pour a little more water over that rag. Replace the lid and put it all back in the oven. You can repeat this if necessary later when you check for doneness. This will produce a nice soft crust that won’t hurt your teeth.
What if my dough over-proofs before I’m able to bake it?
What if you check your dough’s rise and it has over-proofed. That means it has deflated and shrunk in size. The bubbles are not active and look small.
It’s not a total loss, although you’ve lost your chance at baking the Kamut sourdough bread recipe for the time being. But you can revive it or use it in other recipes. Here are some options:
Carefully put it in a frying pan and bake some focaccia. This works only if there is some life and some bubbles left in it. Otherwise it will turn out hard as a brick.
You can add some dissolved instant yeast to give it another rise or baking soda and bake it immediately after it has risen.
Or make pancakes, muffins or other baked goods and use just like discards. Just follow the recipes you want to make and adjust the amount of flour, salt, and liquids to accommodate the sourdough as flour, water, and salt ingredients. At least approximately. It will also work as a sourdough ‘discard’ in recipes designed for such, but remember that it is already salted.
Remake your dough if it is over-proofed
Another option is, to feed it some more flour, salt and water, try about half-again the recipe. At this point it is best to knead it well and when it starts to bubble, again and increases in volume, you can place it in 2 large, floured towel lined bowls, seal well with plastic wrap or a lid, put it back into the refrigerator for another day or two and then bake.
In this way you are treating your bread dough as if it were the starter for a new recipe. You’ll end up with a lot of volume, so you would bake two loaves.
You can bake one today and another a few days later. Just turn it upside down into your Dutch oven or baking casserole and peel off the towel. Bake as outlined in the recipe. You can also put some into the freezer for bread, pizza or focaccia at a later time.
If it all fails, hopefully you have a few pigs or chickens, who love bricks of bread softened in some water or fermented slob, made with collapsed sourdough and loaded with some great sourdough lactic acid bacteria. Your compost pile micro-critters do love that too!
What if I overbake it?

Bonus Breakfast Recipe:
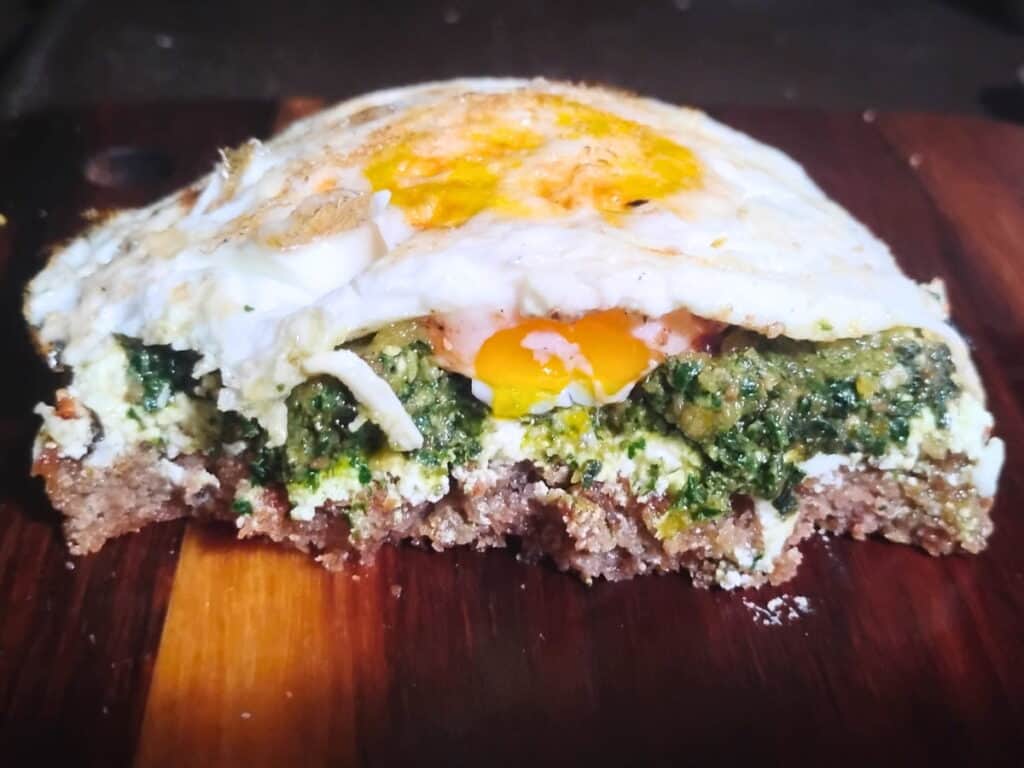
Here is my favorite top of the wood stove breakfast recipe: Bake a loaf of this Kamut sourdough bread recipe. Then toast a slice of it in your frying pan, in some homemade lard. Top with some homemade Chevre cheese and fermented hot chili paste. Fry up a couple of eggs your preferred way with pepper and salt, place on top. Delish! Add a slice of home-cured ham under the eggs too if you have it. I haven’t tried that actually, but have thought about it a few times.
Enjoy This Easy, Super Tasty Kamut Sourdough Bread

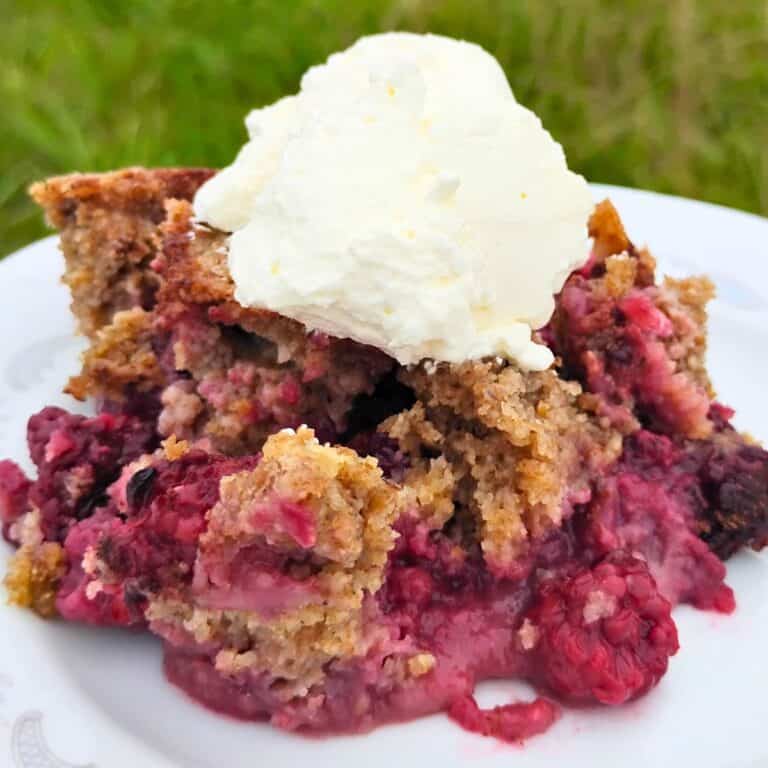
This may not look like your fancy artisan loaf, but its my favorite bread for everything and every day and best of all, it’s no-fuss, quick and easy to make, and great for gut-health. I enjoy an occasional artisan bread with the big holes in it, but I don’t find it very practical for most uses. This one though fits the bill for sandwiches, breakfast breads, to serve with soup, grilled cheeses, and it’s so tasty toasted and topped with nut butter and jam. This is the best bread to have in your recipe box if you’re a busy person who desires to eat healthy. Give it a try today and you won’t regret it.
I hope you try this Kamut sourdough bread recipe. Let me know in the comments below and if you like it, I’d appreciate a 5 star rating!
And I’d love to know if you use a propane BBQ grill to cook and bake with as well. I have for about 10 years. I’d love to hear about your experiences with this. It would be a great option for anyone baking bread in the summer I think, to keep the house cool.
More Great Recipes For You
How does sourdough starter work Sourdough starter from scratch using just flour and water. Learn how sourdough works and how you can use it to bake delicious breads without yeast!
The best Sourdough Rye Bread – Easy, lazy method that makes super delicious, moist, chewy rye bread to partner with your favorite cheese.
Sourdough Seeded Rye Bread With Spelt – If you are a fan of rye bread, you need to try this awesome seeded rye. Loaded with whole grain berries and seeds, awesome with cheese.
Soft Feta Cheese – An easy soft white brined cheese that does not need to get pressed. Great for salads and sandwiches!
No-fail Homemade Mayonnaise – Make mayonnaise from scratch with this easy recipe, which includes a fermenting option to preserve it for long-term storage.
Soft Sweet Potato And Peanut Butter Cookies with einkorn, are a delicious snack for anytime. Loaded with healthy ingredients that give these cookies a distinct and delicious flavor. Great for lunch boxes, trail food, tea time, snacks and more.
Zwiebelkuchen a German onion pie – Delicious German fall tradition. Make some today, you won’t regret it!
Einkorn Zucchini Bread – Make this delicious zucchini bread that is moist, healthy, and doesn’t skimp on flavor! Delicious!
Make your own chevre cheese from scratch How to make super versatile creamy, spreadable cheese that can be used as a dip, or spread, for baking, for savory or sweet shakes, fresh or aged. Replace store bought cream cheese with this healthy version!
Natural cheese making Process Make your own mesophilic and thermophilic cheese starter and use it to make cheese the natural way. Make yogurt from scratch with your own homemade starter too.
Berry ice cream Make delicious and good for you ice cream to enjoy all summer without guilt.
Pin this post
Shop this post
Sources of grain or flour:
- Bulk organic einkorn berries or einkorn flour at Azure Standard*
- Bulk organic khorasan berries or khorasan flour at Azure Standard*
- Bulk organic rye berries or rye flour at Azure Standard*
- Bulk 25 lb organic Kamut® berries at amazon
- 10 lb organic Kamut® berries or Kamut® flour at amazon
- 10 lb organic einkorn berries or einkorn whole grain flour at amazon
- 25 lb organic rye berries or 3 lb rye flour at amazon
Grain by Grain a book by Bob Quinn, the innovator who discovered Khorasan wheat and developed the Kamut® brand and trademarked it.
6 qt Cambro Bread dough proofing bucket
Danish dough whisk
Mockmill Electric grain mill
Country Living grain mill Manual grain mill
*A note about Azure Standard: This is a buyers club that sells clean foods with no GMO and much of it organic. I love shopping there. However, be aware that you’ll need to join a food drop in your area and pick up your groceries at the drop at the prescribed time for your location. It is fun though and you’ll get to meet friendly, like-minded people who prefer to buy clean, organic foods for their families.
Disclaimer:
The material on this site is intended to be of general informational use and is not intended to constitute medical advice, medical diagnosis, or medical treatment. You should consult your physician or other health care professional before making any changes in your diet or exercise regimen.

Kamut Sourdough Bread Recipe
Equipment
- 1 large non-reactive mixing bowl – Glass, plastic or stainless steel. However, some lower quality stainless steel may react with the sourdough.
- 1 dough hook or large heavy duty wooden spoon – Optional. You can use your hands as well.
- 1 Stiff silicone spatula – Optional. You can also use your wet hands.
- 1 grain Mill – Optional but highly recommended when baking with grain. Not necessary if you use pre-ground flour. Grain can also be ground in a blender in small batches, but it won't turn out very nice and you might need to sift it.
- 1 5-qt or 7-qt Dutch oven with lid – Substitute with any oven-proof container of the same capacity, preferably with lid. Or use several rectangular bread pans with aluminum foil to cover.
- 2 pot holders
- 1 cooling rack
- 1 long serrated bread knife
- 1 tea towel or similar to wrap the bread for cooling
Ingredients
- 1½ cups sourdough starter needs to be at room temperature and needs a feeding about 6 hours before using
- 6 cups Kamut flour about 3-4 cups of whole grain – grind fine to medium
- 6 cups einkorn flour about 3-4 cups of whole grain – grind fine to medium
- 1½ Tbsp sea salt pure sea salt, himalayan pink, or Redmond real salt are preferred, but you can use any non-iodized salt.
- 4½ cups water use 4 cups to start, add more only if needed. Use whey in place of some or all of the water if you have it!
Instructions
- Pour the sourdough starter into your mixing bowl. The sourdough needs to be active and recently fed (4-6 hours ago).
- Add 2 cups of the water.
- Add the salt and mix thoroughly.
- Add all the flour and 2 more cups of water. Mix all ingredients with your dough whisk, wooden spoon or your hands.
- When all ingredients are well incorporated, cover the bowl and set aside to rise at room temperature. (75 ℉ is ideal)
- After about 4 hours, check your dough. It should be almost double. Don't wait for it to double or it might over-proof. It will continue to rise for a while longer in the fridge too before it cools down enough for this action to be retarded.
- Place the dough into your refrigerator or root cellar for at least 24 hours. Several days is better and up to a week is fine.
- Prepare your oven by placing aluminum foil at the bottom. This is optional but helps especially when you have strong bottom heat, to keep your bread from scorching. Turn your oven on and preheat to 450 ℉. If you have a cast metal Dutch oven, place it in the oven now to preheat that as well.
- Place a piece of parchment on a cutting board or sheet. Take your sourdough out of the refrigerator and loosen the sides and bottom. Turn the dough out onto the parchment. Take it to the oven.
- Take your baking vessel out of the hot oven and, with a pot holder, remove the hot lid. Place it on a fireproof surface. Grab all 4 corners of the parchment and lift the dough into the pot including the parchment. Straighten the sides a little and sprinkle a little water over the top. Replace the lid (use the potholder!)
- Place the Dutch oven back into the hot oven and bake at 450℉ for about 15 minutes. Turn down the heat to 325℉. Continue baking for 1½ hours.
- If you want to cook in the BBQ grill, I find that I need to turn the pot after the first hour, half way around to make sure it bakes evenly.
- Check for doneness. Be careful to remove the lid away from you to stay clear from any escaping steam. Stick a knife into the middle and if it comes out clean, it'll be done. A thermometer works really well here, I highly recommend using one. Bake till the middle temperature reads 195 degrees.
- When done, turn off the heat and let the bread sit in the pot for about 10 more minutes. Then take the pot out of the oven and, using a potholder, remove the lid. Grab the ends of the parchment and carefully lift the hot bread out of the Dutch oven and onto a cooling rack.
- At this point, you should let the bread cool completely before cutting it, and preferably overnight. Wrap it in a clean tea towel or flour sack towel. If you prefer a soft crust, use a wet towel to wrap it.
- Slice the bread, but be careful, if you opted to make a hard crust bread. It's easy to slip and cut yourself. A long, serrated bread knife is recommended.
- Enjoy your awesome ancient grain sourdough bread! Do try it toasted with some cheese and smoked ham or salami. Or with some raw nut butter. Check out how I use it to make my favorite breakfast.
- If you want a soft crust, you can check my complete instructions here .

Try this simple whole grain bread from ancient grains! It’s so easy and no need to knead. A perfect hearty sandwich bread or dinner bread! Ask your questions right here in the comments. I’ll answer as soon as possible.
Love this combo of whole grains, great flavor!
Great mix! I love incorporating ancient grains into bread. And the lazy way is perfect for me. 😂 Great recipe, can’t wait to give it a try when I get my starter revived!
I need to experiment more with ancient grains, and I’d really love to try this recipe!
Hey Kara, that’s great, I hope you get to try it!
This post was absolutely perfect! I have been going down the rabbit hole of ancient grains and they are amazing! We are making the switch to only using them. This recipe came at a perfect time and I loved the information about Kamut.
That’s so cool, Mara, we’re on the same train! I love the ancient grains!
This sounds delicious! This is going to be my next bread day bake!
Hey Amber, thank you so much for the comment. I hope you get to try it!
Great recipe & guide! I love how thorough it is. I’ve never baked yet with either grain, but wow, this looks amazing!
Hey Penny! Thank you so much for your kind comment!
What a fascinating deep dive into the grains! I have been experimenting with spelt a lot lately, and read many recipes. What stuck out to me, is that a lot of recipes call for “crazy high” hydration, well beyond 75%. My German spelt turns to soup at that point, you could hardly even stretch and fold it anymore. Which suggests to me that, especially in America, there must have been extensive cross breeding. We all know America loves hard wheat, but I have been wondering if they also created a “hard spelt” as it were?! I could find only one article about this and it didn’t credit any sources, but I’m very much inclined to believe it! Do you have any experience with spelt in the States?
Cheers!
Hey Sarah, that’s interesting. I use spelt occasionally, but I didn’t really find that I needed crazy high hydration. But I do know from my research that spelt can be crossbred, since it is not protected and has been grown in a less guarded way than say einkorn or Kamut. Spelt can be close to its ancient roots, but it can also be much more modern, basically it’s a hit or miss if you don’t know the exact source. And spelt is higher on the development scale than Kamut or einkorn because it does have the D-chromosome added in, at least here in America. I tend to prefer Kamut if I can get it or einkorn.
This is wonderful information, I learned so much! I’m very familiar with einkorn but hadn’t learned about kamut yet. Thanks for sharing this! This is a great recipe too!
Thanks so much for commenting, Kimberley! All the ancient grains are wonderful to use in recipes and I love how much more nutritious they are compared with the modern wheat.
I bake with einkorn but have never used Kamut. I listened to a very interesting podcast a while back with “Mr. Kamut” and have been interested in giving it a go but haven’t yet. I’ll have to try your recipe! Thanks!
Thanks for sharing, Jennifer. My response comes a little late, but how cool you got to listen to that podcast. I found the story of Kamut fascinating, but I love it most because if it’s Kamut, it’s organic and grown regeneratively. Hope you got to try some Kamut recipes!