Lacto-fermented Sauerkraut is a favorite the world over. Its health benefits have made history and this powerhouse of nutrition is easy to make.

This post contains affiliate links, which means I make a small commission at no extra cost to you if you click through and make a purchase. See my full disclosure here.
Most people who are not familiar with fermented vegetables in general, have heard of sauerkraut, or fermented cabbage, and know that it’s good for you. However, much of the sauerkraut that is sold in markets has been adulterated with preservatives, pasteurized or canned. That’s a sure way to destroy the benefits that fermentation imparts.
And that’s where making your own lacto-fermented kraut is not only healthier but cheaper as well. You can make a whole quart of sauerkraut for the price of one small cabbage, or better, grow some in your garden.
A package of seeds will make lots of cabbages and lots of kraut. Your homemade sauerkraut will be full of live probiotic activity to enhance your gut flora and support your immune system. Learn more about the health benefits of lacto-fermentation in my post lacto-fermented vegetables.
If you are a fan of Sauerkraut, you will love this incredibly delicious Fermented Coleslaw, a cabbage and roots medley. And don’t miss my popular Lacto-Fermented Tomato Salsa! And you must try making some Awesome Fermented Onions! Try my Fermented Tabouli Salad, packed with nutrition and health benefits, and for a great way to preserve your extra melons check out this Fermented Cantaloupe recipe!
Why Make Lacto-Fermented Sauerkraut From Scratch
Sauerkraut has gained fame with tales of saving sailors at sea during the age of sail in the 1700s. After thousands of sailors had lost their lives to scurvy, a vitamin deficiency, contemporaries sought out remedies for this malady. In the past, these sailors had brought with them vitamin C rich foods. However it could only keep fresh for a short while before it rotted. In an experiment on captain Cook’s journey he was provided with several barrels of fermented cabbage. His crew ate regular doses of it during the months at sea and no one on Cook’s ship contracted scurvy. This is how sauerkraut became famous and saved the age of sail (source).
Lacto-fermented sauerkraut not only preserves the nutrients that are in the vegetable, but it enhances them. You’ll end up with more nutrition after a time of fermentation, plus fermenting adds probiotics with live bacteria that will benefit your gut health, digestion and immune system.
It’s a No-Brainer!! Fermenting makes 1+1 equal 3

Sauerkraut was my very first attempt at making my own fermented foods, back about 30 years ago. I grew up in Germany and sauerkraut as well as barrel-fermented cucumbers were readily available at any butcher shop to go with your meats. It was also found raw in the supermarket and at farmer’s markets, where many fermented vegetables were offered, sometimes right out of the barrel. There were sausages hanging in butcher carts and cheeses in the dairy carts. We had a sizable Greek and Turkish population in my hometown as well, who offered fermented olives, peperoncini, capers, brined feta cheese, mixed vegetables and dolmades in fermented grape leaves.
Here in America I found naturally fermented items harder to find. So the easiest way to have access to them anytime, was to make them myself. And it is so easy that there is no reason why not to do it! So when my kids were little, I started on this journey of fermenting foods and here I am still doing it and loving it. It’s not just healthy and inexpensive, but it’s also a lot of fun to experiment with different vegetables, combinations and spices. Here is the best basic recipe to get you started with fermenting:
Let’s make lacto-fermented sauerkraut
This sauerkraut recipe can easily be scaled up, if you have a large amount of cabbage to preserve, I’ll include instructions for doing so during the recipe. But this basic recipe is for one quart, which is a good size to start and you’ll need just one head of cabbage.
Equipment
Quart size glass jar or Flip-top jar – I highly recommend the Bormioli Fido jars. They automatically vent the gasses and keep oxygen out. And I think they look so cool! However, I use mostly mason jars for fermenting, since I have so many of them already for canning, and I can and ferment A LOT!
See the note below on scaling the recipe for larger scale fermenting.
A weight – My go-to favorite weight for mason jars is a glass fermentation weight. They are nicely heavy and easy to clean, and they fit perfectly into a wide mouth jar. You can also use a rock or a plastic baggie filled with brine:

I had a little too much red cabbage for a quart container but not enough to fill this half gallon. So I used a ziplock bag filled with brine as a weight, to keep the bits from floating, and to reduce the oxygen occupied space inside the jar.
A lid or cloth – I recommend the use of a fermentation top or airlock. It makes fermenting so easy and maintenance free. Your chances of failure are pretty slim when using one of these or a flip-top jar. Most other covers will require regular maintenance: A mason jar sealed lid will need to be burped once a day and a cloth cover invites yeasts to settle on the surface of your brine, which will need to be skimmed off every day or two. These are harmless, but can taint the flavor if not kept in check.
Large Bowl – You’ll be mixing and kneading your cabbage in it, so make sure that it’s spacious for working in.
Mandoline, food processor or knife and cutting board – A knife is sufficient for a small quantity of cabbage. And it has the advantage that you can shred the cabbage to your liking, even very coarse. If you process larger quantities, consider a food processor or a mandolin to get the job done quicker and to make your shreds even.
Scale – If you don’t own one, here is a very inexpensive scale with great reviews. I rarely use a scale, so I don’t buy the expensive ones, but this little one comes in handy when working with herbs and fermenting. If you have a cabbage but no scale, you can also check the note below on fermenting without a scale.
Tamper – optional. I use an acacia wood pickle packer for tamping down fermentations such as this kraut. It works so great and I’m glad to have it. However, a fist works pretty good too.
Ingredients

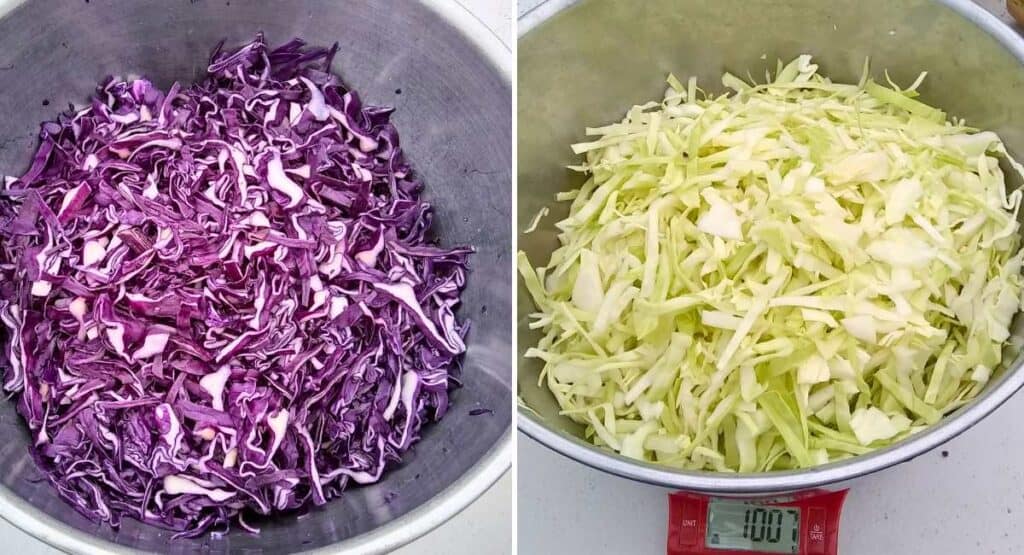
1 small to medium head of cabbage – pick one that feels heavy for its size. You’ll need to end up with about 1½ lbs shredded cabbage. And don’t limit yourself to white cabbage. While it’s the classic cabbage to use in sauerkraut, there is much that speaks for using red cabbage. While white cabbage is especially high in vitamin K, red cabbage tops the white with it’s high amounts of antioxidants and it makes a beautiful, vibrant red Kraut. So use one or both or try to mix the two!
Salt – we’ll be using a 2% ratio in weight. The method to figure out your salt amount is shown in step 4 below.
While any additive-free salt will work, I prefer to use Redmond’s Real Salt, Himalayan pink salt, Celtic sea salt, or any unrefined, additive-free sea salt. They are better because all of these contain essential trace minerals, which is a more healthy choice. Plain canning and pickling salt is just sodium chloride and does not add these important trace minerals to foods. Avoid common table salt or any other salt with additives.
Optionals:
Sauerkraut in my opinion doesn’t need any add-ins to be delicious. But sometimes I do add caraway seeds in mine, because its tradition and I like the taste.

Caraway seeds – In Germany, sauerkraut is usually made with some caraway seeds. They help with digestion and add a nice flavor to your kraut. You can grind it if you don’t like the pieces in it, but they get soft and I don’t find them offensive when eating the kraut.
Pepper corn – You can add a few peppercorns for a bit of spice, any color you like.
Cayenne peppers – Throw in a cayenne pepper or two if you like it more hot.
Turmeric – This will give your cabbage a nice orange hue and add some more health benefits. Always pair turmeric with black pepper corn if you want the health benefits.
Onions – Try some sliced onions mixed in with your cabbage for variety.
You can play with adding any pickling spices or mixing with other vegetables, such as carrots, celery root, or beet root. Be creative. To get a more extensive list of ideas for spices and vegetables for fermenting, visit lacto-fermented vegetables.
Instructions

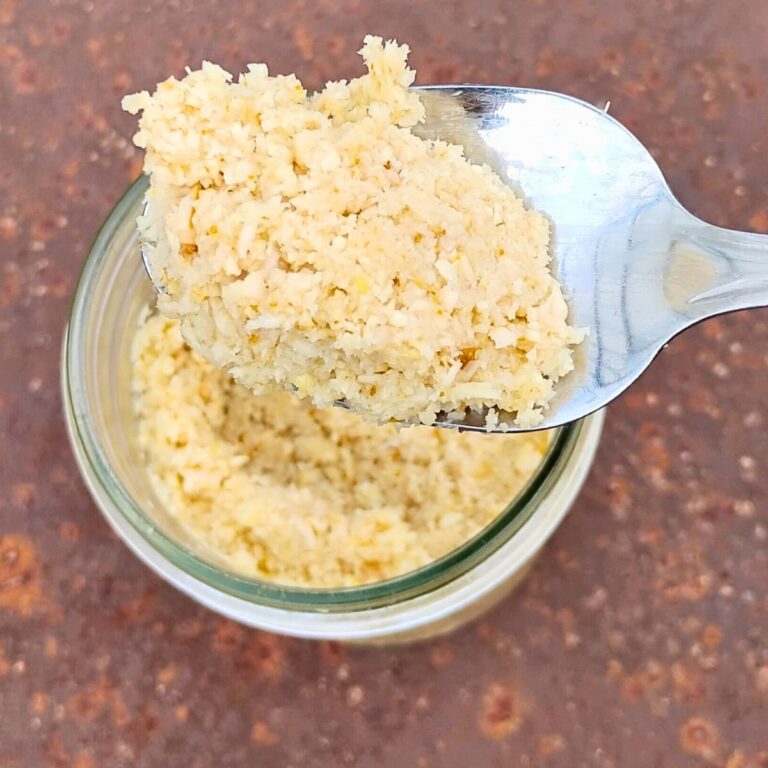
01. Core and shred the cabbage to your desired thickness. Reserve a couple of the large, tough outer leaves for later. Then shred the rest of the cabbage. I like the strands fairly thin, but you can make them wider if you prefer. They’ll be pretty chewy even after fermenting.
02. Set your bowl on the scale and zero it (hit tare), on the gram setting.
03. Add the sliced cabbage and record the weight of just the cabbage.
04. Here you’ll do a little math to figure out 2% of the weight in salt:
Compute the weight of your cabbage x .02. This will give you the amount of salt to add. (Example: 1000 grams of cabbage x .02 = 20 grams of salt). You can apply this ratio to any amount of cabbage that you want to ferment! That’s the beauty of using a formula. See *note below if you don’t have a scale.

05. Adding the salt: It’s easiest if you tare your scale to zero again with all the ingredients in it and add the amount of salt that you need by weight, or you can just add it to the total, which is what I did.
06. Mix the cabbage and salt thoroughly. Let the mixture sit in the bowl for 10-30 minutes before proceeding.

07. Knead the Cabbage. Here is where you need to put in a slight bit of elbow grease. Knead the cabbage for a few minutes till it becomes pliable and limp and starts to release juices. You can pound it with something heavy too, but I just like to knead it and then I will know when it’s getting juicy enough.

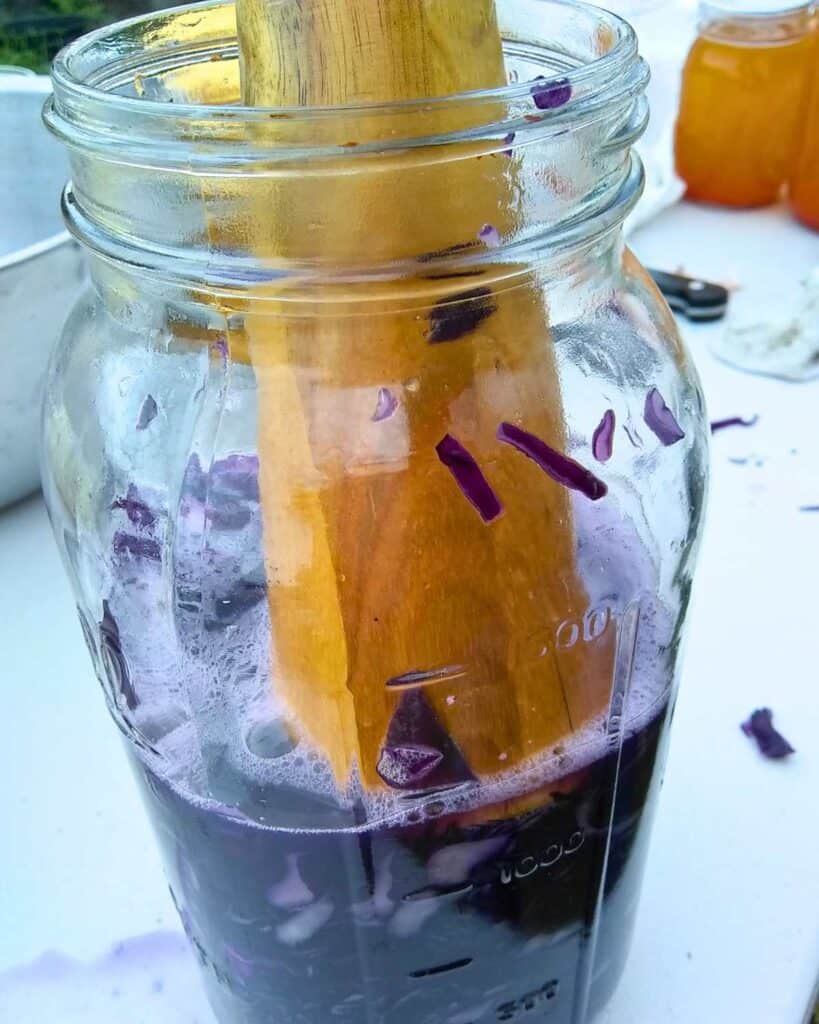
08. Stuff your cabbage with the juice into the glass jar. Pack it down tightly. You can do that with your fist or a pickle packer tamper (that is what I use and I love it!). As you pack down the cabbage, you’ll find the juices rising. Keep packing the jar to within an inch and a half of the top rim. Press it in pretty hard.

In the end you should have some juices rise above the ingredients. If not, let it sit a while longer and push on it again. You can add a little water if necessary. If you need a lot of water, then you should make a brine by adding 1 tablespoon of salt to a pint of filtered water. I rarely find that necessary. If you use fresh from the garden cabbage you should get plenty of juices. Cover the top with the reserved cabbage leaves to keep floaters from rising.

09. Place a weight on the cabbage to submerge it in the brine. The brine should cover all of your cabbage, so none of the cabbage is exposed to the air.

10. Cover your jar with a fermentation lid. If you use a regular lid, you will need to burp it once a day to release the pressure that develops during fermentation.
If you use a cloth cover, you’ll need to keep an eye on the surface and skim off any whitish layer that forms regularly, or any floaters. And you’ll have to be extra vigilant on keeping all the ingredients submerged. They cannot be exposed to oxygen.
11. Place your container in a darkish corner. Put a bowl under it to catch any overflow if that happens. This will be its home for the next 3 weeks or so. Try to find a place where the temperature is above 70 and below 80℉. This will be your best fermentation temperature, especially for the first few days. But fluctuations are ok and a little higher or lower is fine for short periods.
12. Check it occasionally. You might need to burp it once a day if you’re using a sealing lid. Just quickly loosen the lid enough to let the pressure escape, and tighten it right up again. Don’t remove the lid unless you have an issue to deal with.
If you’re using a cloth cover, skim the surface whenever necessary and be sure to keep the cabbage under the surface of the brine.
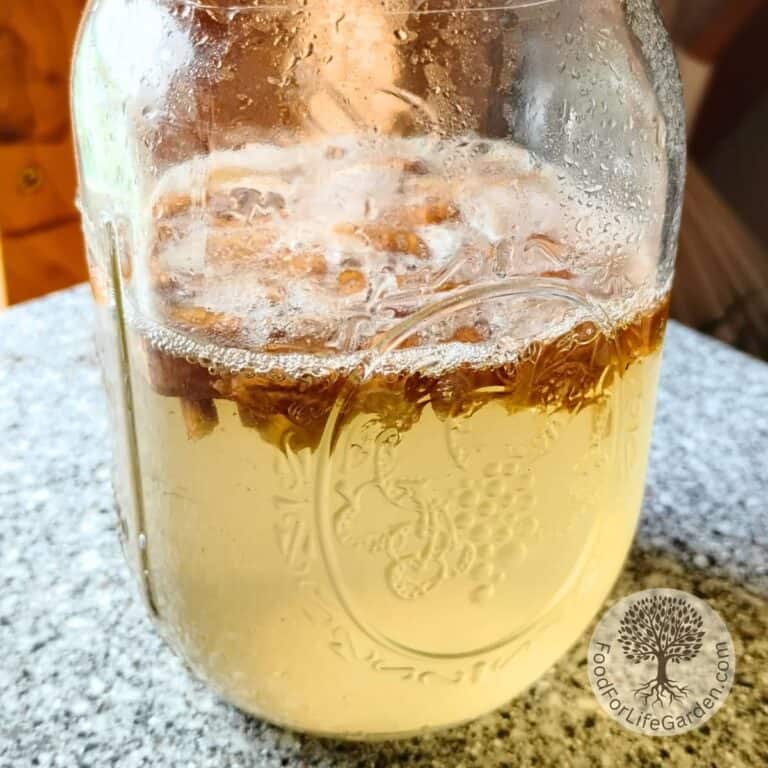
You don’t usually have to do anything if you use a fermentation lid, just check to make sure it’s fermenting. After 2-3 days, you’ll see the brine get cloudy, bubbles start forming, and the liquid is expanding, possibly oozing out of the jar.

13. Give it a smell and a taste after about three to four weeks. Your kraut should be done. When you open the lid, smell it. You should smell that distinct fermentation smell. It should smell pleasant, and tangy. Check the kraut, is it still firm? Does it look good? If so, proceed and taste a bit of it. If you taste a salty and tangy flavor and your kraut is crunchy to slightly soft, all is well.
14. You can now place it into cold storage for long-term keeping. Cold storage will slow the fermentation way down and make your kraut keep for a very long time. At least a year. I’ve had some of mine stored in the cellar for two and a half years and it’s quite tangy but still crunchy and delicious.

If you have a cool corner in your home, you can also keep it at room temperature if it’s not too hot. It won’t keep as long as in cold storage, but it should stay delicious for several months at least. Let the smell and taste be your guide as to whether it’s still good. Most likely you’ll have eaten it well before it declines. If it smells bad or you find that it is turning mushy and unappetizing, it’s probably time to feed it to the compost, where it will be useful as an effective composting accelerator.
*Note: If you have a head of cabbage and are ready to go, but you don’t have a scale you can wing the salt ratio for a quart size ferment. Add 1 tablespoon of salt to the amount of cabbage that fits into a quart jar. I’ve used that method for years before I learned about the more technical way to do it. Back when I started, heirloom recipes were much less precise and technical, but they still worked.
Scaling the recipe:
This recipe can be scaled up indefinitely, using the cabbage to salt ratio formula. You can use a half gallon mason jar to fit double the recipe. You can use one of those gallon size glass crocks or you can use a 5 gallon food grade bucket or a cambro plastic container. Or, if you have access to a big ceramic crock, you can use that as well. Just be sure that the glaze is safe for acidic foods.
Just shred all your cabbage, weigh it, add the 2% of salt in weight (as explained in step 4) and use anappropriate size container for fermenting. To use a weight in a larger container, try one of the different sized ceramic weights you can purchase, or use a plate and top it with something heavy that is food grade, such as a gallon jug of water.
In Conclusion

As you can see, making sauerkraut is super easy and takes very little trouble. The result is a food that is loaded with health benefits, tastes amazing and will enhance any meal. Try making a Reuben style sandwich, top your grilled meats or just serve it as a side. It will help your gut to digest those tough meat proteins and other hard to digest foods. Eating a small serving of fermented food with each meal is a good health promoting practice to get in the habit of.
So, hey, let’s make some kraut!
Let us know in the comments below about your experiences with Sauerkraut. If you got to make some, I’d love to know how it turned out and about your favorite ways to serve it. Did you experiment with other ingredients?
Visit lacto-fermented vegetables to find out about the benefits of fermented foods and why it’s so important to add them to your daily diet. You’ll also find master recipes for fermenting just about anything, from Asparagus to Zucchini.
And don’t forget, stay tuned for more recipes, homestead advice, tips, and ideas by subscribing to Food For Life Garden News now! Never miss a new post!
Common Questions
How long can I keep the ferment at room temperature?
If you have a cool spot in your home, you can keep the sauerkraut for several months at room temperature. I wouldn’t try to keep it over 70 degrees for the long term. It will keep fermenting very actively and eventually deteriorate and turn mushy. Cooler temperatures slow down the process and this will preserve your kraut for a very long time. I keep most of mine at about 55 degrees in my cheese cave or root cellar. It will last for years that way. Likewise in a regular refrigerator.
Is grocery store sauerkraut fermented?
Some of it is. Some might just be pickled. However, most sauerkraut that is sold in stores will have been pasteurized, even the fermented kind, which destroys the probiotic benefits. If you find it on store shelves, it is either pickled or heat processed and not active anymore. Check the refrigerator section for active, raw, probiotic sauerkraut. If you’re planning to cook with it, it’s fine to get the pasteurized kind, since you’ll be heating it anyway.
Is fermented sauerkraut good for you?
Fermented sauerkraut not only retains its vitamins and nutrients, they are enhanced by the fermentation process. In addition, you’ll also get active probiotic bacteria that are beneficial for your gut activity, enriching your gut flora and helping to keep a balanced bacteria mix in your gut, which will also help support a healthy immune system. The simple process of fermentation will not only preserve your vegetables, but it will make them even healthier!
More tasty fermented food recipes
Fermented Salsa – Delicious zesty tomato salsa. It’s summer in a jar!
Fermented Coleslaw – A cabbage and roots medley with fabulous coloring and awesome flavor. Packs nutritious punch and probiotic diversity.
Fermented Tabouli Salad – a delicious cold salad or a complete meal, made gluten-free with quinoa and packed with nutrition and health benefits. Delicious fresh or fermented!
Fermented Cantaloupe – Have you tried lacto-fermenting fruit? It’s a great way to preserve your extra melons this summer!
Fermented Onions – You’ll love these tasty, tangy onions. Try them plain or spiff up any sandwiches, salads and burgers with a ready supply of these onions sitting in your fridge.
Fermented Salsa Verde – Try this bright and fresh tasting green salsa. It’s so good on your grilled meats, with baked potatoes, as a dip or condiment, as part of a salad dressing, and with any Mexican dishes!
Fermented Chili Paste – Here is a great way to preserve your end-of-the season harvest of green peppers. This paste will last all year in your refrigerator to use as a condiment, seasoning, or topping.
Fermented Hot Sauce With Cantaloupe – How to make a delicious fermented hot sauce that is great with meat, fish, eggs and on sandwiches. What a great way to use some cantaloupe and spicy peppers.
Fermented Cucumber Pickles – How to ferment your excess of cucumbers to enjoy all year long and with the added benefit of improving your gut health with probiotics.
Creamy Cucumber Salad – This is a super delicious summer salad. A must for cucumber season, but it’s great any time if you can get cucumbers! Add a little fermentation brine and cultured sourcream or cheese for probiotic benefits.
Fermented Vegetables – How to ferment your summer’s bounty to enjoy it all year long and with the added benefit of improving your gut health with probiotics. Learn the basic skill of fermenting any kinds of vegetables and get the science behind it too.
Fermented Eggs – A probiotic, nutritious, delicious snack that you can keep in your refrigerator for several weeks. It’s there, ready to satisfy that food craving with something that’s good for you. And you’lI love eggs with salsa, or salsa with eggs!
Fermented Basil Paste – Keep a jar of this in your refrigerator all year, to season your dishes. Preserve not only the herb, but also its aroma and pungent basil flavor. It’s one of my favorite ways to preserve basil for the long term.
Pin This Recipe For Later

Lacto-Fermented Sauerkraut Recipe

Lacto Fermented Sauerkraut Recipe
Equipment
- Quart size glass jar – A mason canning jar works great or you can use a Flip-top jar with a hinged lid, which is self-venting and keeps oxygen out.
- A weight – I prefer to use a glass fermentation weight but you can use a clean rock or a zip baggie filled with brine (1 tbsp of salt per 1 pint water)
- A lid or cloth – Best is a fermentation top or airlock. These fit on canning jars. Otherwise you can use a sealing lid that fits your jar or a cloth secured with a rubber band.
- Large bowl
- knife – you can also use a mandolin or an electric food processor
- cutting board
- Scale – If you don't have a scale see notes below. Here is the link for an inexpensive scale.
- Tamper – optional – I love using a pickle packer for recipes like this, but you can use your fist.
Ingredients
- 1 small to medium head of cabbage – pick one that feels heavy for its size, red or white. You'll need to end up with about 1½ lbs shredded cabbage.
- Salt – the amount used depends on the cabbage weight.
Instructions
- Core and shred the cabbage to the desired thickness. Reserve a couple of the large outer leaves.
- Set your bowl on the scale and zero it (hit tare), on the gram setting.
- Add the sliced cabbage and record the weight of just the cabbage.
- Here you'll do a little math to figure out 2% of the weight in salt:Compute the weight of your cabbage x .02. This will give you the amount of salt to add. (Example: 1000 grams of cabbage x .02 = 20 grams of salt). You can apply this ratio to any amount of cabbage that you want to ferment! That's the beauty of using a formula.
- Adding the salt: Tare your scale to zero again with all the ingredients in it and add the amount of salt that you need by weight.
- Mix the cabbage and salt thoroughly. Let the mixture sit in the bowl for 10-30 minutes before proceeding.
- Knead the Cabbage. Knead the cabbage for a few minutes till it becomes pliable and limp and starts to release juices. You can pound it with something heavy too, but I just like to knead it and then I will know when it's getting juicy enough.
- Stuff your cabbage with the juice into the glass jar. Pack it down tightly. You can do that with your fist or a pickle packer tamper. As you pack down the cabbage, you'll find the juices rising. Keep packing the jar to within an inch and a half of the top rim. Press it in really well to push out any air and to coax out the juices.In the end you should have some juices rise above the ingredients. If not, let it sit a while longer and push on it again. You can add a little water if necessary. If you need a lot of water, then you should make a brine by adding 1 tablespoon of salt per pint of filtered water. I rarely find that necessary. If you use fresh from the garden, heavy cabbage you should get plenty of juices.
- Use the large reserved leaves to cover the shredded cabbage, which will help keep the bits submerged.
- Place a weight on the cabbage to submerge everything in the brine. The brine should cover all of your cabbage, so none of it is exposed to the air.
- Cover your jar with a lid or a cloth.
- Place your container in a darkish corner. Put a bowl under it to catch any overflow if that happens. This will be its home for the next 3 weeks or so. Try to find a place where the temperature is above 70 and below 80℉ most of the time. This will be your best fermentation temperature, especially for the first few days. But fluctuations are ok and a little higher or lower is fine for short periods.
- Check it occasionally. You might need to burp it once a day if you're using a sealing lid. Just quickly loosen the lid enough to let the pressure escape, and tighten it right up again. Don't remove the lid unless you have an issue to deal with. If you're using a cloth cover, skim the surface whenever necessary and be sure to keep the cabbage under the surface of the brine. Things to look out for is a thin layer of harmless, grayish-white kahm yeast and floaters. Keep those skimmed daily.You don't usually have to do anything if you use a fermentation lid, just check to make sure it's fermenting. You'll see the brine get cloudy, bubbles start forming, and the liquid expanding, possibly oozing out of the jar. This will normally start after 2-3 days.
- After 3-4 weeks: Give it a smell and a taste test. Your kraut should be done. When you open the lid, smell it. You should smell that distinct fermentation scent. It should smell pleasant and tangy. Check the kraut, is it still firm? Does it look good? If so, proceed and taste a bit of it. If you taste a salty and tangy flavor and your kraut is crunchy to slightly soft, all is well.
- You can now place it into cold storage for long-term keeping. Cold storage will slow the fermentation way down and make your kraut keep for a very long time. At least a year. I've had some of mine stored in the cellar for well over 2 years and it's quite tangy but still crunchy and delicious. If you have a cool corner in your home, you can also keep it at room temperature if it's not too hot. It won't keep as long as in cold storage, but it should stay delicious for several months at least. Let the smell and taste be your guide as to whether it's still good. Most likely you'll have eaten it well before it declines. If it smells bad or you find that it is turning mushy and unappetizing, it's probably time to feed it to the compost, where it will be useful as an effective composting accelerator.
Notes
Shop This Post
Wide mouth funnel
Electric food processor
Mandolin
Cambro bpa-free container
Bormioli Fido jars
Butter muslin
Floursack towel
Fermentation tops
Airlocks
Redmond’s Real Salt
Himalayan pink salt
Celtic sea salt
Glass weights
Ceramic weights
Acacia wood tamper


Sauerkraut is such a delicious snack or side for your meals and totally delicious as a sandwich or burger topper and you can mix in other veggies like grated or shoestring carrots or beets too! And do ask here if you have any questions! I’ll be glad to answer them.
Love the addition of cayenne and turmeric! We love to eat our kraut with sausage and potatoes ❤️
I have actually never tried Sauerkraut before, but now I want to try it! It sounds delicious!
This is wonderful. I’ve been wanting to make our own sauerkraut for awhile now. This recipe is so detailed and helpful. Thank you!
I love all your posts Heidi, so thorough! I have been wanting to start making sauerkraut again, thanks for the reminder and great suggestions!
Can I scan this at after it’s all fermented… Water bath orpressure, canning?
Hey Lynette, sorry for the delay, I’ve been away from my blog for a bit. Anyway, you should be able to water-bath can it if your PH is low enough. Check a canning guide for that. I don’t ever can mine, so I can’t tell you for sure. Canning will destroy all the good bacteria, enzymes and many vitamins in your Sauerkraut, which, for me at least, is the reason I ferment it in the first place. It will be much less healthy if you can it. It will keep in your fridge or a cool cellar for a year easily without canning.