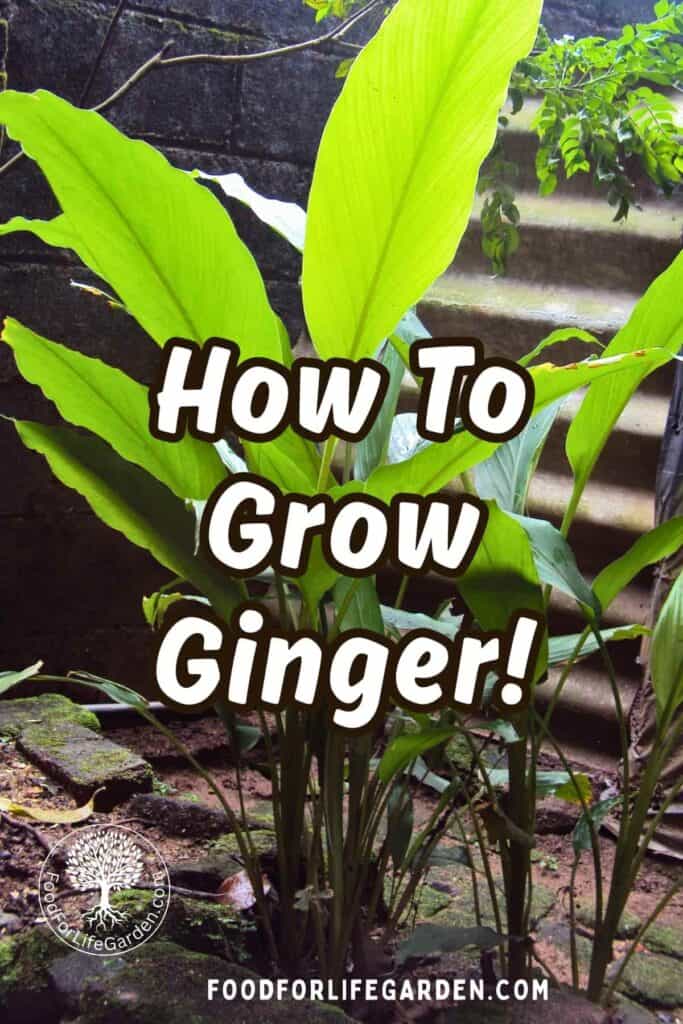
Growing ginger at home is easy and fun. It makes a great house plant if you’re in the North. Or grow it in your Garden in the South!
This post contains Amazon and other affiliate links, which means I make a small commission at no extra cost to you if you click through and make a purchase. See my full disclosure here.
If you are a huge ginger fan like I am, you might like to know that you can grow your own rhizomes even inside your home. It’s such a fun plant to grow and it will reward you with fresh, tasty ginger to eat.
Ginger makes a beautiful house plant if you don’t have a garden or are living too far north to grow it outside. It grows really well in a pot. Homegrown ginger is much more pungent, juicy, and potent when you harvest it fresh. Store ginger has lost much of it’s potency in storage.
By the way, you can grow turmeric just like ginger too! Read on to find out more about ginger and how to grow ginger (and turmeric) in pots and outdoors.
All About Growing Ginger
Ginger originated in tropical rainforests from India to Southern Asia. It has been used in Asian cooking, and medicinally, since ancient times.
Ginger was introduced to other countries when it was traded throughout the medieval times on spice routes. And in the 14th century a pound of ginger was worth as much as a whole sheep. It was the first foreign spice grown in the New World around 1585. (source)
Ginger, Zingiber officinale, in the Zingiberaceae family, is a perennial plant that spreads by rhizomes. It is hardy in zones 9-11 if temperatures do not fall below freezing. Since it is a tropical plant that grows on the forest floor, it loves a rich loamy soil, high humidity, frequent showers, warm temperatures (70-90 degrees) and dappled shade.
Ginger Has A Great Many Health Benefits
I love ginger as much for its fiery flavor as for its health benefits. For years I’ve been drinking ginger tea regularly because it’s my favorite tea. I also use it generously in baked goods such as in sweet potato bread, and in drinks such as switchel and ginger beer. And then it is a key ingredient in ginger honey and fire cider for colds and flus.
Ginger is famous for its anti-nausea properties, as well as anti-inflammatory, antioxidant, and antimicrobial properties. It has been used since ancient times in many medicinal preparations and herbal mixes for countless ailments. And modern science now acknowledges much of this ancient herbal wisdom.
Ginger can act as a stimulant in herbal blends, to ‘wake’ the body to receive treatment. But it shines on its own in so many ways.
Ginger Ale was created in Ireland and has earned itself a reputation to help with an upset stomach.
Historically, ginger was grown in pots and carried on ships to prevent scurvy. And it was used as an aphrodisiac in ancient times.
You can read more about ginger’s benefits on my fermented ginger honey page. And also in the benefits of ginger beer. There is so much ginger can do for your health and it can truly be your partner in health.
The Ginger Family
Other plants in the ginger family, which we are most familiar, with are turmeric, cardamom and galangal. They all spread by their underground stems, or rhizomes. And typically that is the part we eat, except in the case of cardamom, where we use the seeds as a seasoning.
All members of the Ginger family have potent medicinal properties, and turmeric especially, has received a lot of attention lately for its anti-inflammatory properties. You can go to my fermented turmeric page to read more about turmeric and its health benefits.
Fun Facts About Ginger
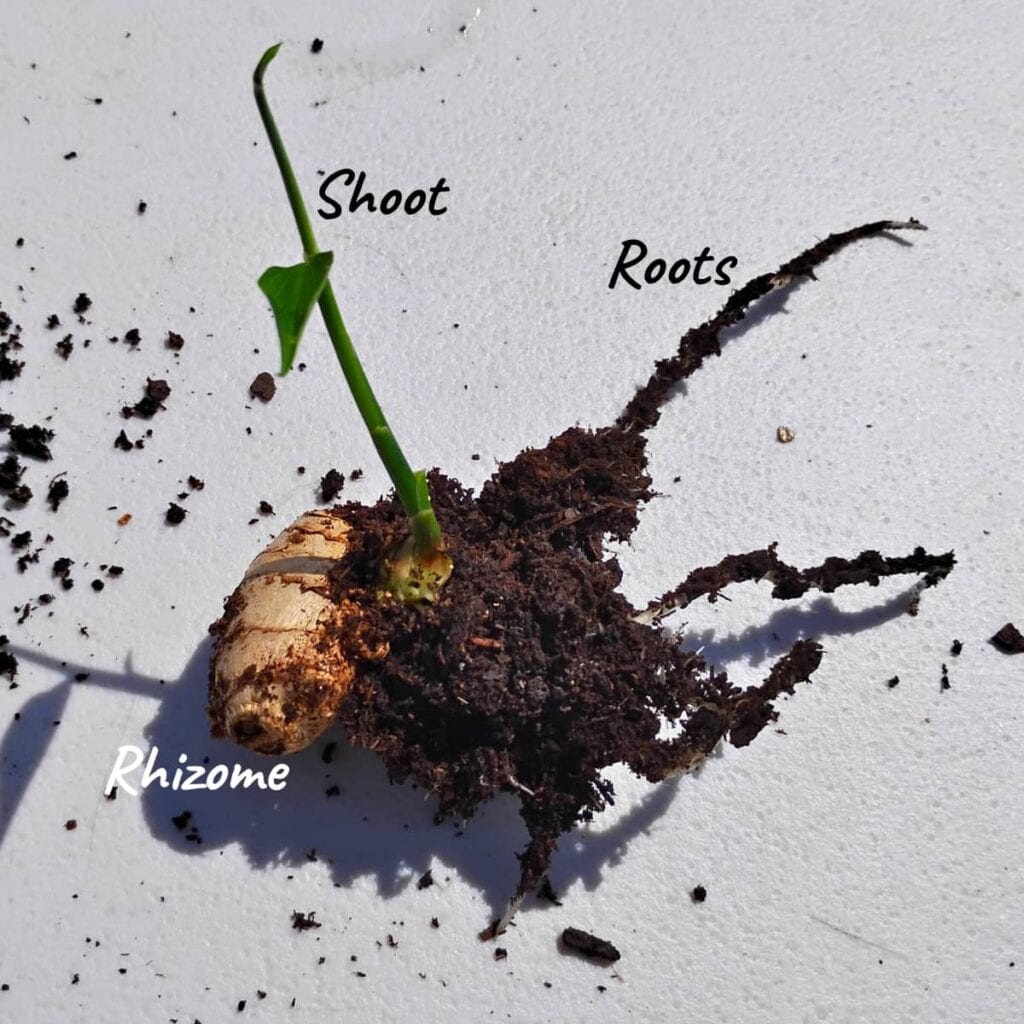
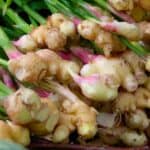
The ginger we get from the grocery store are actually rhizomes, not roots. The rhizome is the stem of the ginger plant that runs below the soil surface and produces shoots with leaves and flowers that we can see above the ground. The roots are below the ground, to supply the ginger plant with nutrients. They are skinny and we don’t eat them.
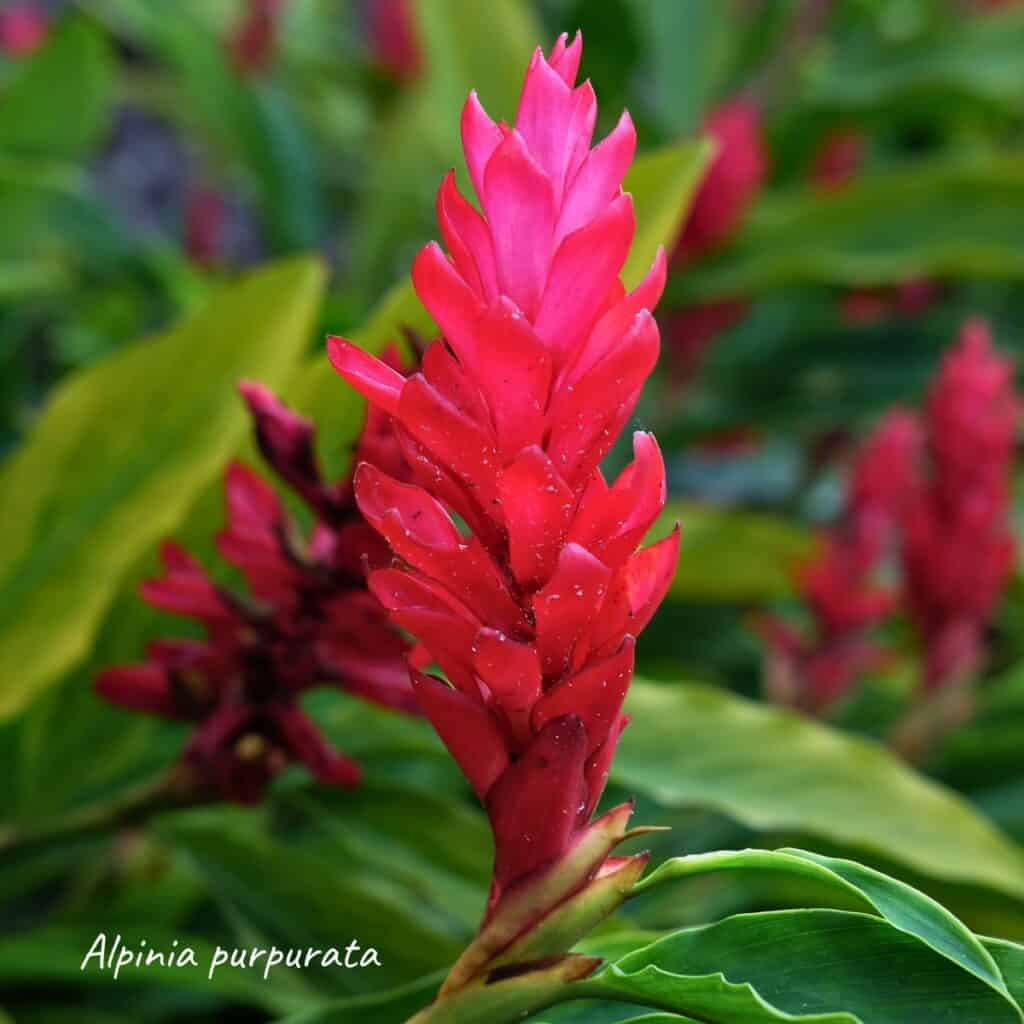
There are many ginger plants you can grow. Some are bred for their amazingly beautiful flowers such as the Hawaiian ginger plants. You can buy the rhizomes on Amazon but they don’t have great ratings, however, I thought I’d link them in case you’re interested.
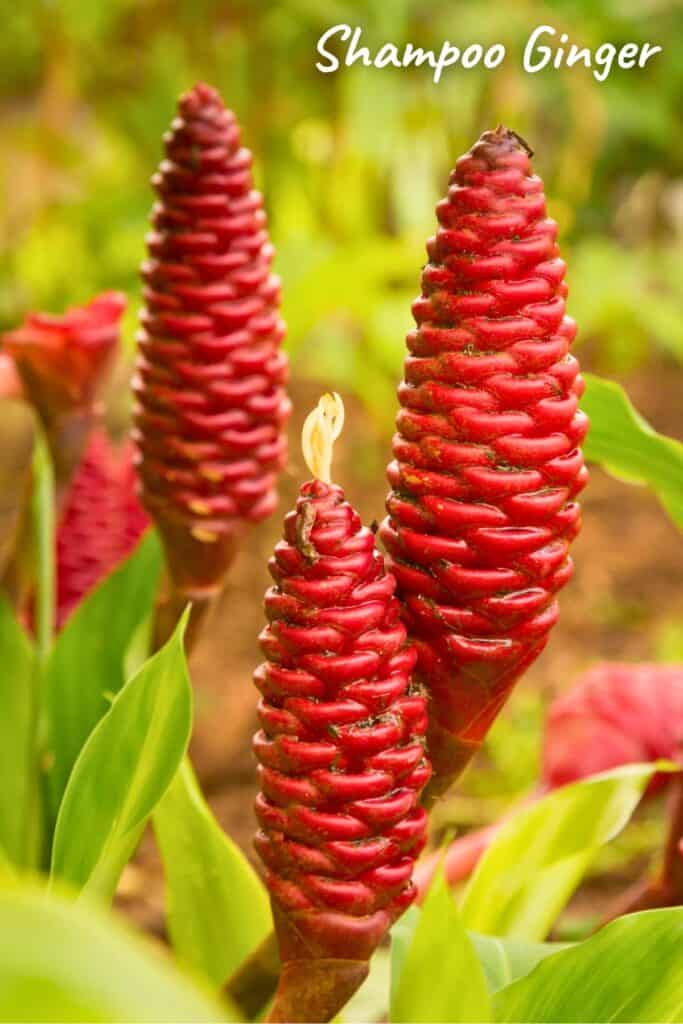
One that I really want to try, but haven’t yet, is the Awapuhi shampoo ginger. You can squeeze the flower to get a juice which you can use as a hair shampoo. How cool is that?! And you can eat the rhizome too.
Ginger leaves are edible too, as are the flowers. But if you want to cook them up, be sure to chop the leaves finely, since they can be a little tough. They have a more subtle ginger flavor.
I have a hardy ginger plant, Zingher mioga, that grows shoots which can be sliced and eaten or pickled, and the leaves are edible as well when young, and so are the flower buds. But the root of this plant is not edible. It’s a cool plant to grow in any case and it is a hardy perennial to zone 6.
I love growing ginger. It’s such an awesome plant and it’s so nice to have fresh ginger available. Read on to learn how to grow ginger.
How To Source Ginger Rhizome For Growing At Home
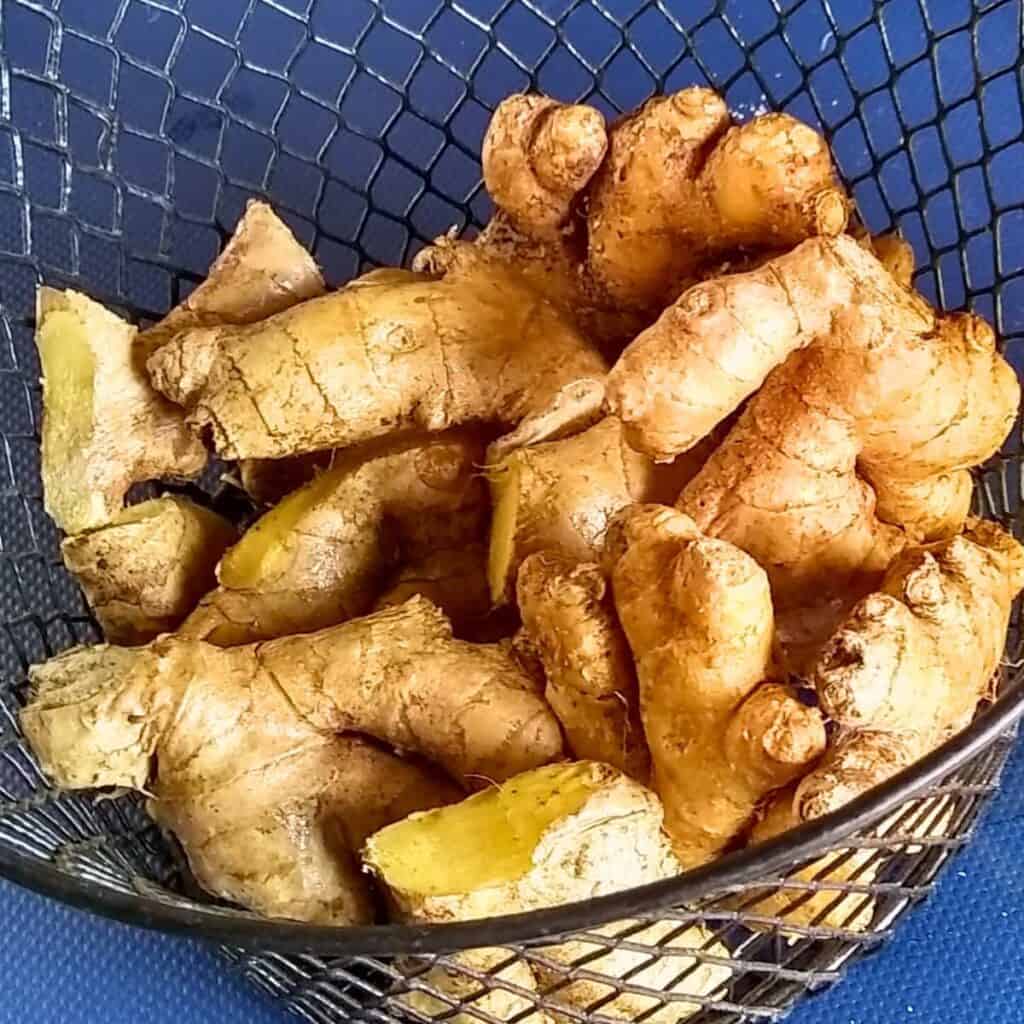
You can use grocery store ginger for growing your plants, however, many have been treated either by irradiation or with chemicals to inhibit sprouting. So they may not grow for you, but it’s worth a try.
If you want to give it a go, wash them and soak them in water for 24 hours. Maybe you’re in luck. If you see some in the store that show signs of sprouting, by all means pick those and you should be able to grow them.
A better source of viable ginger rhizome is a health food section or a whole foods store which typically carries organic ginger. Those are normally happy to sprout for you as long as they are fresh and healthy. If you can’t locate any, try Fedco Seeds for nursery stock, or you can also get fresh organic ginger from the Azure Standard buyer’s club. I have received beautiful organic ginger from them on many occasions at a great price.
When To Plant Ginger
Get your ginger as early in the season as possible to get a good head start and to take advantage of the hot summer months to grow good sized rhizomes outside. February to early March is a good time to start. Ginger often takes a month to sprout.
Ginger takes a long time to mature, 8 to 10 months. If you plant it indoors early and you live in a warm climate, you can transplant it outside once the weather warms, and harvest in the fall just before your first frost. Or take it back inside in a pot to grow it out a while longer.
If you come across this post at any time and want to start growing ginger, by all means, use the same instructions and if it’s late summer or fall, just keep the ginger in a pot to grow indoors over the winter. You can then move it outside in the next spring.
How To Prime Your Ginger For Sprouting
If you’re lucky, your ginger may have already begun to sprout. If not, here is what to do.
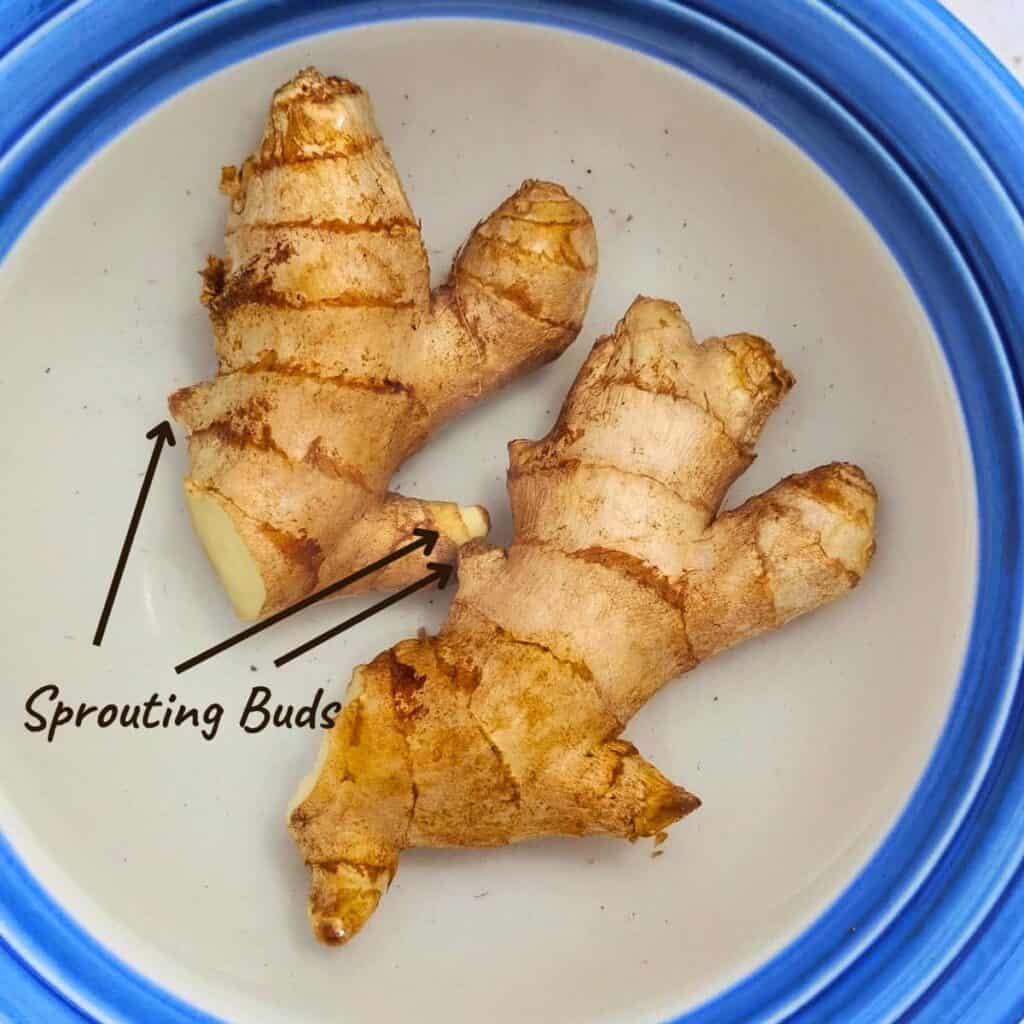
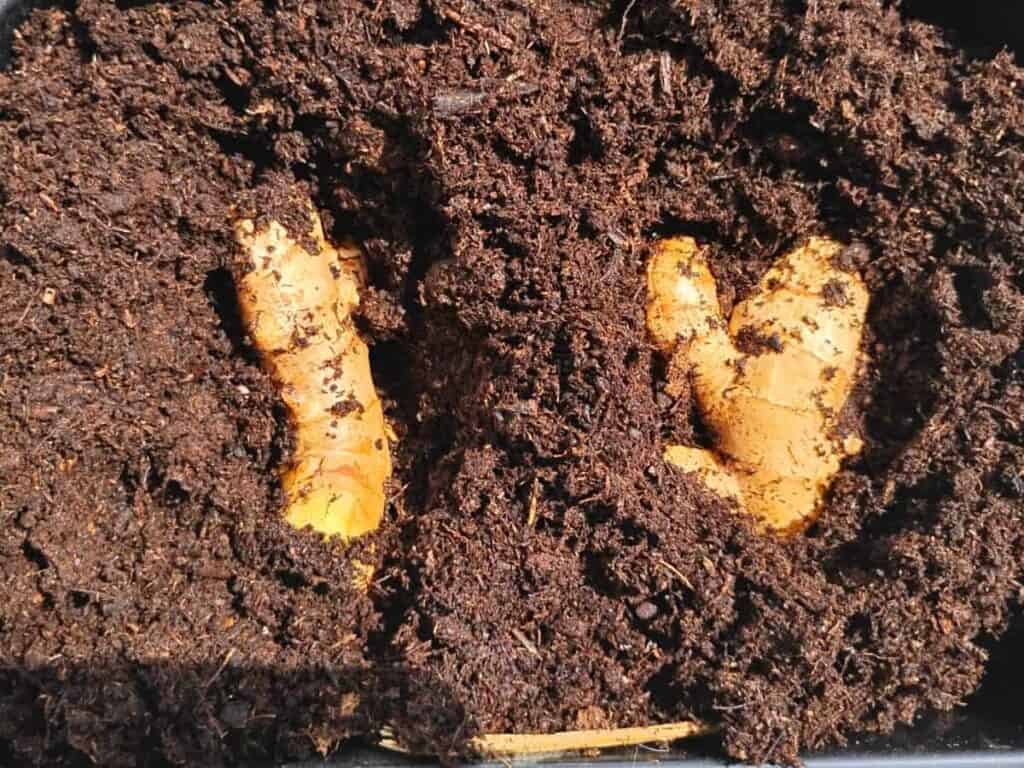
If your ginger is a large hand, you can separate some fingers for planting. They should be a large size finger, several inches long with a few buds. But larger pieces of ginger, and especially whole hands, grow faster and yield more. Let the cut heal for a day or two before planting. I had just smaller pieces left over from cooking this time, and they work as well, but they will probably not grow as big and as quick as the larger chunks.
If you have plump and juicy ginger, you can skip this step. However if your ginger is a bit older, shriveling, non-organic, or otherwise not prime, soak it in clean filtered, non-chlorinated water for about 24 hours. This will help get it primed for sprouting. I had a few pieces that were pretty dry, but they are sprouting. Hope it will work.
Ginger likes temperatures of at least 70℉ and up to 90℉. You can use a heating pad with a thermostat to help reach those temperatures.
Planting The Primed Ginger
Fill a shallow dish or a pot with some lightly moist peat moss or seed starting mix.
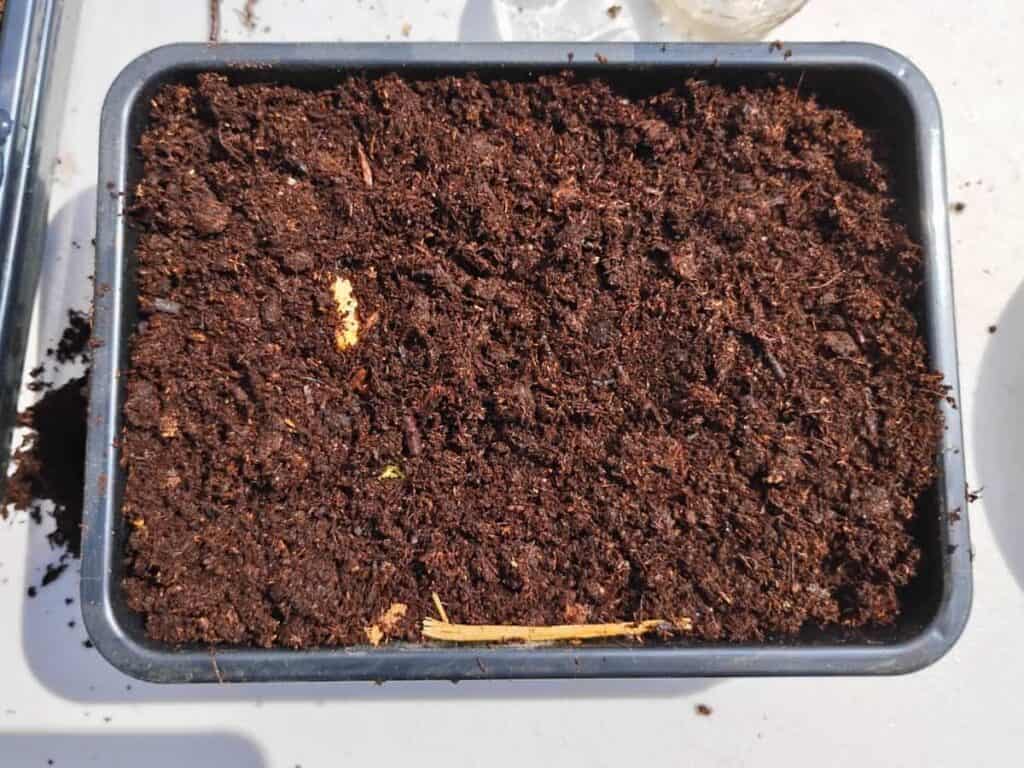
Plant your ginger pieces in the soil with the nobs pointing up. Cover with just barely with soil or peat moss, about 1/2 in deep. Keep this lightly moist, but do not get it soaking wet, we don’t want the ginger to rot.
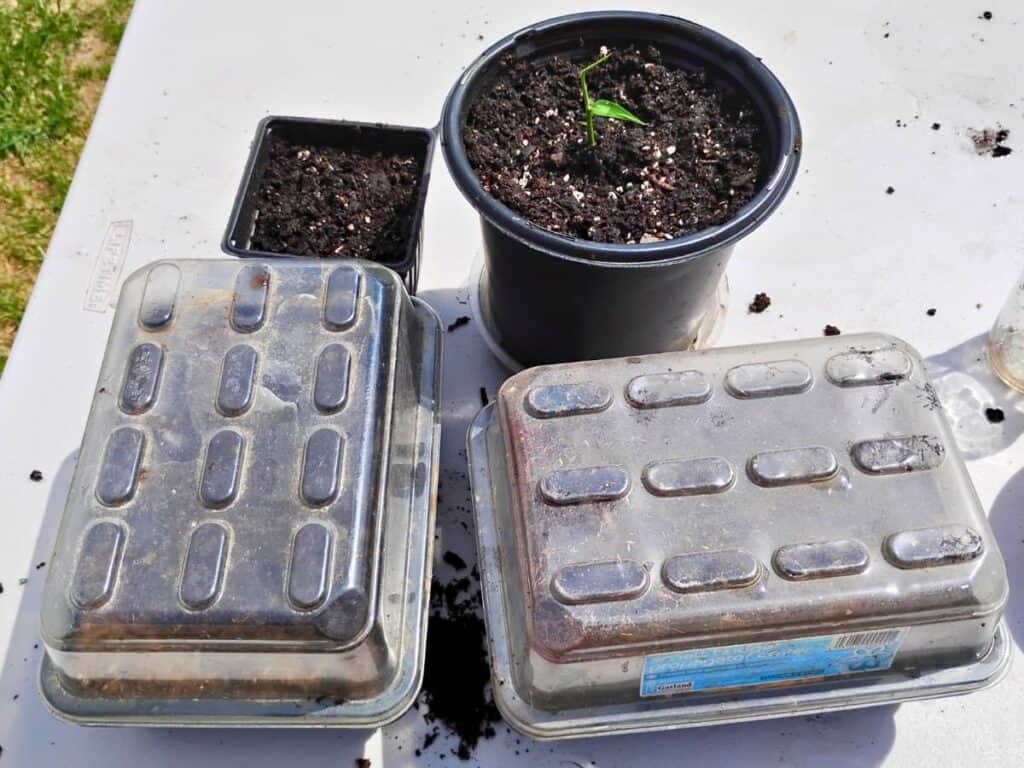
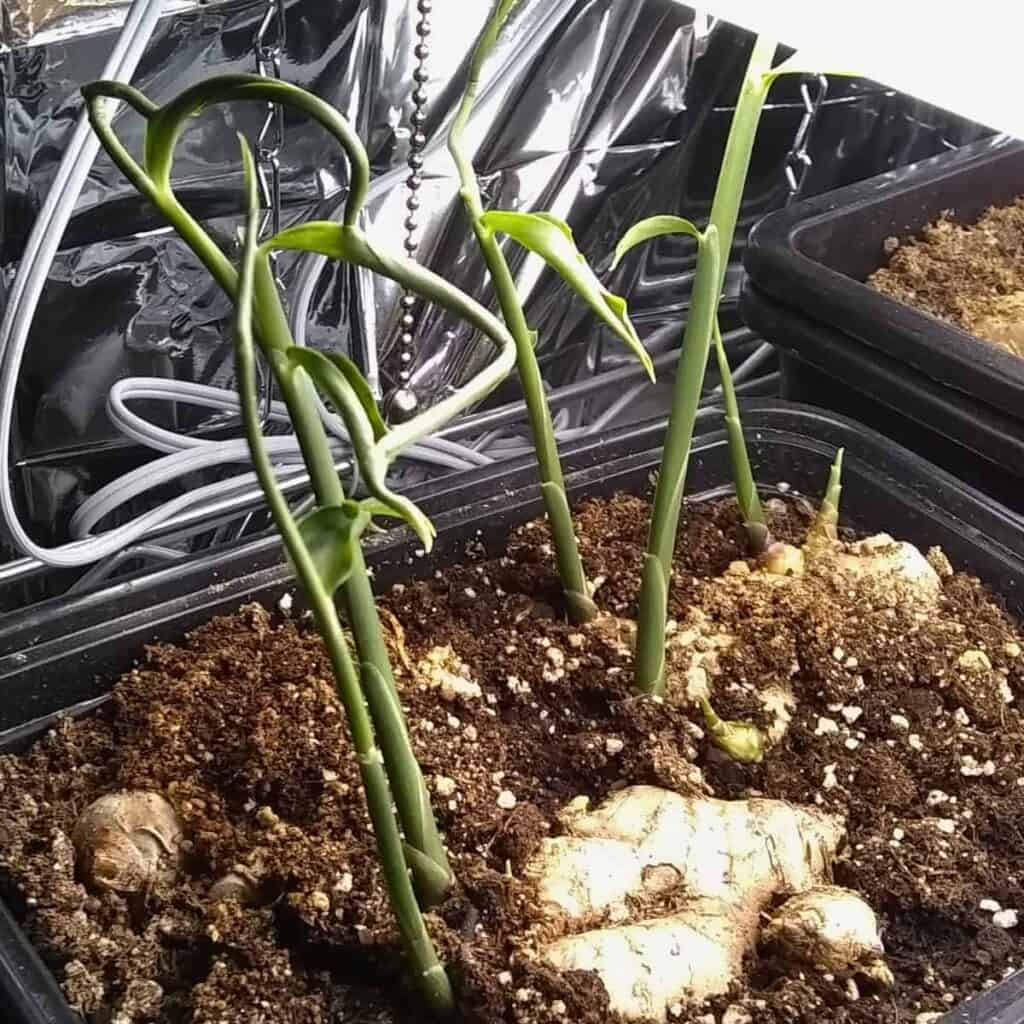
Place your pot or tray on a heating mat or in a warm location with a temperature over 70 degrees until the ginger starts to sprout. A humidity dome is a great help for keeping the environment humid and the soil moist.
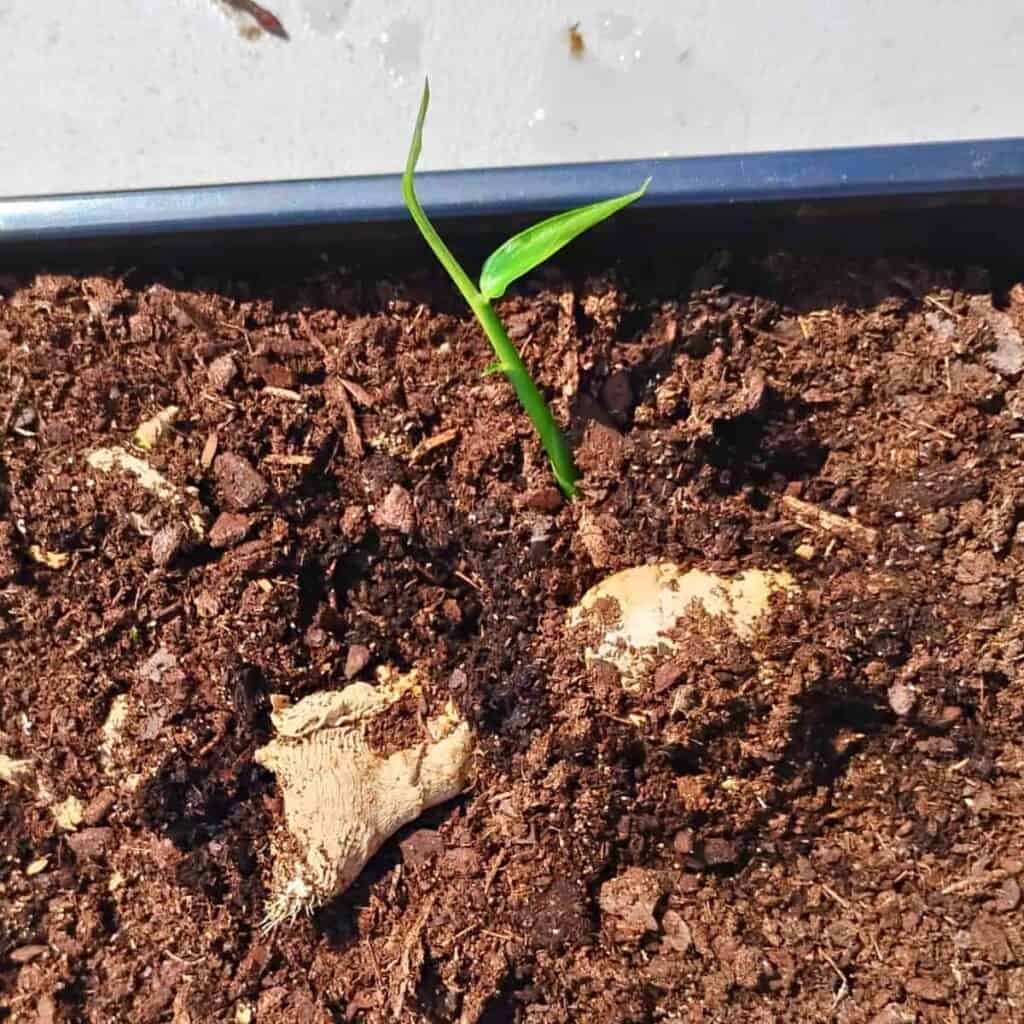
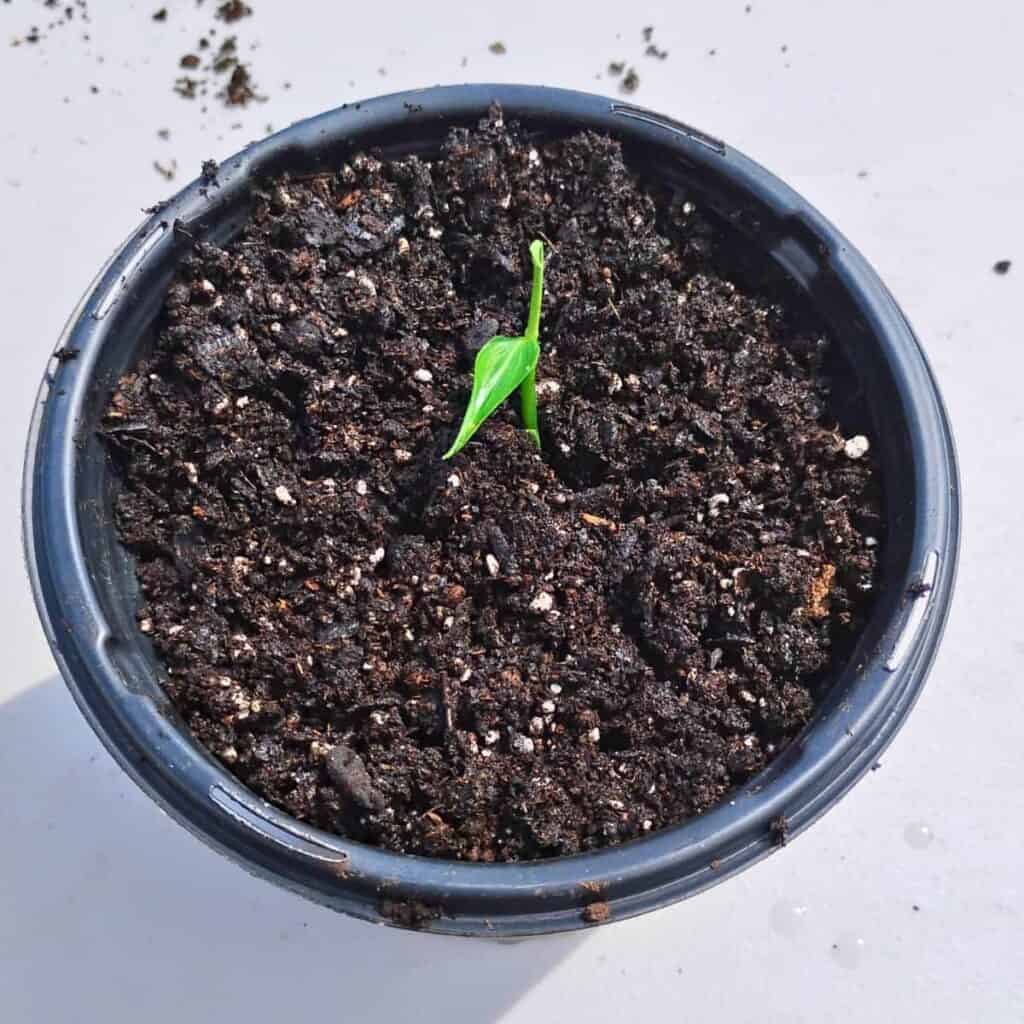
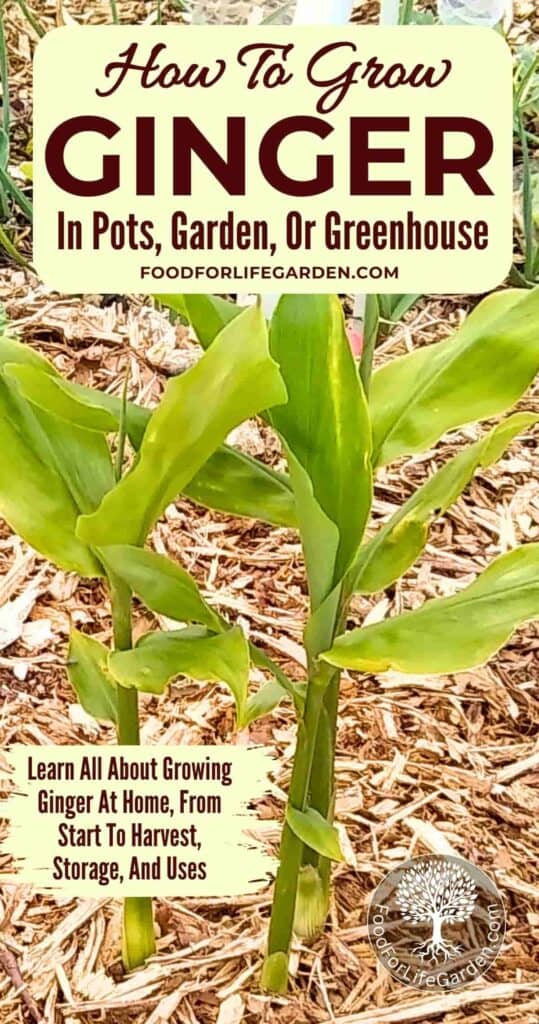
When the ginger sprouts, you’ll see a green spike emerging from a node. This will continue to grow upward and it will also start to grow its roots into the soil below.
At this point you’ll want to place your ginger under grow lights or place it in front of a bright window that does not get too much direct sun.
Choosing A Location For Growing Ginger
Ginger loves it hot, but, especially if you’re growing ginger in the south, you will want to give it dappled shade or partial shade at least during the hottest part of the day, which is normally in the afternoon.
If growing it indoors, a window, that gets an hour or two of direct sun during the early part of the day is ideal.
Transplanting The Ginger
Planting Into Pots
Once your ginger has grown a shoot that’s a few inches tall, take it out of your sprouting tray and transplant it.
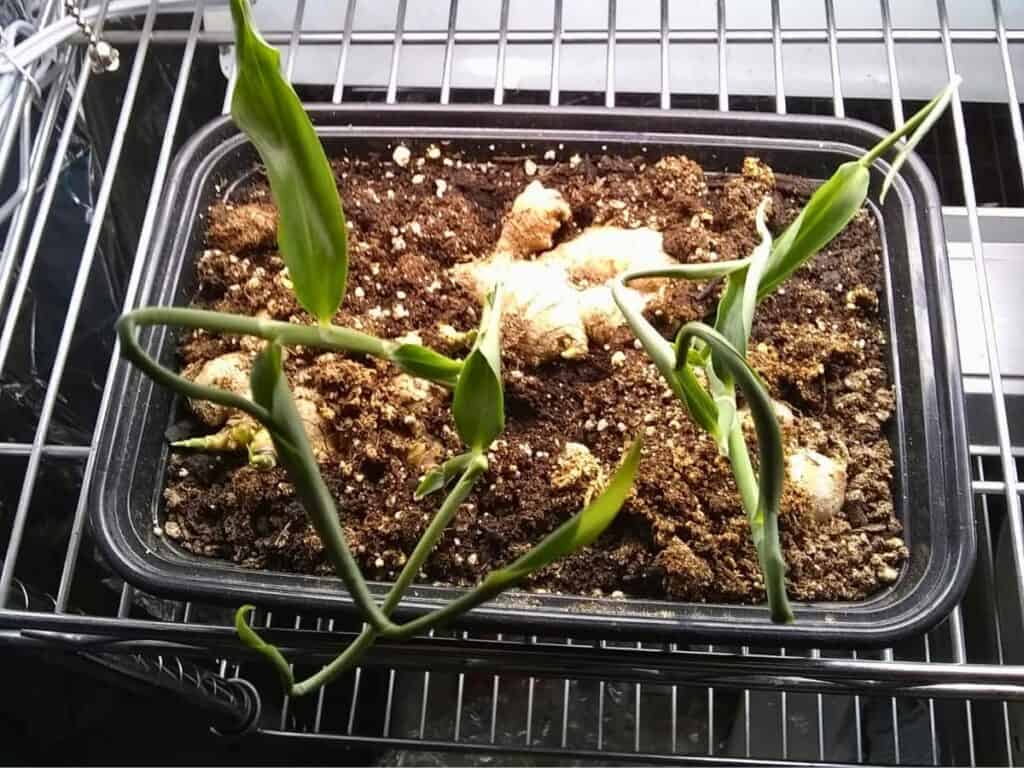
Fill your pot with potting soil and homemade compost, peat moss and compost, or fine natural pine bark with compost. Go heavy on the compost. Ginger is a heavy feeder and would probably grow happily in pure compost. You could also use a bagged compost if you don’t make your own. Your soil mix should be spongy, soft and full of organic matter. Be sure to allow for easy drainage by adding some perlite or fine pine bark. I also like pumice a lot.
Bury your ginger a couple of inches deep. Keep the soil moist but not wet. Ginger likes humidity, so if you’re growing it in a dry place, it’s a good idea to mist it with a spray bottle every few days.
Now let it grow till you need to transplant it again.
This can be out into your garden if you’re in a more southern climate. In the north, you can grow it in a greenhouse in the ground or in a large 12″-18″ wide and shallow pot or growbag, which you can keep inside your greenhouse or place outside. This way you are flexible to move it around when needed. And if you plant in a pot, you can bring it back into the house in the fall to finish growing it.
Transplanting Outside Into Your Garden
Harden off your ginger plant for a week by placing it outside for a short time on day one and increasing outside time each day before planting it into the garden.
Wait till the soil and night temperatures have warmed to 55 degrees before you transplant the ginger into your garden beds or before you place the pots outside overnight.
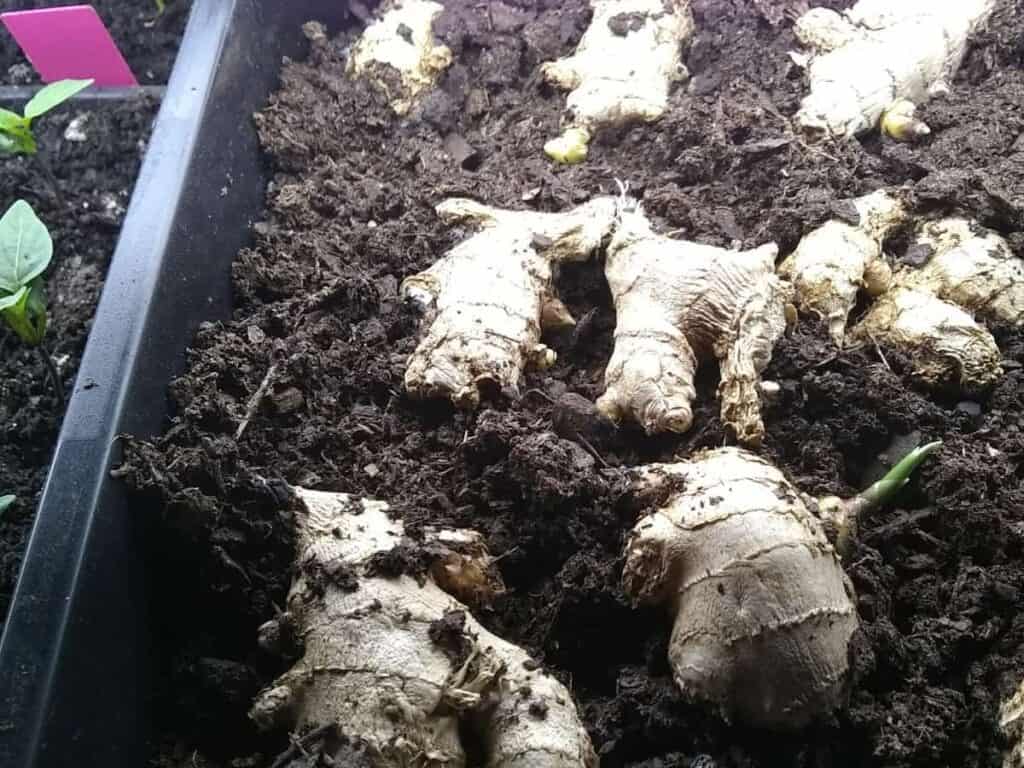
Add plenty of compost to your planting site and loosen the soil. Ginger loves organic matter and it loves to eat! Mix in a little pine bark or pumice stone to keep the area well draining. Plant in a raised bed if necessary or hill the soil up a little to allow for better drainage.
Space the ginger roots 8-12 inches apart and plant 2-3 inches deep.
After the ginger grows a few inches tall, you can hill the soil up a little around the plant and mulch the area to retain soil moisture and keep the weeds down. Be sure to keep the soil moist throughout the growing season, but do not allow water to pool up around the ginger. It doesn’t like wet feet nor does it appreciate to dry out.
Hilling around your ginger as you see pink parts of the rhizome surface, will help encourage more rhizomes to form, just like with potatoes.
Ginger can grow 3-4 feet tall and spread about 1-2 feet wide.
Irrigation
Be sure to keep the soil moist throughout the growing season with regular, daily watering. You’ll want to mimic a rainforest climate. During the monsoon season, ginger gets a shower almost daily, so it appreciates overhead watering, but you can use drip irrigation too. And it helps to retain moisture when you mulch with a layer of pine bark, grass clippings, chopped leaves or wood chips.
Fertilizer
Use organic fertilizer if you’re growing the ginger indoors or in pots, unless you used mostly compost for your soil. Watering with a diluted fish or kelp emulsion is a great organic fertilizer option about once a month. If growing it in the ground, you can side-dress with compost throughout the season. And a monthly showering of diluted fish emulsion is appreciated even if your plants are growing in a garden bed.
Harvesting Ginger
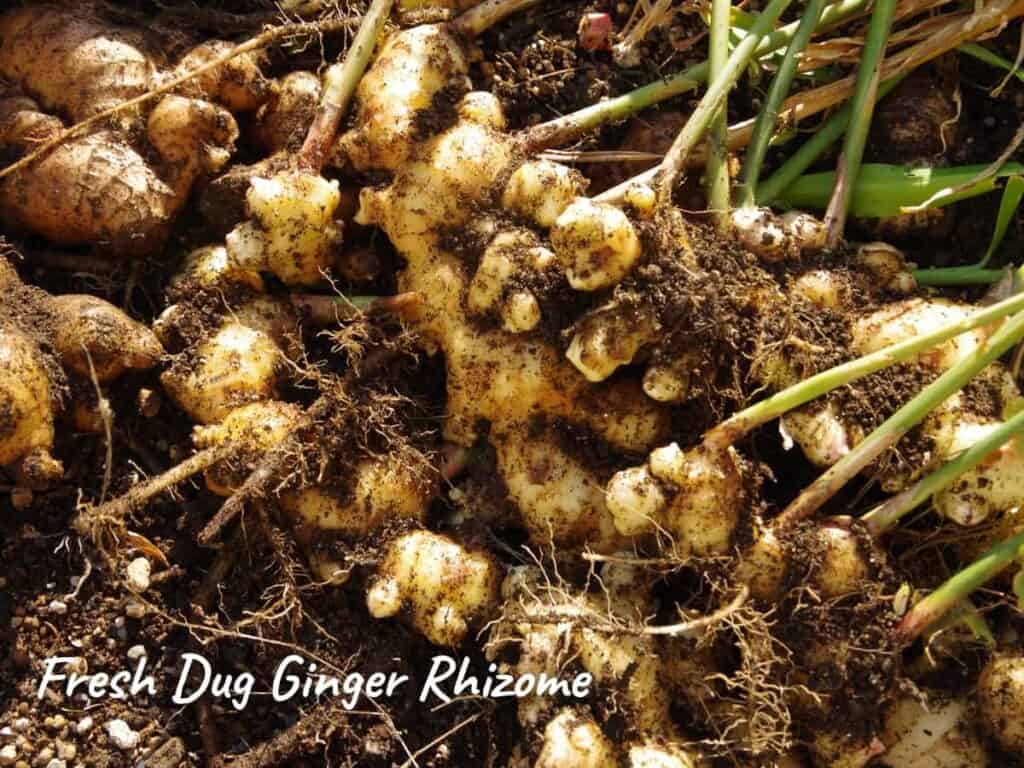
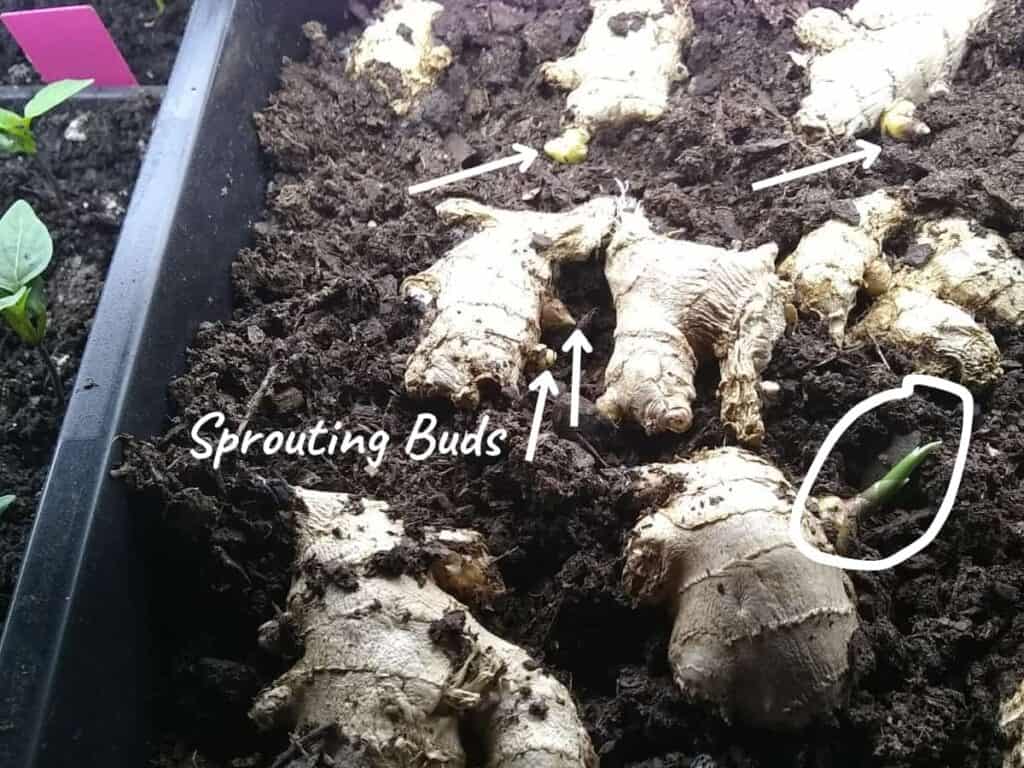
Ginger takes 6-10 months to mature. You can start harvesting part of the rhizome after about 6 months. However, for bigger rhizomes, wait till the leaves stop growing and start to die back. Now the plant is starting to put all its energy back into the root to store it for next season. This is when the ginger is at its most potent. You can just reach down into the soil and cut or break off a piece and use it. Let the rest continue to grow. Or pull the plant out of the ground or container, take what you need and replant the rest.
You’ll find that the fresh harvested ginger has a super thin skin. Not like the ginger you get in the grocery store. It is much more potent and stronger like this, and it looses some of it’s potency in long term storage.
When you’re ready to harvest the whole plant, loosen the soil a little, careful not to nick the ginger, then gently pull it out of the soil. Take as much as you want, remove the leaves from those you’re keeping, and replant one or two stalks with the rhizome to keep it growing.
In hot tropical frost-free zones 9-11, you can keep growing it outside in your garden. Otherwise, just replant in a pot and take it inside for the winter before the first frost, or when temperatures start to fall to near 40 degrees. In this fashion, you can keep it going indefinitely. Harvest anytime throughout the winter and until it starts to sprout in the spring.
Repotting and Dividing When Growing Ginger In Pots
Ginger should be repotted and divided regularly if you’re growing it in pots. Which is easy to do when you want to harvest a portion of it anyways.
Break off a portion to keep in your kitchen. Then give the rest some fresh rich soil, replant it and it will happily keep growing. If your pot is on the small side, the ginger can become root bound and stunted. To avoid this, consider a bigger pot or divide and plant it into two or three pots.
Overwintering
Most ginger plants become dormant in the fall, usually from October till March. After harvesting the ginger you need, repot the rest. Then keep it in a warm and humid place such as a bathroom, laundry room, or kitchen.
To keep the humidity high, you can place the pots on a tray that is filled with marbles, clay pebbles, or gravel. Fill with water to just below the bottom of the pots and the evaporation will keep the area humid.
Keep it warm, but avoid placing the ginger near a heat source.
If the leaves start to die, you can cut them back and use the cuttings for mulch. In the spring the ginger rhizome will send up new shoots.
Troubleshooting
If your leaves are yellowing, it means the plant needs more nutrients. Feed it some diluted Fish or Kelp emulsion or another organic fertilizer that you may have on hand.
When ginger’s leaves are looking dry at the edges or are browning, it isn’t getting enough water. Increase your watering frequency or the amount.
If the soil is too wet, the rhizome can rot. Keep it moist, but not wet and mulch to better retain the moisture.
Your ginger may start to flower, and that is ok. Enjoy its beauty, and taste the flowers, they are edible as well!
Pests And Diseases
I have no experience with pests on ginger so far, and hope it stays this way, but I listed some below that could possibly become an issue:
Fungal Diseases such as rhizome rot and leaf spot blight, as well as ginger blight and anthracnose.
Bacterial Diseases include bacterial wilt and bacterial streak leaf blight.
Insect Pests include thrips, root-knot nematodes, rhizome scale, aphids, ants, chinese rose beetles, and mealybugs:
I found a page that lists pictures and details on pests and diseases as well as tips for dealing with them at Plantvillage.
My Recommendations For Dealing With Pests And Disease:
- I’d use a spray of plain water with a few drops of dishsoap for aphids. However, do not spray soap water during the day, as it can harm the plants if the sun shines on the wet soapy leaves. And take care to spray only when no other beneficial insects are around.
- For prevention practice crop rotation and regular daily watering, while providing good drainage. Plant on a hill or in a raised bed if necessary and avoid low spots where the water could pool.
- Keep good airflow to avoid fungus.
- Lots of organic matter in the soil will help keep the plants healthier and more resistant.
- Planting companions such as nasturtiums, marigolds, garlic etc. is a great way to keeping pests and diseases away or at a minimum.
Remember that any sprays or treatments, organic or not, will also have the potential to harm desirable organisms, not just the ones you want dead. So use care and don’t overuse treatments. Avoid treating during the day when bees visit flowers and spot-treat rather than using broad applications.
Top Companion Plants For Ginger
Plants that ginger loves are: Garlic, Basil, Marigolds, Nasturtiums, Turmeric, and Green Onions.
Plants to avoid are: brassicas and plants of the mint family since they compete for space or nutrients.
Storing And Preserving Ginger
If you keep ginger growing in a pot, you might not need to store it, just take what you need from your plant, replant the rest, and do that again as needed.
Storing it in the refrigerator
When you want to store ginger in the refrigerator, do not cut or peel it. If it’s left whole with the peel on, it can store for several weeks in a paper bag.
I also read that people store it in a ziplock plastic freezer bag with all the air pressed out. I’m not sure how well this works, as I haven’t tried it. But I thought I’d mention it.
Freezing ginger
If you cut too much ginger for your recipe, it will not keep more than a few days in the refrigerator. If you want to preserve it for longer, you can freeze it in ice cube trays.
Just place the grated or chopped ginger into the segments of an ice cube tray and pour a bit of water over it to cover. Freeze and then store the ginger ice cubes in a freezer bag up to 6 months.
You can also freeze ginger whole. When you need it, just grate what you need while frozen and place the rest back into the freezer for later. In fact, it’s easier to grate it frozen than when it’s fresh.
Storing It In Vodka
Another option for storing cut or grated ginger for several weeks is by covering it with vodka or brandy and storing it in the refrigerator. I have not tried this. Let me know in the comments if you have and how it worked for you!
Drying ginger
Slice thinly and dry in a warm location with good airflow, or in the sun. I like to dry my herbs in a non-electric hanging drying rack such as this. It can be hung outside under a tree during the day and then I can bring it in at night.
Once dry, you can store the chips in a jar and use them as is to make a warming ginger tea in the winter. Ginger should be made by simmering the roots for about 15 minutes and then letting it steep for another 10-15 minutes. It’s super tasty just on its own, or sweeten with honey. I often add dried turmeric as well. with some fresh ground black pepper.
You can also take those ginger chips and grind them in a coffee or spice grinder as needed to make your own ginger powder for cooking and baking. It’s much more flavorful when you grind it fresh.
Fermenting Ginger
Fermenting ginger is one of my favorite ways to preserve ginger. I like to finely grate or chop it, add salt and ferment it for a few weeks. Then it can be stored in the refrigerator or a cool cellar for a very long time. The best thing about it is that fermenting adds probiotics, increases the benefits and nutrients of ginger and makes ginger easier to absorb in your body. Lacto-fermenting ginger and other vegetables is great for your gut and your immune system. Lots of wins!
Your Questions Answered
What can I do with ginger?
I love to make ginger tea, find the recipe in the drying ginger paragraph. Ginger is an amazing medicinal plant and you can learn about its benefits and how to make a cough syrup on my fermented ginger honey page.
You’ll also find the health benefits of ginger on my page of benefits of ginger beer.
In the heat of summer, make some quick and easy refreshing ginger ale. If you want a super delicious probiotic drink, brew yourself some ginger beer, using a ginger bug. It’s super easy and tastes awesome!
Make a ginger switchel for summer hydration and as an effective sports drink.
Add ginger to fire cider for cold and flu season.
And it’s so good in spice breads such as sweet potato bread.
How long does it take to grow ginger?
It takes 8-10 months to get mature ginger. But it can be harvested sooner if you need it. You can start harvesting after around 6 months.
Can I plant ginger from the grocery store?
You can try, however, commercial ginger is often irradiated or bathed in chemicals that are meant to keep ginger from sprouting and to prolong shelf life. If you see any ginger that shows signs of sprouts growing, definitely pick those, they should work.
For your best odds, try to find organic ginger. If you cannot locate any organic ginger, then wash your grocery store ginger thoroughly and soak it for 24 hours in non-chlorinated water. Discard the water and hopefully that will help your ginger to sprout.
Does ginger come back every year?
Yes, ginger is a perennial plant. You’ll need to ensure to keep it from freezing. In fact you’ll want to keep the temps above 40 degrees. Then just harvest and replant as much as you like to keep the plant growing indefinitely.
What not to plant with ginger?
Other heavy feeders such as cabbages and aggressive growers such as mints and sunchokes, are best not planted near ginger as they compete for food and space.
Does ginger like full sun or shade?
Ginger prefers dappled shade, such as it would have when growing on a rainforest floor.
Have Fun Growing Ginger!

As you can see, it’s super easy to grow ginger and it’s so rewarding. I love growing ginger and I love to use the fresh rhizomes in cooking, baking, teas and preparations for healing. Give it a try and I’m certain that you’ll love growing ginger too!
Let me know in the comments below if you have grown your own ginger and what is your favorite way to use ginger! And if you have any questions about growing and using ginger, please do ask, and I’ll answer as soon as I can.
Dont forget to like this page, subscribe, and save it for later. I’d be thrilled to have you part of my Food For Life Garden Community. Sign up today and you’ll get notified of new content each week as well as tips for homesteading !
More Content Like This
How to make 18-day compost The best compost for your garden beds in less than 3 weeks.
Grow your own peppers from seeds – Your complete guide to growing peppers. From selecting seeds to planting, growing, companion planting, and harvesting. Find out the benefits of growing your own peppers and how to preserve them.
How To Grow Garlic – What to do to get big and healthy garlic bulbs. When and how to plant and harvest.
How to Grow Celery From Seed To Harvest – All about the celery. If you want to grow it for bulbs, stalks, leaves or seeds. This post has you covered.
How to grow onions from seed – Learn all about growing onions from seed to harvest and how to prepare them for long term storage. Plus how to choose the right varieties!
25 Essential Herbs To Plant – Start your home apothecary garden with these 25 powerful allies for your health. Learn their benefits, how to grow them and where to source them.
Grow mushrooms at home in your garden This is one of the most rewarding experiences in wood chip gardening. Grow your own mushrooms intentionally. It’s easy and they taste so delicious!
Probiotic Ginger Paste – A convenient way to have ginger on hand when you need some, either as seasoning in cooking or baking, or to use this powerful ally in your daily health routine.
Fermented Ginger Honey – Keep this potent fermented health food on hand. Use the powers of Ginger and Honey in a tasty syrup form that you’ll love.
Fire Cider Recipe – Get your fire cider recipe and make this tonic to be ready for cold and flu season!
Ginger Switchel Recipe – A refreshing electrolyte drink for hydration during summer activities.
Health benefits of ginger beer Learn all about the awesomeness of ginger.
Ginger bug recipe puts exciting fizzy sodas on your table! Meet my friend the ginger bug and learn how to get one started for yourself.
Shop This Post
Heating pad with a thermostat
Grow lights
Ginger Sources
Fedco Seeds for nursery stock
Azure Standard has organic ginger
Hawaiian ginger plants
Awapuhi shampoo ginger
Growing Ginger Is Super Fun, Easy And Rewarding!
Equipment
- 1 Bowl for soaking the ginger
- 1 pot or shallow tray for sprouting the ginger
- 1 large pot to transplant the ginger
- A humidity dome use a plastic bag or cling wrap to lay over the sprouting pot or tray
Materials
- 1 piece ginger rhizome
- 1 spray bottle with water
- 1 heat mat (optional)
- grow light (optional)
Instructions
How To Sprout Ginger
- If your ginger is a large hand, you'll want to separate some fingers for planting. They should be a good size finger, several inches long with several buds. Larger pieces grow faster and yield more. Let the cut heal for a day or two before planting.
- If you have plump and juicy ginger, you can skip this step. However if your ginger is a bit older, dry, non-organic, or otherwise not prime, soak it in clean filtered, non-chlorinated water for about 24 hours. This will help get it primed for sprouting.
Planting Ginger
- Fill a shallow dish or pot with some lightly moist peat moss or seed starter mix.
- Plant it in the soil with the buds pointing up. Cover with a little soil or peat. Keep this lightly moist, but not soaking wet.
- Place this on a heating mat or in a warm location over 70 degrees until the ginger starts to sprout. Cover with plastic wrap or a humidity dome.
- After a month or so, you'll see a green spike emerging from a bud. At this point, place your ginger under grow lights.
Choosing Your Location For Growing Ginger
- Ginger loves it hot, but, especially if you're growing ginger in the south, you will want to give it dappled shade or partial shade at least during the hottest part of the day, which is normally in the afternoon.
- If growing it indoors, a window, that gets an hour or two of direct sun during the early part of the day is ideal.
Transplanting The Ginger Into Pots
- Once your ginger has grown a shoot that's a few inches tall, take it out of your sprouting tray and transplant it.
- Fill your pot with potting soil and homemade compost, peat moss and compost, or fine natural pine bark with compost. Go heavy on the compost.
- Bury your ginger a couple of inches deep. Keep the soil moist but not wet. Mist it with a spray bottle every few days.
- Now let it grow until you need to transplant it again.
- This can be out into your garden, a greenhouse in the ground, or into a large 12"-18" wide and shallow pot or growbag, which you can keep inside your greenhouse or place outside.
Transplanting Outside Into Your Garden
- Harden off your ginger plant for a week by placing it outside for a short time on day one and increasing outside time each day.
- Wait till the soil and night temperatures have warmed to 55 degrees before you transplant the ginger into your garden beds.
- Add compost to your planting site and loosen the soil.
- Space the ginger roots 8-12 inches apart and plant 2-3 inches deep.
- After the ginger grows a few inches tall, you can hill the soil up a little around the plant and mulch the area to retain soil moisture and keep the weeds down.
- Hilling around your ginger as you see pink parts of the rhizome surface, will help encourage more rhizomes to form, just like with potatoes.
- Ginger can grow 3-4 feet tall and spread about 1-2 feet wide.
Irrigation
- Be sure to keep the soil moist throughout the growing season with regular, daily watering. And it helps to retain moisture when you mulch with a layer of pine bark, grass clippings, chopped leaves or wood chips.
Fertilizing
- Use organic fertilizer. Watering with a diluted fish or kelp emulsion is a great organic fertilizer option about once a month. If growing it in the ground, you can side-dress with compost throughout the season.
Harvesting Ginger
- Ginger takes 8-10 months to mature. You can start harvesting part of the rhizome after about 6 months. For bigger rhizomes, wait till the leaves stop growing. Just reach into the soil and cut or break off a piece and use it. Let the rest continue to grow. Or pull the plant out of the ground, take what you need and replant the rest.
- When you're ready to harvest the whole plant, loosen the soil a little, careful not to nick the ginger, then gently pull it out of the soil. Take as much as you want and replant one or two stalks with the rhizome attached to keep it growing.
- In hot tropical frost-free zones 9-11, you can keep growing it outside in your garden. Otherwise, just replant in a pot and take it inside for the winter before the first frost, or when temperatures start to approach 40 degrees.
Repotting and Dividing When Growing Ginger In Pots
- Ginger should be repotted and divided regularly if you're growing it in pots. Which is easy to do when you want to harvest a portion of it anyways.
- Break off a portion to keep in your kitchen. Then give the rest some fresh rich soil, replant it and it will happily keep growing. If your pot is on the small side, the ginger can become root bound and stunted. To avoid this, consider a bigger pot or divide and plant it into two or three pots.
Overwintering
- If you're growing ginger in the North, a sunny location helps to keep it warm enough, and don't mulch too deeply so the soil can warm up.
- If you’re planning to plant the ginger outdoors once it gets hot outside, then you can just plant it in a smaller one or two gallon pot for now and later transplant it outside or into a bigger pot or a grow bag.
- Ginger can grow 3-4 feet tall and spread about 1-2 feet wide.
Transplanting The Ginger
- Most ginger plants become dormant in the fall, usually from October till March. After harvesting the ginger you need, repot the rest. Then keep it in a warm and humid place if possible.
- To keep the humidity high, you can place the pots on a tray that is filled with marbles, clay pebbles, or gravel. Fill with water to just below the bottom of the pots and the evaporation will keep the area humid.
- Keep it warm, but avoid placing the ginger near a heat source.
Troubleshooting
- If your leaves are yellowing, it means the plant needs more nutrients. Feed it some diluted Fish or Kelp emulsion or another organic fertilizer that you may have on hand
- When ginger's leaves are looking dry at the edges or are browning, it isn't getting enough water. Increase your watering frequency or the amount.
- If the soil is too wet, the rhizome can rot. Keep it moist, but not wet and mulch to better retain the moisture.
- Your ginger may start to flower, and that is ok. Enjoy its beauty, and taste the flowers, they are edible as well!
Pests And Diseases
- I have no experience with pests on ginger so far, and hope it stays this way, but I listed some below that could possibly become an issue:
- Fungal Diseases such as rhizome rot and leaf spot blight, as well as ginger blight and anthracnose.Bacterial Diseases include bacterial wilt and bacterial streak leaf blight.Insect Pests include thrips, root-knot nematodes, rhizome scale, aphids, ants, chinese rose beetles, and mealybugs:
- I found a page that lists pictures and details on pests and diseases as well as tips for dealing with them at Plantvillage.
My Recommendations For Dealing With Pests And Disease:
- Remember that any sprays or treatments, organic or not, will also have the potential to harm desirable organisms, not just the ones you want dead. So use care and don't overuse treatments. Avoid treating during the day when bees visit flowers and spot-treat rather than using broad applications.
- I'd use a spray of plain water with a few drops of dishsoap for aphids. However, do not spray soap water during the day, as it can harm the plants if the sun shines on the wet soapy leaves. And take care to spray only when no other beneficial insects are around.
- For prevention practice crop rotation and regular daily watering, while providing good drainage.
- Plant on a hill or in a raised bed if necessary and avoid low spots where the water could pool.
- Keep good airflow to avoid fungus.
- Lots of organic matter in the soil will help keep the plants healthier and more resistant.
- Planting companions such as nasturtiums, marigolds, garlic etc. is a great way to keeping pests and diseases away or at a minimum.
Top Companion Plants For Ginger
- Plants that ginger loves are: Garlic, Basil, Marigolds, Nasturtiums, Turmeric, and Green Onions.
- Plants to avoid are: brassicas and plants of the mint family since they compete for space or nutrients.
Storing And Preserving Ginger
- If you keep ginger growing in a pot, you might not need to store it, just take what you need from your plant, replant the rest, and do that again as needed.
- Storing it in the refrigeratorWhen you want to store ginger in the refrigerator, do not cut or peel it. If it's left whole with the peel on, it can store for several weeks in a paper bag. I also read that people store it in a ziplock plastic freezer bag with all the air pressed out. I'm not sure how well this works, as I haven't tried it. But I thought I'd mention it.
- Freezing gingerJust place the grated or chopped ginger into the segments of an ice cube tray and pour a bit of water over it to cover. Freeze and then store the ginger ice cubes in a freezer bag up to 6 months.You can also freeze ginger whole. When you need it, just grate what you need while frozen and place the rest back into the freezer for later. In fact, it's easier to grate it frozen than when it's fresh.
- Storing It In AlcoholAnother option for storing cut or grated ginger for several weeks is by covering it with vodka or brandy and storing it in the refrigerator. I have not tried this. Let me know in the comments if you have and how it worked for you!
- Drying gingerSlice thinly and dry in a warm location with good airflow, or in the sun. I like to dry my herbs in a non-electric hanging drying rack such as this. It can be hung outside under a tree during the day and then I can bring it in at night. Or you can use a dehydrator.Once dry, you can store the chips in a jar and use them as is to make a warming ginger tea in the winter. Ginger should be made by simmering the roots for about 15 minutes and then letting it steep for another 10-15 minutes. It's super tasty just on its own, or sweeten with honey. I often add dried turmeric as well. with some fresh ground black pepper.You can also take those ginger chips and grind them in a coffee or spice grinder as needed to make your own ginger powder for cooking and baking. It's much more flavorful when you grind it fresh.
- Fermenting GingerFermenting ginger is one of my favorite ways to preserve ginger. I like to finely grate or chop it, add salt and ferment it for a few weeks. Then it can be stored in the refrigerator or a cool cellar for a very long time. The best thing about it is that fermenting adds probiotics, increases the benefits and nutrients of ginger and makes ginger easier to absorb in your body. Lacto-fermenting ginger and other vegetables is great for your gut and your immune system. Lots of wins!
Ideas To Use Ginger
- Ginger is an amazing medicinal plant and you can learn about its benefits and how to make a cough syrup on my fermented ginger honey page.
- In the heat of summer, make some quick and easy refreshing ginger ale.
- If you want a super delicious probiotic drink, brew yourself some ginger beer, using a ginger bug. It's super easy and tastes awesome!
- Make a ginger switchel for summer hydration and as an effective sports drink.
- Add ginger to fire cider for cold and flu season.
- And it's so good in spice breads such as sweet potato bread.
- Make a ginger tea.
Notes
Have Fun Growing Ginger!
As you can see, it’s super easy to grow ginger and it’s so rewarding. I love growing ginger and I love to use it in cooking, baking, teas and preparations for healing. Give it a try and I am certain you will love growing ginger too!Pin This Post
You’ll love to have your own fresh ginger, whether you grow it in a container or in your garden. It’s so much better than the aged ginger you get from the store. Don’t hesitate to ask if you have any questions about growing ginger right here in the comments!
This is very interesting! We’ve never tried growing ginger, but we might this year. Thanks for all of this information!
You’re welcome! I hope you get to try it this year!
I’m going to have to get back to this article when I have more time to thoroughly read! What a cool article! I know about ginger’s benefits but it tastes so strongly haaa not easy to ingest hahaha
It can, you’re right! I’ve been drinking ginger tea for many years and I kind of enjoy the strong taste, but I know it’s not everyones cup of tea. It is very healthy though!
Perfect timing! We are adding ginger to our garden this year and this is tge perfect growing guide! Thanks, Heidi! Awesome as usual!😁
Thank you so much for commenting, Penny! I’m excited that you’ll be growing ginger. I hope you love it as much as I do!
This is neat! I’ve never considered growing ginger before but I have seen that shampoo plant! I didn’t realize it was a type of ginger.
Now, I think we’ll try growing ginger. Thanks for expanding my horizons!
Thanks for commenting Hayley. That shampoo plant is such an odd and fascinating plant, I think. I hope you have success growing ginger!
Always wanted to try growing ginger, this is great!!
Thanks so much for your comment and I hope you get to grow ginger soon!
Wow, thank you very much for sharing all these information. We love ginger and I’ll certainly have to try to grow my own now that I know how 🙂
I’m glad if this helped and I hope you get to try is soon! Thanks so much for stopping by and for your comment!
This is such great info. I’m super interested in trying to grow my own ginger now. I had never thought about it before, but we use it fairly regularly!
It’s not your common garden plant, that’s for sure, but growing ginger is fun. I think you’ll enjoy it!
Thank you for this amazing info! I want to try this out!
That’s awesome, Chelsea! I hope you get to try it!
I knew about awapuhi but I didn’t know it was a ginger plant! And your freshly harvested ginger looks so beautiful, I have never seen ginger look like that. Your ideas for ginger companions are so helpful, I really want to start a garden but it is scorchingly hot where I live, thinking of starting with some herbs. But for how much I use ginger and all its benefits I should probably throw some of that in there too!
That would be very cool. Ginger loves the heat, and if you give it some shade, I think it will love to grow where you are.
I love cooking with ginger but I’ve never tried growing it up here in Canada. I’m inspired to try now, thanks!
I’m glad to have inspired you! It grows really well in a pot, so I would give it a try!
I’ve been consuming ginger daily either in food or drink. This is so helpful!!
I’m glad you found this helpful! Ginger is such a fantastic herb!
Oh, I’m SO excited about trying to grow ginger!! Never tried this before and I love ginger. Thank you so much for your in depth post. Very helpful!
I hope you get to try it! It’s such a cool plant to grow. Glad you found this helpful.
I had honestly never considered growing my own ginger but now I can’t wait to try! Thank you for this super informative article.
You’re very welcome, Amelia! I’ glad you found this helpful and I hope you get to try growing your own ginger!