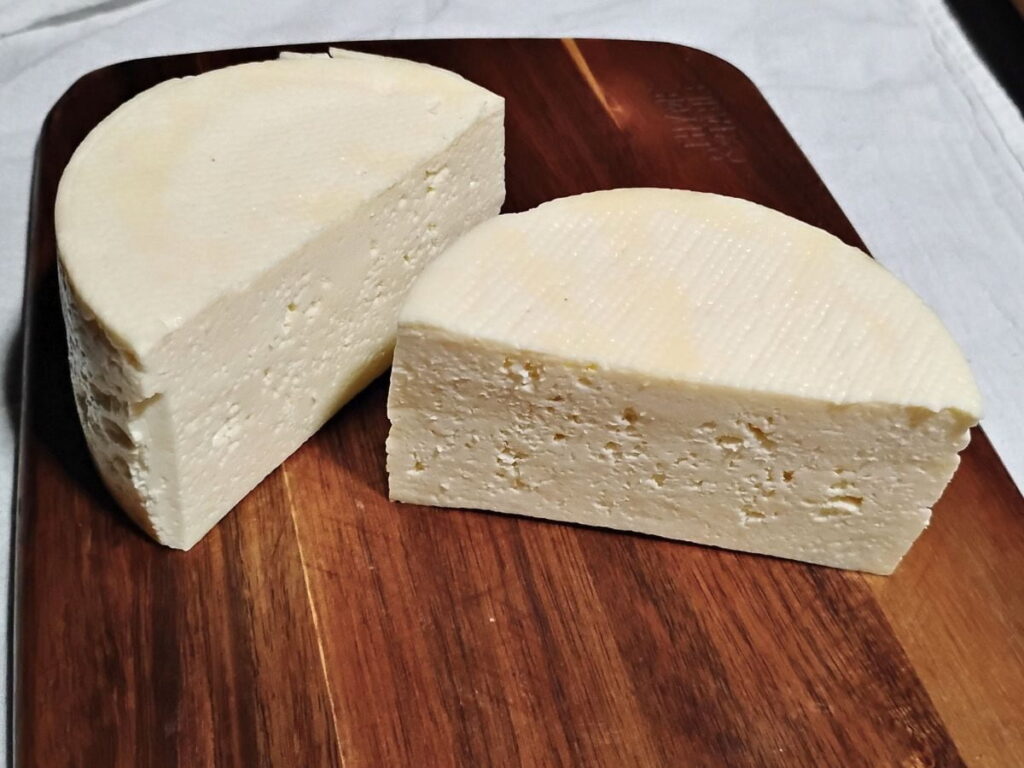
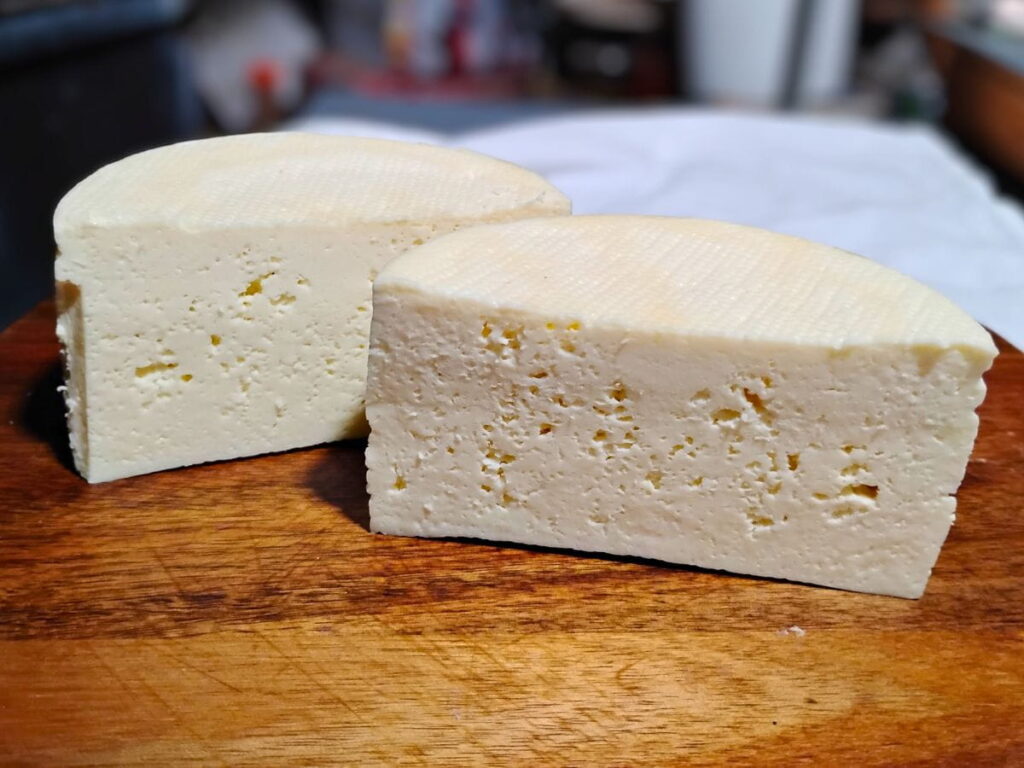
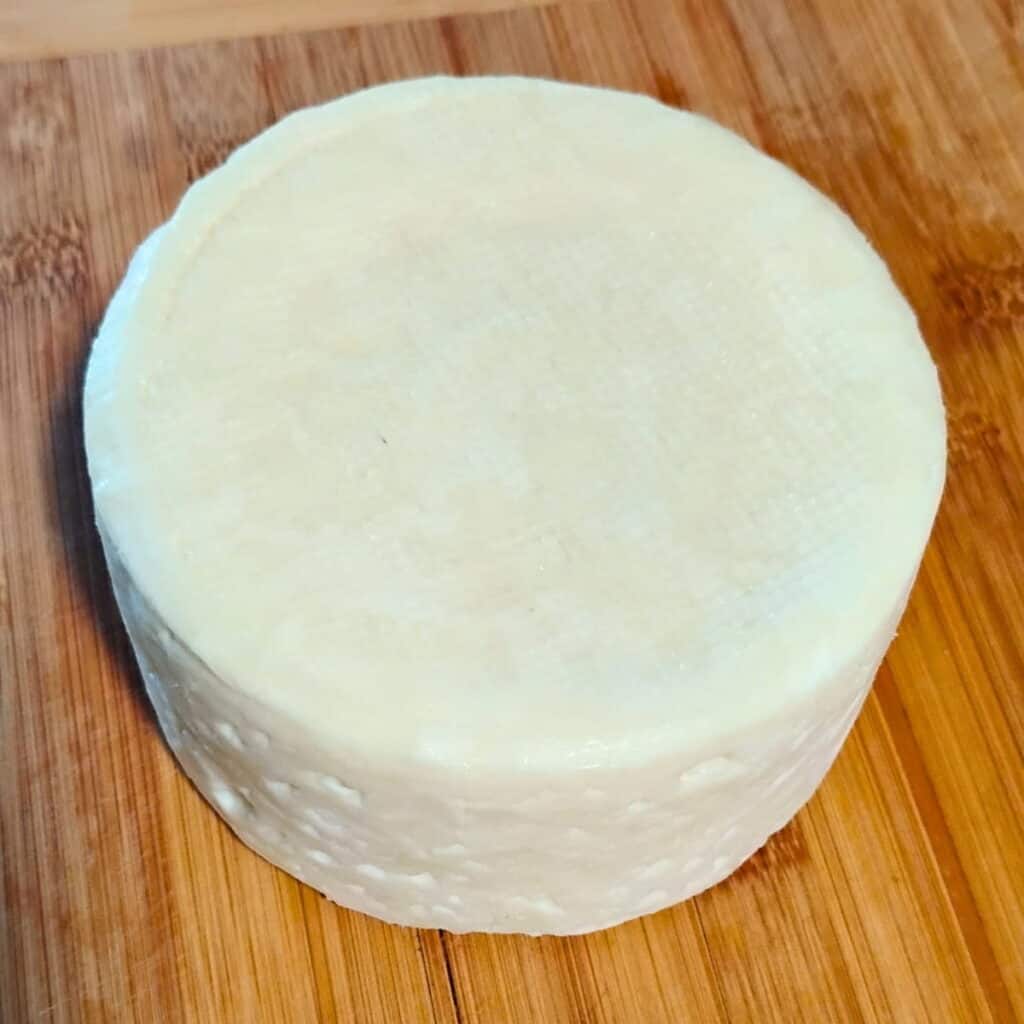
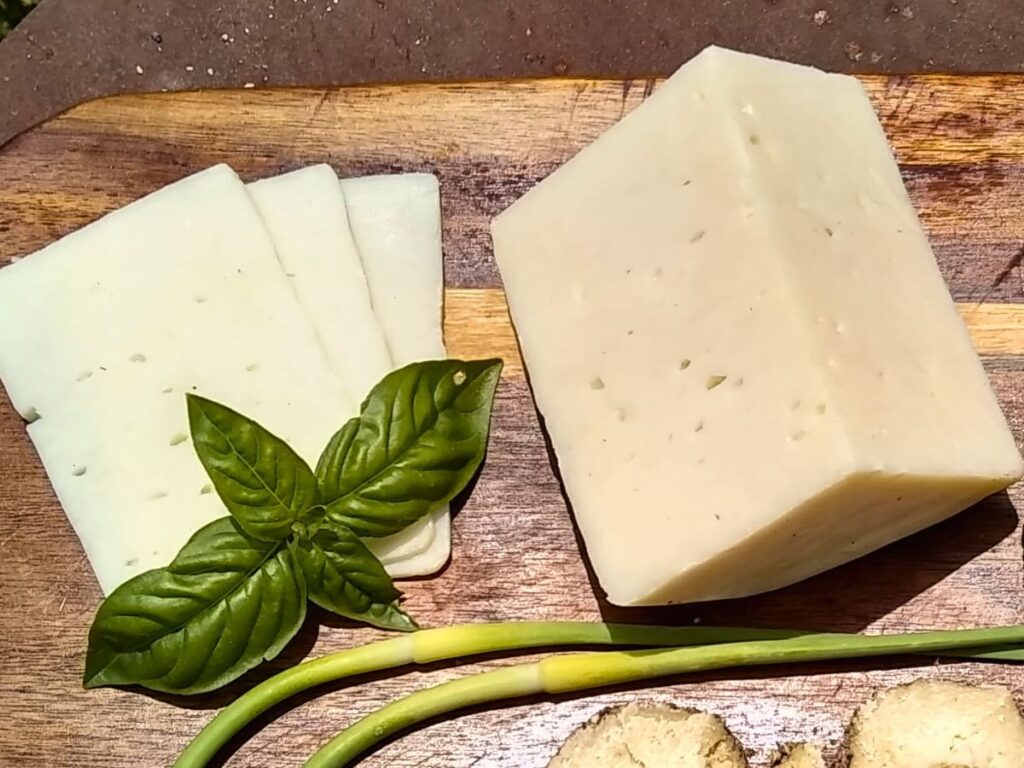
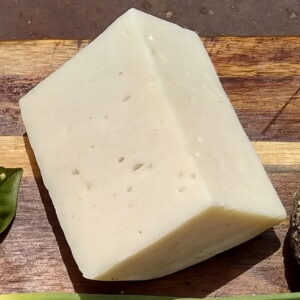
Bel Paese Cheese is a delicious semi-soft slicing cheese that can be made without a cheese press and ripened and aged in the refrigerator.
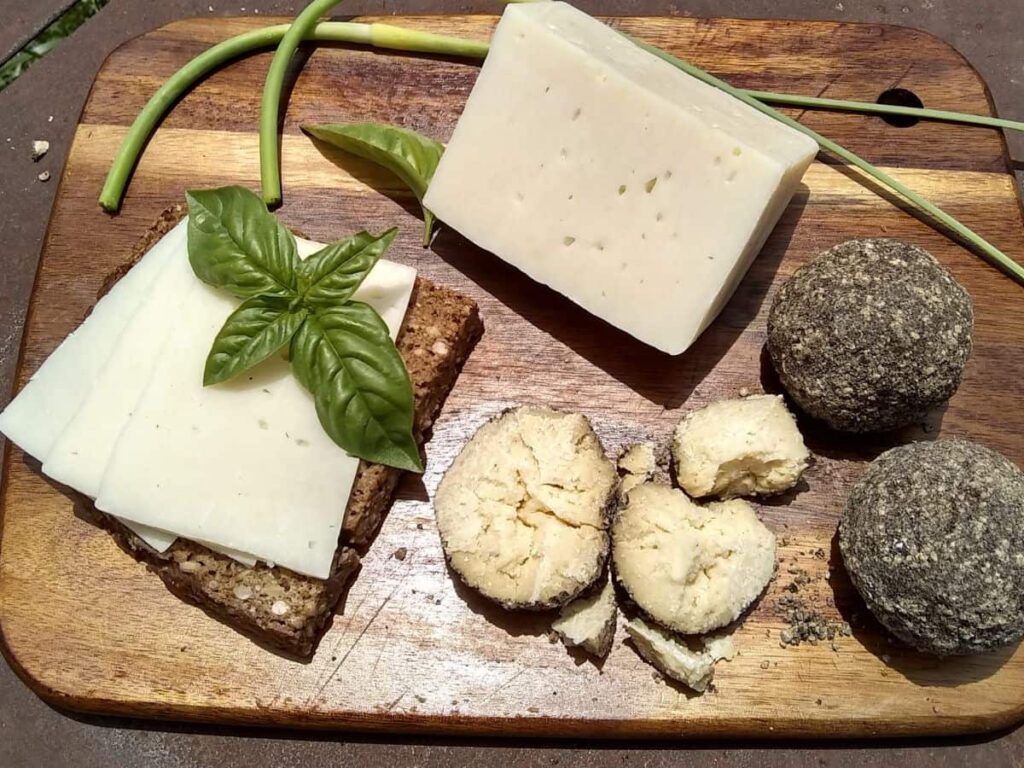
Of all long-ripened cheeses I’ve made, I use this one the most for slicing and layering on sandwiches or just plain eating on a slice of Rye bread. I also use it in place of mozzarella on pizza and pasta much more often than mozzarella itself. It’s less fickle to make and can be aged in the back of your fridge for months and years, ready to pull out when you need some cheese.
Bel Paese cheese has a mild flavor after 2 weeks, but can get piquant when it’s made from goat’s milk and after you let it age for several months. I’ll describe my way of making it with raw goats milk, but I’ll make notes along the way for those of you who can only get pasteurized cow’s milk. I think you’ll absolutely adore this lovely cheese and wouldn’t be surprised if you’ll make it again and again. So here is how to make Bel Paese cheese!
Learn how to make your own Cheese Starter Cultures from raw milk! If you love this cheese, you might want to try my recipes for feta cheese, an easy Soft Feta, or a Bulgarian Sirene. And for all you goat cheese lovers, I’ve got a great recipe for Chevre Cheese from scratch. Discover Clabber Cheese, the original cheese, and my favorite, German Quark Cheese to make outrageously delicious and healthy desserts and awesome cheesecakes. New: Learn how to make a Cheese Culture With Sourdough Starter from scratch. No raw milk required!
- Bel Paese Cheese (Italico), The Beautiful Country Cheese
- Why You’ll Love This Bel Paese Cheese
- Tips To Make The Best Bel Paese Cheese At Home
- How To Make The Best Bel Paese Cheese
- Storage
- How To Use Bel Paese Cheese
- Your Questions Answered
- Enjoy Your Delicious Bel Paese Cheese, The Beautiful Country Cheese!
- Other recipes you might like
- Pin This Recipe For Later
- Shop This Post
- Recipe Card
This post contains affiliate links. As an Amazon affiliate, I make a small commission at no extra cost to you if you make a qualifying purchase. See my full disclosure here.
Bel Paese Cheese (Italico), The Beautiful Country Cheese

Bel Paese cheese was invented in 1906 by Egidio Galbani in the Italian Lombardi region near Milano, in a town called Melzo. It wanted to create an everyday cheese that would compete with the alpine cheeses of Switzerland and France. It was a hit and today this cheese is famous and produced all over Italy and even in the United States.
Bel Paese means ‘beautiful country’. It is normally made with cow’s milk, but I love the results from making it with raw goat’s milk. I’ll describe my favorite way for making it with raw milk here, but I’ll also mention how you can make it from cow’s milk, raw or pasteurized.
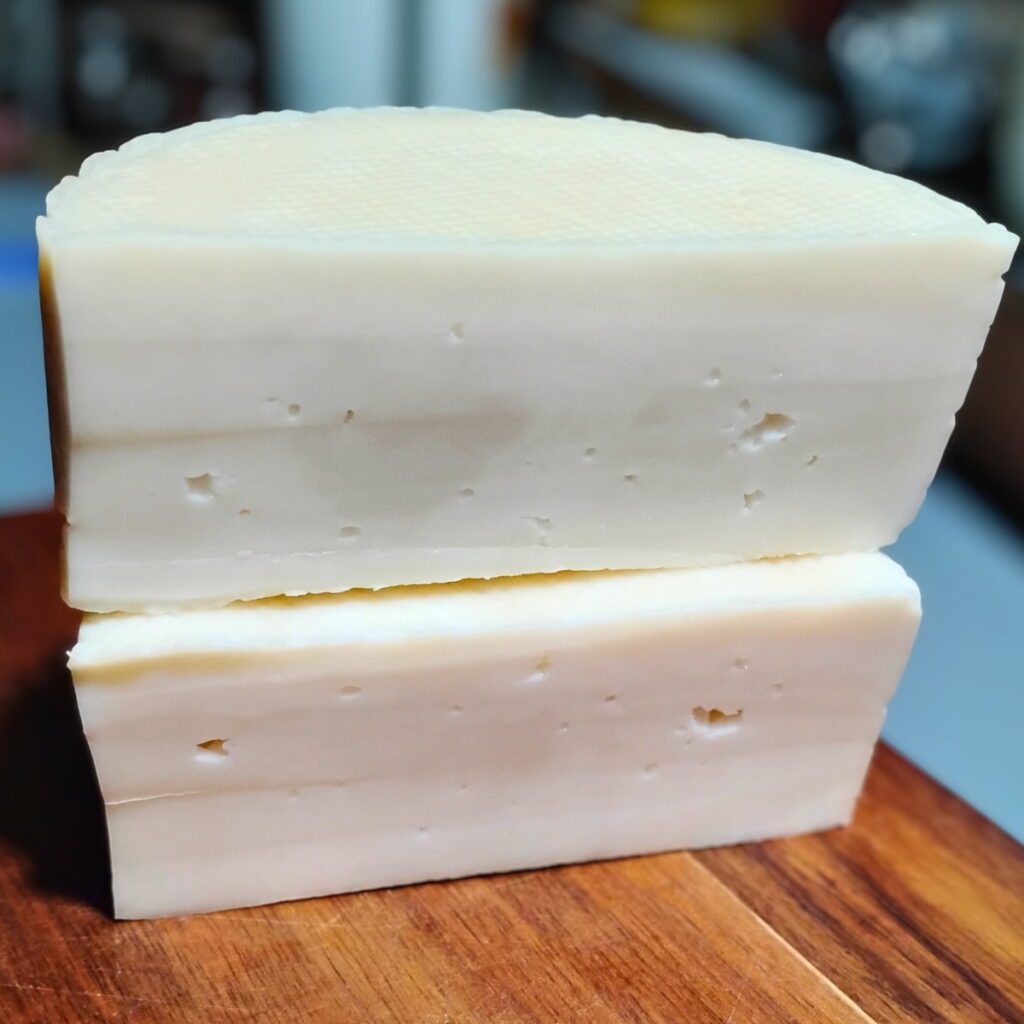
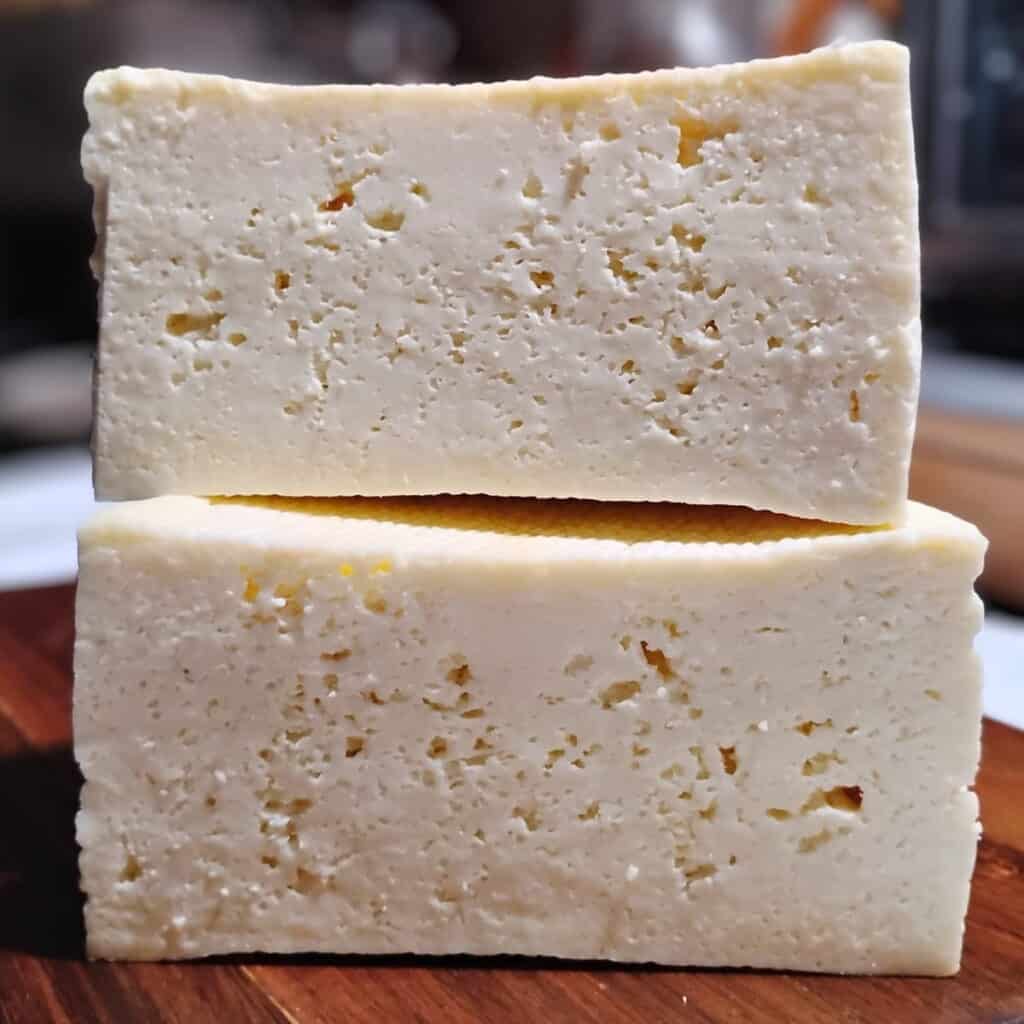
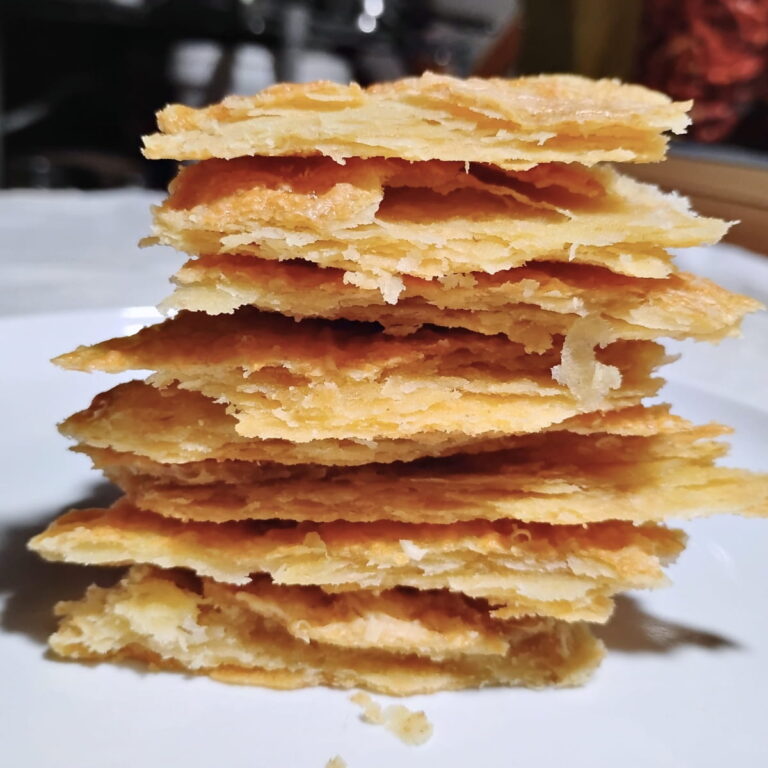
Bel Paese is one of those go-to cheeses that fit almost any application. It’s mild enough to be enjoyed by picky eaters, but it can get quite flavorful after several months of aging. The semi-soft texture, creaminess, and mild flavor is comparable to mild provolone cheese in my opinion, or German Buttercheese. And its meltiness is wonderful on pizza and pasta as well as panini sandwiches.
It’s perfect too on cold Italian sandwiches with some Salami or prociutto and I love a few slices on toasted Rye bread with fried eggs on top so it semi-melts.
You can also try to cut some cubes, roll them in spice, and marinate them. I actually just thought of this now, and never tried it, but now I’m eager! If I get to it, I’ll update this and let you know how it went. If you beat me to it, by all means, leave a comment for us and let us know what you think! I do feel that it’s best to age it for at least a month before adding it to oil.
Why You’ll Love This Bel Paese Cheese
- It’s a deliciously mild and creamy everyday cheese that tastes fantastic!
- You’ll love the semi-soft texture of it!
- Bel Paese is so easy to make compared with many other cheeses. It requires less hands on time and once you have it draining, it will just need occasional maintenance.
- This is such a versatile all around, everyday cheese. It can be a substitute for many other cheeses such as provolone, alpine, mozzarella, fontina, and cheddar cheese.
- And you’ll appreciate that it can live in your refrigerator instead of a cellar or cheese cave. That makes it accessible for pretty much anyone who wants to make cheese.
- I would consider this a beginner cheese, although it requires a few more advanced techniques, but nothing too wild and it’s a perfect first step to get acquainted with hard cheese making, without the need for any special equipment.
- This cheese will have probiotic cultures (yogurt type thermophilic cultures and mesophilic cultures) and it get’s heated to just over 100 degrees, but it remains raw and it will have the benefits of live cultures and gut-healing properties. Even if you use pasteurized cow’s milk, you’ll repopulate that dead milk with living cultures and that will greatly improve its value. It can’t bring back all that gets destroyed during pasteurization, but it sure will improve the milk.
- This cheese can age for years and once you make it and seal it up, you can keep it in the back of your fridge. Then when you clean out your fridge 3 years later and find it in hiding, it will still be good to eat. A little more mature, but delicious and with lots of extra character.
Tips To Make The Best Bel Paese Cheese At Home
- If you’re using Pasteurized milk, I recommend that you add calcium chloride to your milk. Pasteurization not only kills the good bacteria, but it also breaks the calcium in the milk and denatures proteins. For best results, add some calcium back in to provide better structure and cohesiveness in the curd. It can also improve the yield of any milk, but it is not necessary for raw milk.
- Flip your cheese shortly after pouring it into the mold. I like to flip mine for the first time after 10 minutes for a better texture in the cheese. After that every half hour for the next 2 hours and then once or twice more.
- This cheese normally gets brined after forming and draining. If you prefer, you can just salt it instead, because it’s so small. That means covering it generously with salt on all the surfaces, flipping after a few hours and reapplying salt. You can do this overnight. Then let it dry for another day or two at room temperature, flipping it occasionally. This method is sensible if you’re just starting out and are not planning on making a bunch of cheeses yet.
- I prefer using a saturated brine, because your brine can be reused over and over, and it’s worth having it if you make cheese often. Make it once and just keep using it. You will waste less salt and it makes less mess. I pour my brine into half gallon canning jar and keep it in the fridge. Then I pour it into the brining container when I have a cheese to salt.
Seasoned cheesemakers keep their brine for decades and claim it gets better and it becomes somewhat of a prized possession, much like an aged sourdough starter. It takes a lot of salt, but as long as you don’t dump it out, it’s not wasted. If you’ll never make cheese again, use this salt solution by the spoonful and add it as seasoning to bread, baked goods, soup, marinades, meat brines, etc.
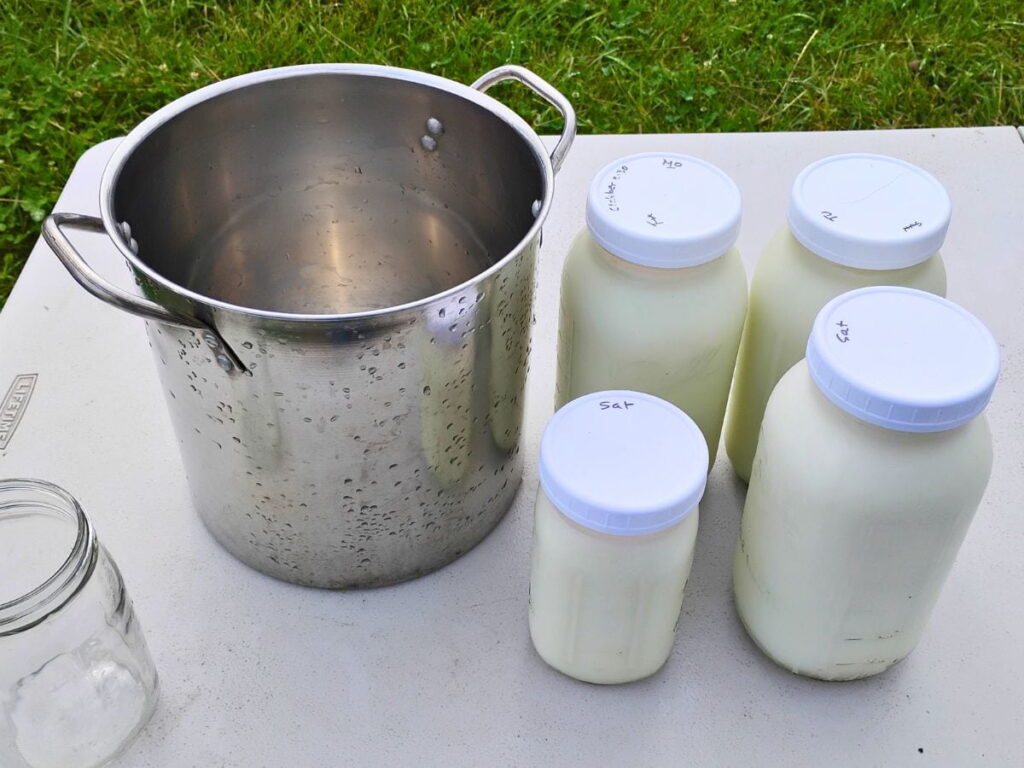
- My instructions call for 2 gallons of milk. 2-4 gallons is my favorite amount of milk for this cheese. While you could make it with 1 gallon, it’s really not worth all the trouble and cheese ages better when the loaf is bigger. You could make a huge batch, but I find that it’s more convenient to have smaller loafs of this in the fridge for stashing and for using. 8 gallon batches make some huge 7 pound loafs that are a bit hard to find room for when you don’t have a root cellar and limited fridge space!
- Maintenance: Flip the cheese after it goes into the refrigerator to age once a day for a week and then about 2-3 times for the weeks thereafter. Once it develops a greasy film, wipe it with salted brine, vinegar or wine every few days. It’s good to eat after 2 weeks, but it’s best to wait about a month. For long term storage, I vacuum pack my cheese, but you can also wax it. Then stash it away in your fridge. Turn it once every few weeks.
Rennet
Use organic animal rennet if possible. Avoid “Vegetable” or “microbial” rennet also called Fermentation Produced Chymosin (FPC). In the U.S. cheese is most often made with genetically modified organisms, molds, or fungi that are lab-grown on GMO soy or corn bases. In fact, 80-90% of cheese you buy in the store is made with genetically modified, manufactured microbial rennet.
Regular animal rennet is most often clean, but can also be made with genetically altered or manufactured materials, and the label does not need to reveal any of this. Honestly, I’d stick with organic or at least a non-GMO product.
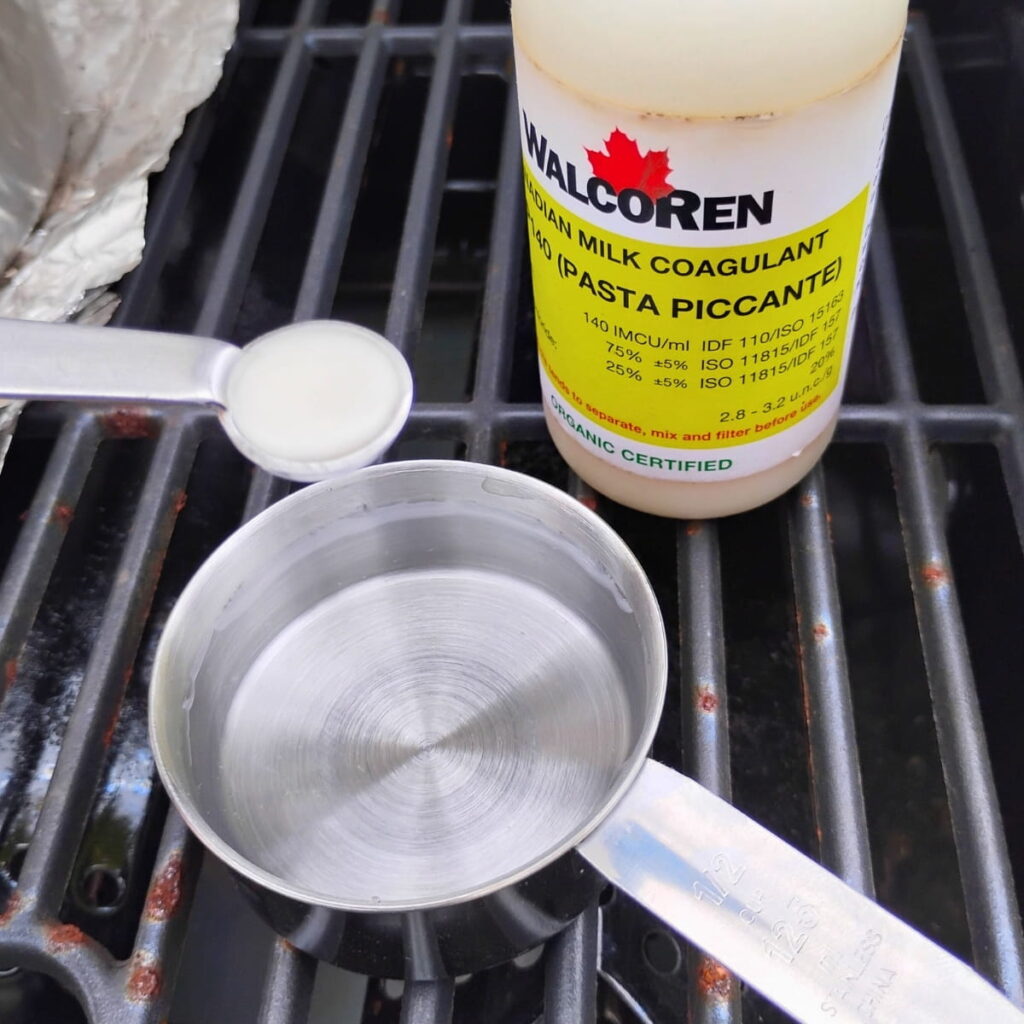
My go-to rennet is from Walcoren. It’s made the old-fashioned, traditional way from kid or sheep abomasum and it’s all natural and organic. You can find it in liquid or tablet form. I use the Walcoren Organic Kid Rennet and they also make Lamb Rennet. I have had mine for years and it still works. One jar will last a very long time in your refrigerator and if you plan to make cheese regularly, it’s a must-have item in any case.
Another option is this clean-ingredient, no-GMO animal rennet. It’s a high quality rennet in a smaller size bottle and therefore cheaper. I have used this for many years in the past before I found Walcoren.
Aged cheeses are best made with animal rennet and not vegetable rennet, since vegetable rennet can impart off-flavors as the cheese ages. Vegetable rennet is not traditional for cheesemaking, but it can work. If you must go with vegetable rennet you can try a thistle based rennet that is made with clean ingredients, or make your own from bull thistle stamen, but be aware that your cheese might turn out bitter, especially if you use cow’s milk or age your cheese for more than a couple of months. Here is an Organic Microbial Vegetable Rennet, which is lab made and fungus based, but not GMO. It has some good reviews.
If you’re using pasteurized milk, increase the rennet to 1/2 tsp!
Starter Culture
Raw Milk Options
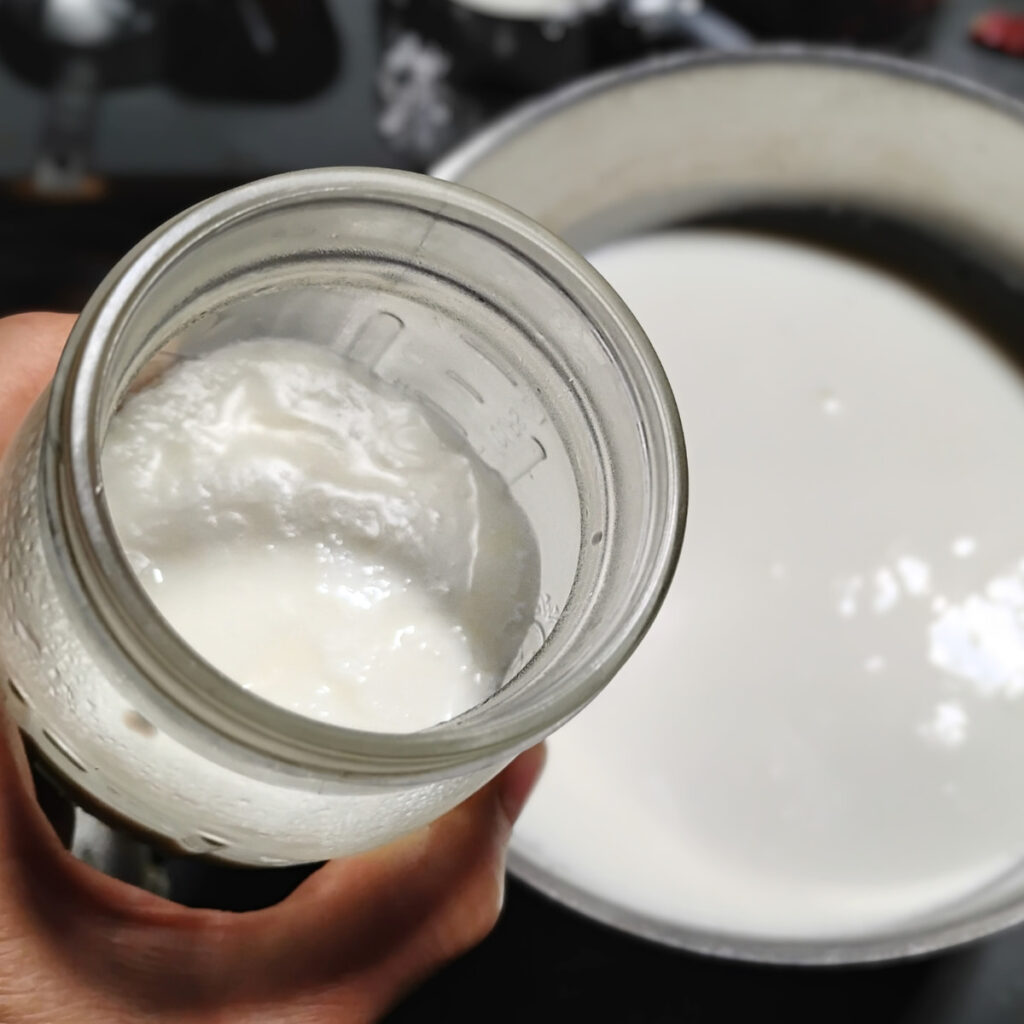
There are natural options for starter cultures to make Bel Paese Cheese. Bel Paese utilizes part thermophilic, part mesophilic cultures. If you have clabber culture from raw milk, you don’t have to worry about any of that. It contains all the microbes you need that will be activated and go to work in warmer and medium temperatures naturally.
The gist of making raw milk starter culture: Just let a pint of your fresh, still warm raw milk clabber (thicken) at room temperature, use a spoonful of that to inoculate another pint of fresh, raw milk, repeat and after 3-4 rounds, you’ll have a clabber culture that you can use to start cheese with. To get more details about this process, check out this Natural Cheesemaking Process article. And you can learn more about making Clabber here.
Whey: If you made cheese before with raw milk starter, you can also use the unsalted whey from a previous batch of cultured cheese. Raw milk clabber whey is what I use most.
If you don’t have access to raw milk
Whey: If you’ve been making cheese, just use some of your latest whey from your last cultured cheesemaking project. If it is a raw milk whey or yogurt whey you’re good to go. If you used mesophilic cultures in a previous cheese, then I would also add some yogurt to your whey, use half the amount of each. (Note that you can only re-culture whey, from cheese made with direct set cultures, a few times before it runs out of strength. This is not true for natural, wild cultures, which are good indefinitely.
Kefir: If you’re keeping milk kefir grains, you can use your milk kefir as a starter culture. It is what I used for years and it contains both mesophilic and thermophilic microbes.
Yogurt: You could buy some cultured plain yogurt from the grocery and use it (be sure it contains live bacteria).
Make cheese starter from either sourdough or fermentation juice as described in How To Make Cheese Culture From Sourdough. This requires that you have an Active Sourdough or any Raw Fermented Food in your fridge. Or take a few days and make some! You basically need to capture some wild live lacto-bacilli and introduce them to the pasteurized milk after growing them on raw food or flour, which is what you do with sourdough and fermented vegetables. Pasteurized milk is dead milk and this will help it come back to life.
I have tried making this cheese with culture made from Fermentation Juice Starter and pasteurized milk and it came out really nice but with lots of holes, sort of what you get when using Kefir. It tastes wonderful after a month of aging. Stay tuned to find out how well it ages over a longer term.
I’m also working on a sourdough starter version. My first batch did not turn out so well and I think that was because I forgot to add calcium chloride to the pasteurized milk and I let it get a little too warm at one point. I do have a cheese from this test, but I have yet to cut into it and the curd was a bit loose after pressing it. I’ll update on this too and am planning to start another one soon.
How To Make The Best Bel Paese Cheese
This cheese can be made with things you have at home, except for the rennet, unless, of course, you have some. You cannot use junket rennet from the grocery store, you’ll need specific cheese rennet. Other than that you can use what you have and make it do.
I have a ‘shopping list’ for you at the end of this post with links to most items found here.
Equipment
Two 12 quart stock pots – One will be used to mix and culture the cheese. The other is for draining the cheese. (If you don’t have two large stock pots, you could also drain the whey off into a few smaller containers. Then get your cheese draining station set up over a small container, add the curds to the draining basket and then dump all the whey back into the first pot once it’s empty. Move your draining basket on top of it and proceed. The idea is to have a place for the cheese to stay warm and humid during drainage).
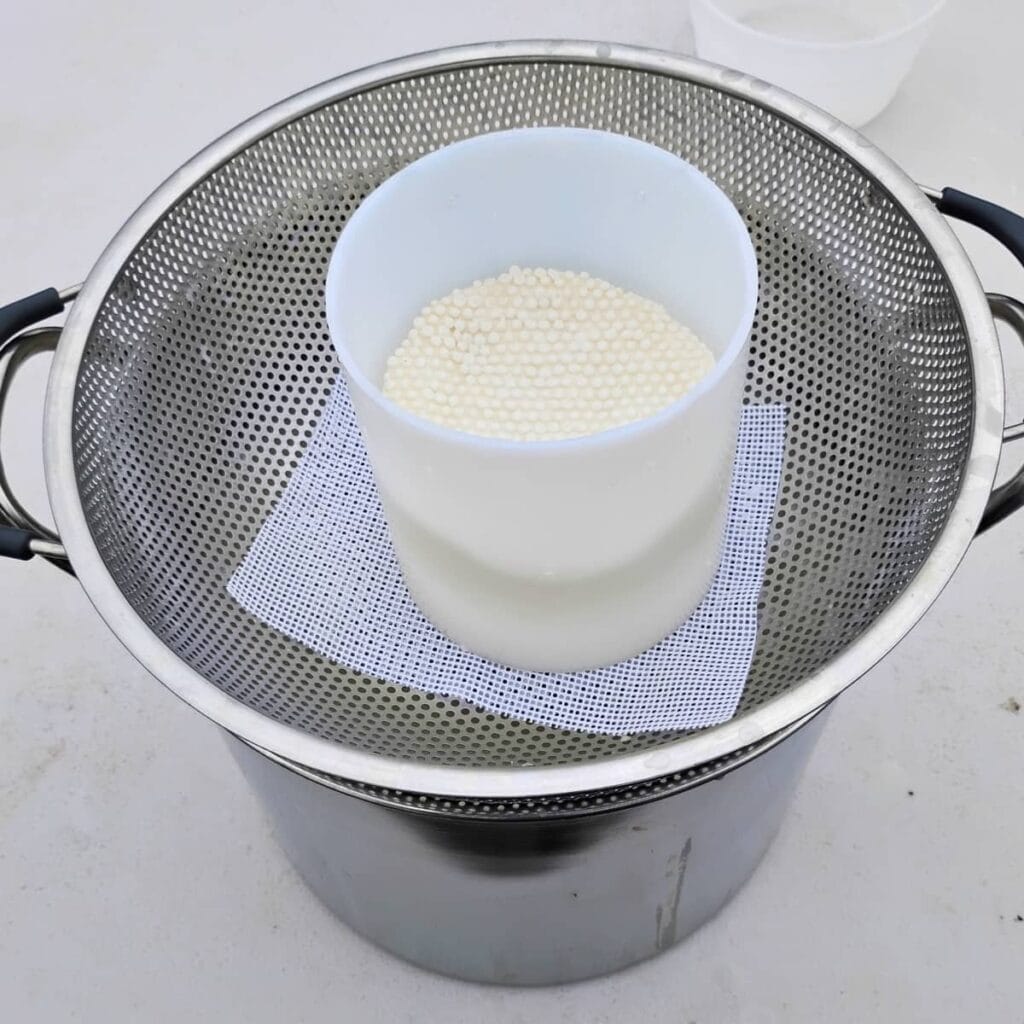
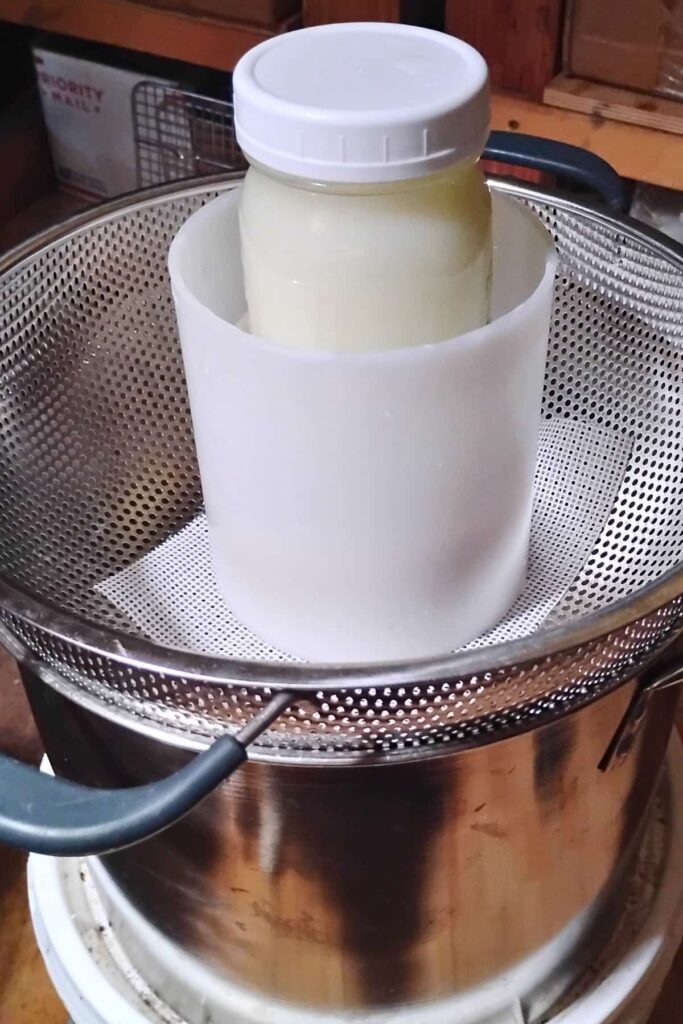
Colander – I use this to place my draining form into. It sits deep in my 12 quart pot where I can keep a cozy warm and humid environment for the Bel Paese during the draining phase, when covered with a thick towel or an upside down bowl.
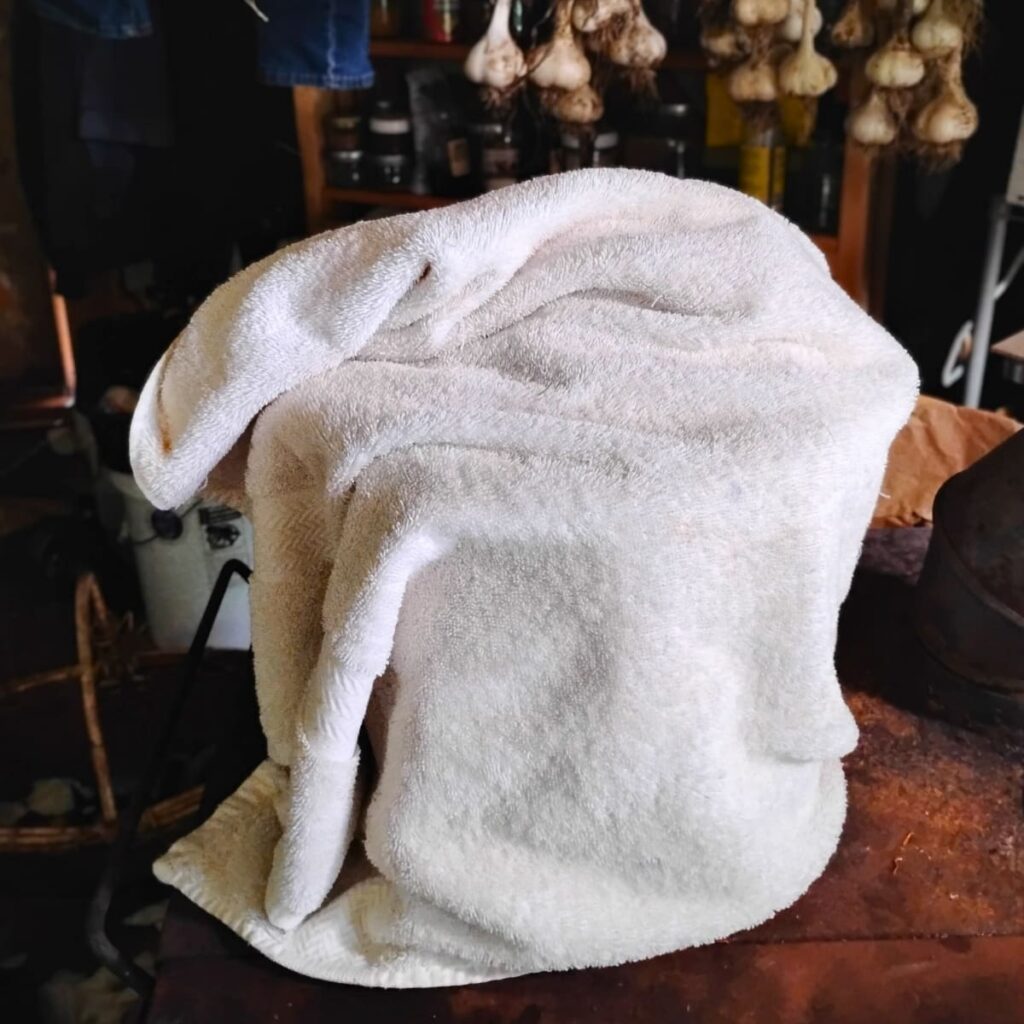
Thick bath towel – Or sink full of warm water to keep the temperature warm inside the pot during incubation. I use it to cover the draining cheese curds later as well, to keep it warm for better drainage.
Cheese form – If you have a small 5″ cheese press form, you’ll have a perfect size for this. If not, you can easily create a form by being a bit creative. A large Ricotta cheese or cottage cheese tub will work if you make a lot of holes on the bottom and sides. You can use a salad spinner basket, or a bamboo or wicker basket that’s about 5 x 5 inches
Back thirty-some years ago I made a cheese press mold with an old, cheap, straight sided plastic juice pitcher. I rigged up a make-shift cheese press and used that for all my hard cheeses. I sawed out a wooden disk as a follower. A follower is basically a disk that fits inside the basket and covers the cheese curds. Pressure can be applied to it to press the cheese in the form. This is not actually needed for this particular cheese, although I like to use it with a light weight to get a smoother cheese interior. But don’t sweat it if you can’t find a follower, this cheese works without a press.
Follower – optional. This is what covers the cheese and is normally used to press it. Force is applied to it either with a cheese press or some kind of weight, to help compress the curd and shape the cheese. A follower must fit really well, and should not get stuck, which can happen when the cheese form is tapered. A cheese press mold usually comes with a follower of the correct size. But this cheese does not need pressing and a follower is optional.
Butter muslin – you’ll need a piece under the cheeseform if it has no bottom. If your cheese form has large holes or slots, you’ll want to line it with cheesecloth to keep the curds from squeezing out and to prevent your cheese from getting stuck.
Pint canning jar with lid – I use this, filled with some warm whey, and press the cheese lightly by placing it on top of the follower. It also helps keep the cheese warm from above during the draining. This is not necessary, just my preference.
Skimmer – optional, but I love my skimmer for cheesemaking. It’s perfect for stirring, scooping, and chopping up the curd. It’s just a great tool to have!
Thermometer – This is an essential tool for cheesemaking, although it is optional for some of the mesophilic cheeses, because the temperatures for those are not often critical. You could get away with no thermometer and guess at the temperature, but I prefer having the thermometer to look at and not worry about whether I’m overheating my milk or curds.
Wooden board or rack – for drying the cheese.
Container with lid – for ripening the cheese in the fridge. Glass or plastic works
Glass container for brining – (Not needed if you choose to salt the cheese) I love those half gallon or gallon glass containers from Walmart that come with glass lids, I think Anchor Hocking makes some of them. They are perfect for brining cheese and are easy to clean after. You could make the brine right in it by adding the warm whey to the salt and stirring often to dissolve it. Then it should be cooled down a bit for brining the cheese.
Half gallon jar for saving the brine later – After brining the cheese, you’ll want to save the brine. I just keep it in a half gallon sized or two quart mason jars inside the fridge, but you could store it in your cellar or cheese cave (wine cooler) too.
Optional for aging:
Wax – I can only recommend pure beeswax, preferrably from organic operations and be cautious to not source from beekeepers that run their hives on commercial agricultural fields to minimize pesticide content. Bees that work in commercial berry fields most certainly pick up all sorts of pesticide residue for example. And bees working in raps fields, might pick up GMOs.
Try to avoid the common red or other color cheese wax. The colored waxes have food coloring mixed in. And they are made with paraffin wax, which is oil-based, a by-product from crude oil refining. I get my organic beeswax in pellets at a really good price from Azure Standard. For dipping, at least 5 pounds is recommended. If you’re brushing it on you can just get a pound to start.
Vaccuum bags and vacuum sealer – I try to reduce my use of plastics. And this is one of the areas where I need to change and start using beeswax. It’s been convenient to use plastic vacuum bags for keeping the cheese to age it, and it’s easy to remove some cheese and reseal the remainder. But it’s certainly not ideal. So while I have been using this method for a long time, I can’t really recommend it with good conscience. But it does work.
Ingredients
Find the exact measurements in the recipe card at the end of the article.
Raw goats milk – You could scale up or down, but I found 2-4 gallons to be the most convenient size for making Bel Paese cheese. If you’re using store-bought milk, be sure to get pasteurized milk, and not use ultra-pasteurized. It won’t work.
Starter culture – Use your raw milk clabber, or whey from your last raw milk cheesemaking project. Alternatively (and for lack of raw milk), use yogurt with live cultures, kefir, or starter culture made with sourdough or vegetable fermentation juice. See the ‘starter culture‘ section above for more details!
Animal Rennet – If you must use vegetable rennet try to find an organic or non-gmo kind. Animal rennet is safest if you’re looking to use clean ingredients. My choice is organic Walcoren Kid Rennet liquid or tablets. If you are using pasteurized milk, use 1/2 tsp rennet! Find more detail in the ‘rennet‘ section above.
Non-chlorinated water – this is needed to dilute the rennet.
Optional: Calcium chloride – Not needed for raw milk, but highly recommended for pasteurized milk. You can go without it, but you’ll get much better results when you add this to your pasteurized milk for cheesemaking, to fix the problem of broken calcium due to pasteurization. This needs to be diluted in 1/4 cup of non-chlorinated water before adding.
For Salting The Cheese – 2 Methods
Salting The Cheese:
Salt – You do not need a brine, you can salt the cheese instead by sprinkling it with salt generously on all surfaces, flipping and re-salting once or twice more. But brining can use the salt more efficiently and a brine is reusable.
For The Super-Saturated Salting Brine:
2 quarts whey – Take two quarts of your whey from draining the cheese. I like to make 2 quarts at a time and keep it in the fridge for every time I need a salt brine for making cheese.
4 cups salt – You’ll need this much salt to make a super-saturated brine. It’s easy to dissolve your salt in the warm whey.
Instructions To Make The Best Bel Paese Cheese
This recipe has a few different options to choose, you can read through it and decide what you prefer and then just follow the set of options that will work best for you.
Adding The Ingredients And Mixing The Milk
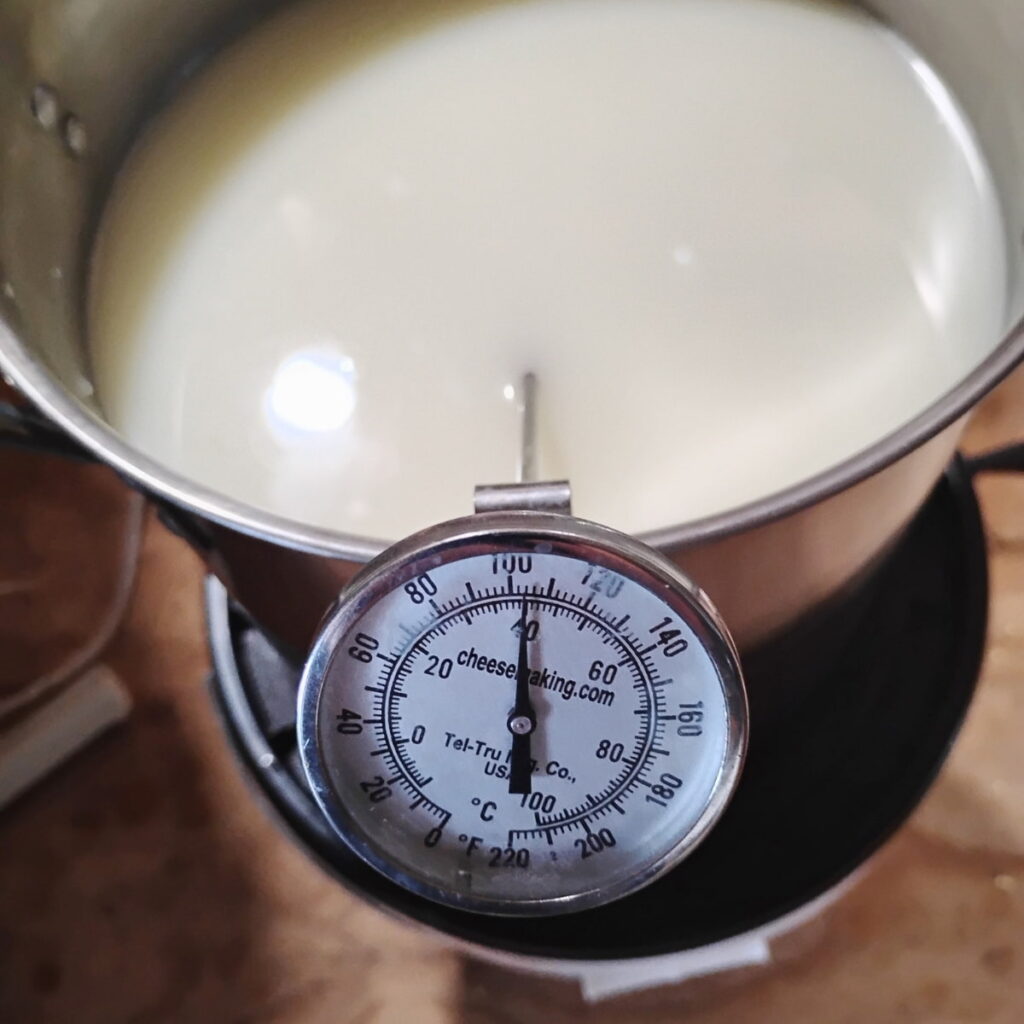
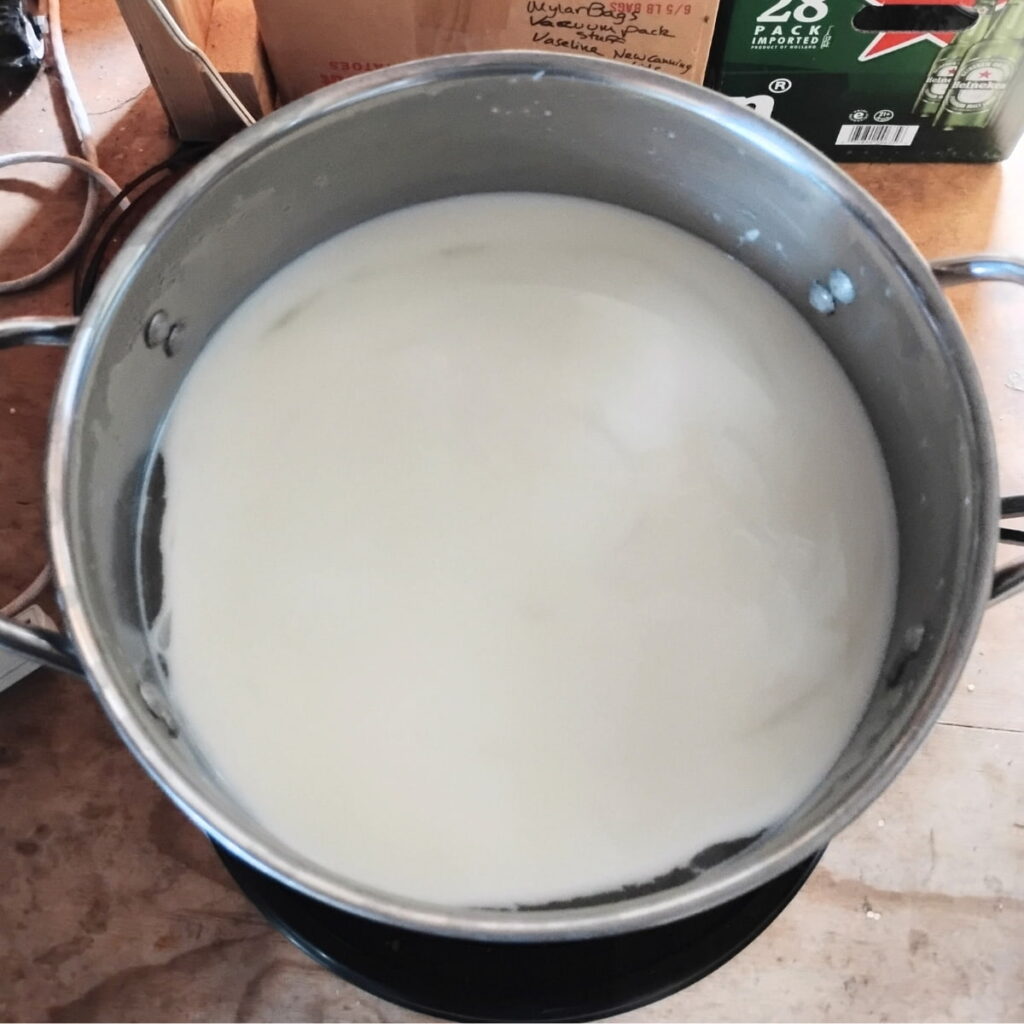
Heat the raw milk slowly to 102-105 degrees. (108 degrees if its pasteurized or if it’s cow’s milk). Take it off the heat.
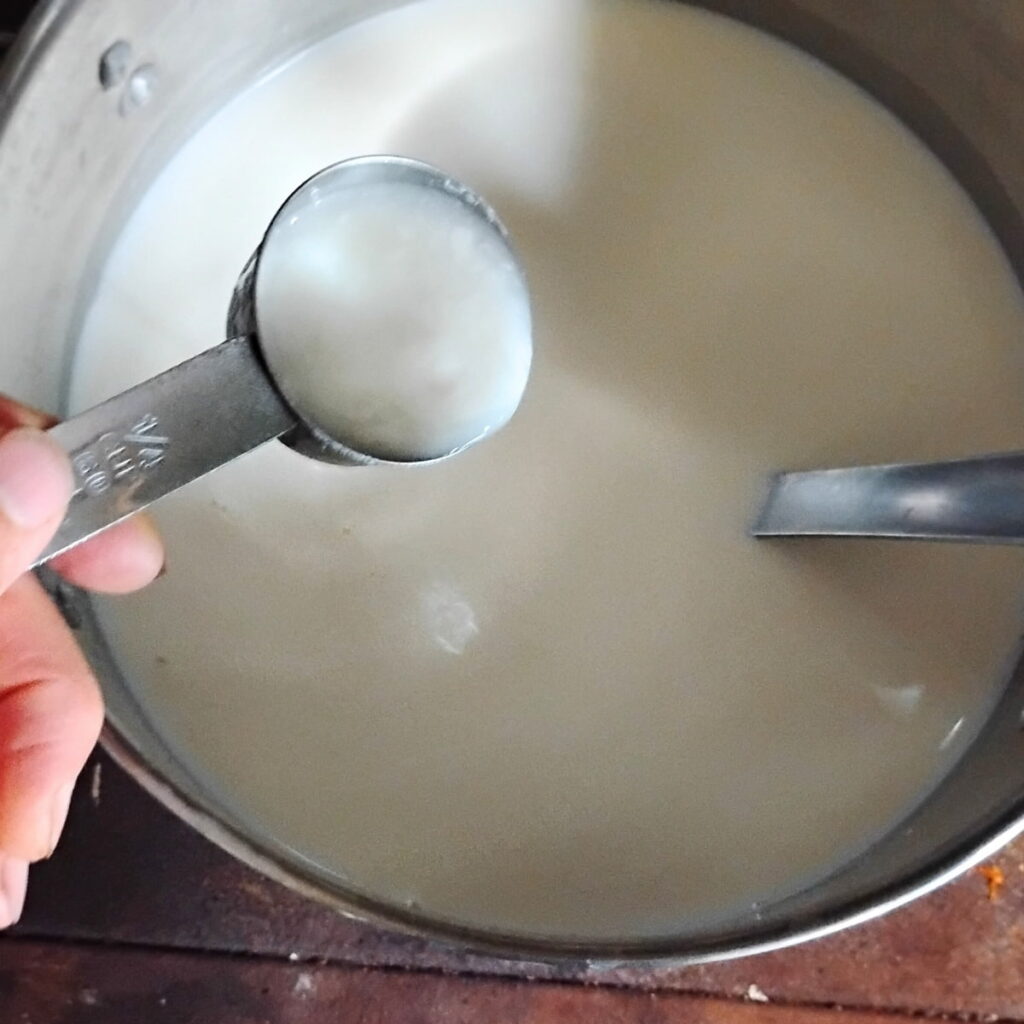
Add the starter culture and stir it in thoroughly. If you’re using calcium chloride, add the diluted calcium chloride now too.
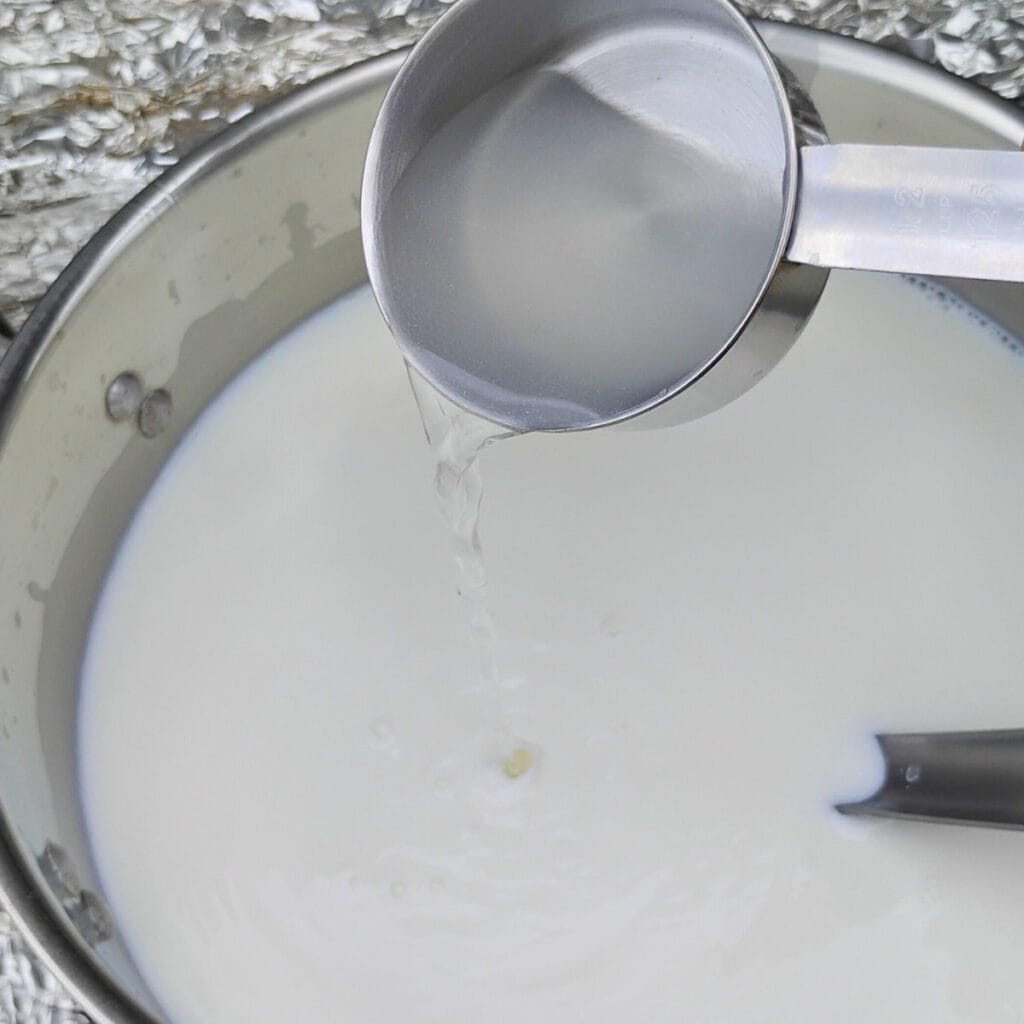
Dilute the rennet in a quarter cup of water. Pour it into the milk and stir well for about 15-20 up and down strokes without breaking the surface. Then stop and use your spoon to still the moving milk.
Incubating The Milk
Ideally you’ll be holding this temperature, so keep it in a warm place. I like to wrap the pot in a large, thick towel. If you have a sink, filling it with 105 degree hot water is perfect to keep your pot of milk warm after heating the milk. Keep adding hot water to maintain the temperature.
Checking The Curd
After 40 minutes, check the curd. Is it thick?
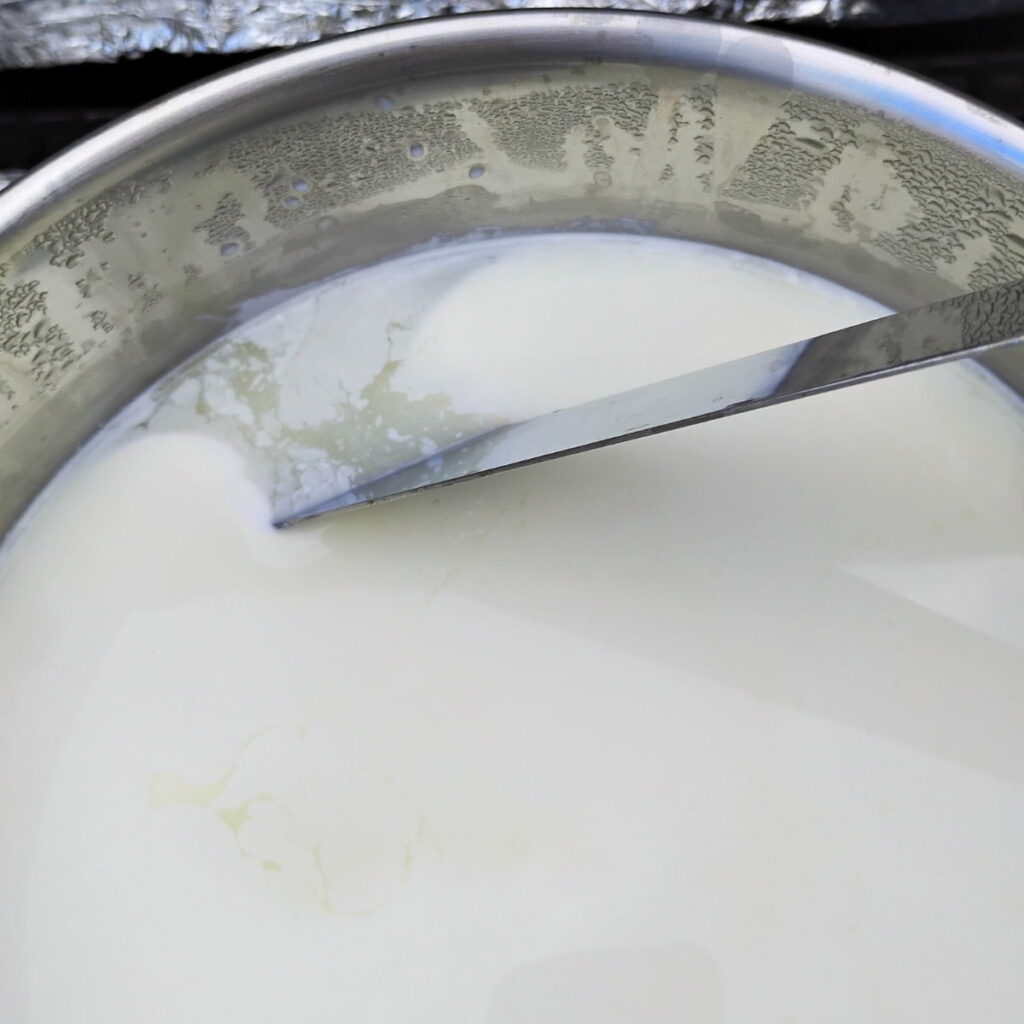
Stick a knife in it and see if it breaks cleanly. If so, it’s time to cut the curd. If not, let it incubate for another 10 to 15 minutes or until you get a clean break.
Cutting The Curd
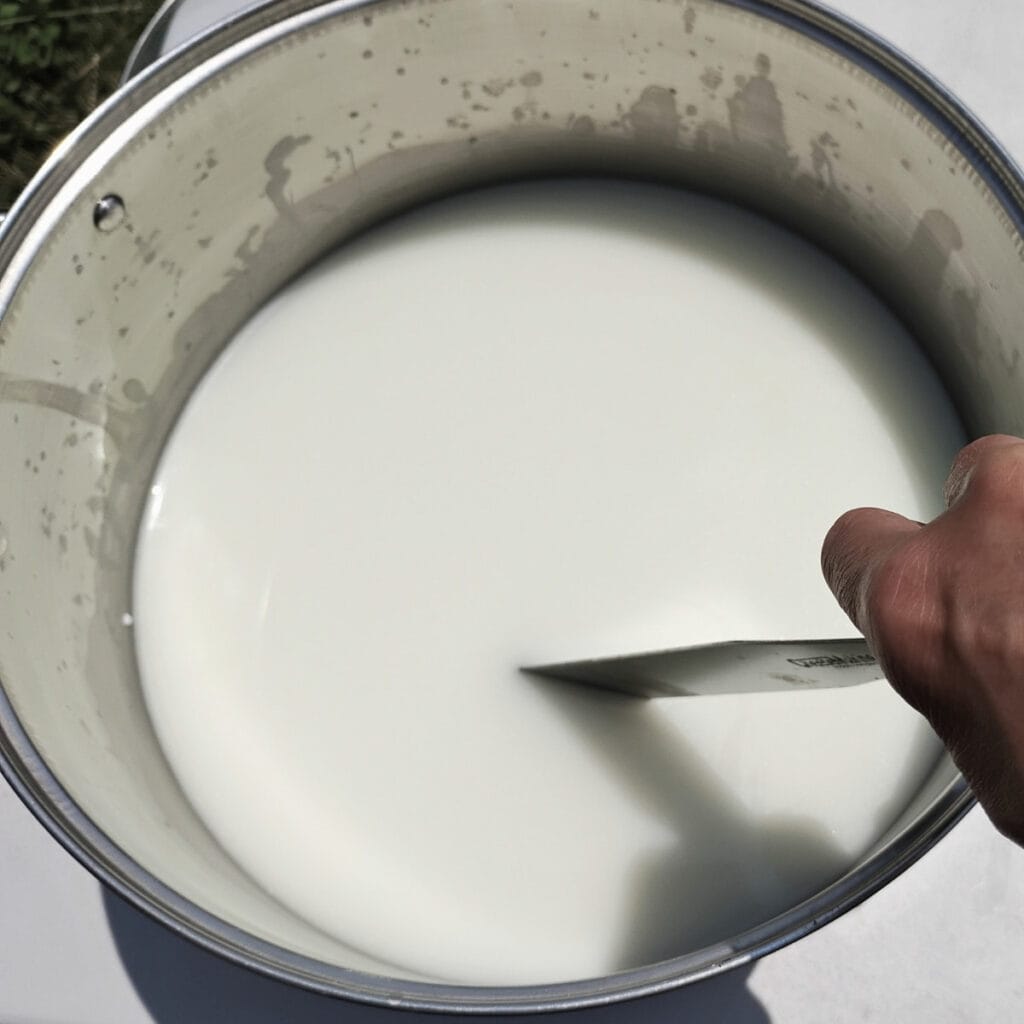
With a long knife cut lines about 1-2″ apart all the way down to the bottom of the pot. Then cut perpendicular lines 1-2″ apart all the way to the bottom.
Let the curd heal for about 10 minutes.
Now use a knife to cut smaller lines or use a wire whisk to cut the curd with an up and down motion and then, using a skimmer or the whisk stir the curd sideways in circular strokes to basically slice layers into the curd strands from the top to the bottom of the pot. Your goal is small 3/8″ or pea-sized pieces. Let it rest for another 10 minutes.
Cooking The Curds
Now heat the curds and whey back up to 102 degrees (108 for pasteurized) very slowly while stirring the curds.
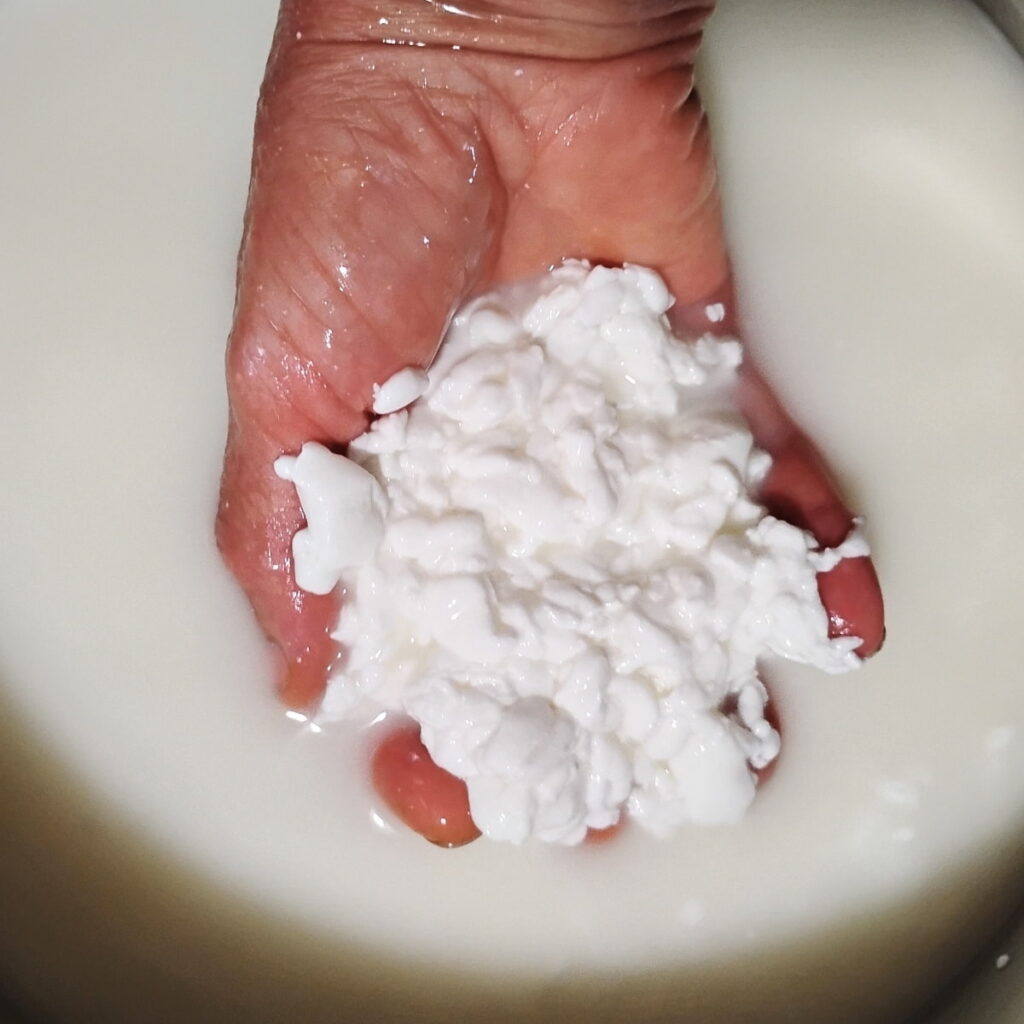
You can use your hand or skimmer for stirring. I prefer my hand. It’s easier to get into all the corners and to keep all the curds separated and moving freely.
Stir every few minutes while heating to keep the curd from sticking together and matting on the bottom. This is easiest in the hot water bath if you have it, but I do it on the stove, since I don’t have a sink. I also have used a bigger 16 quart pot, added water, submerged my cheese pot in it and heated this on the stove, double-boiler fashion. It keeps the curds away from the direct heat of a stove top. Just try to keep your curds from overheating where they touch the bottom of the pot.
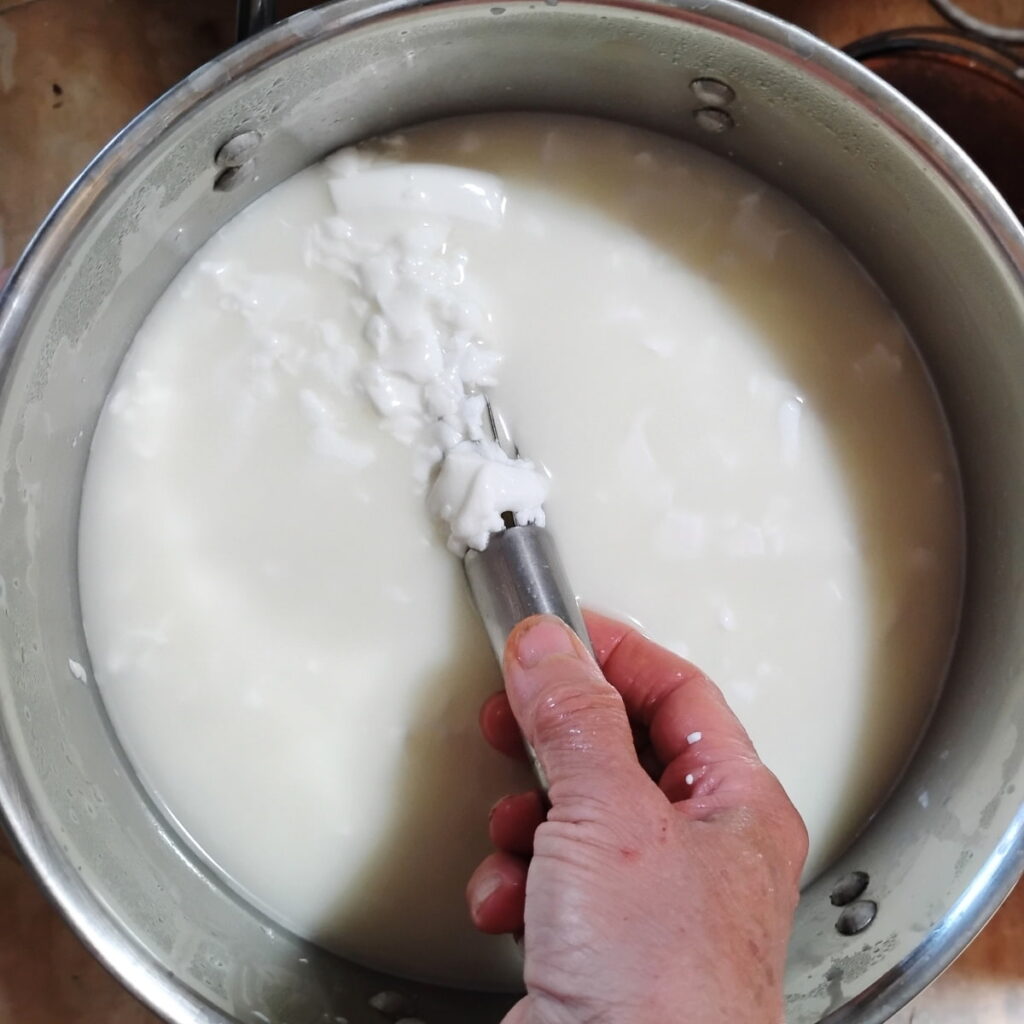
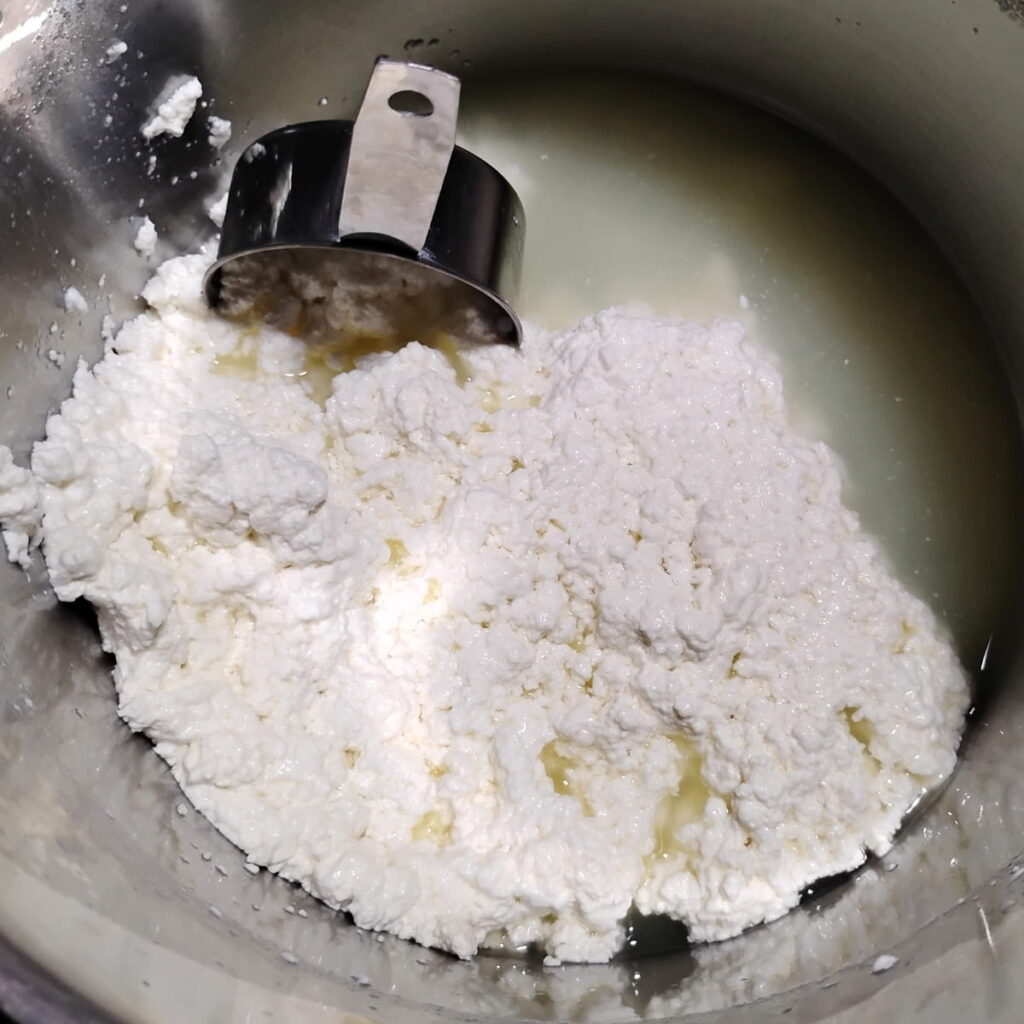
After 20-30 minutes of stirring (your temperature should be 102 (108) degrees now), check the curds to see if they will mat. Squeeze a handful of curds and if they mat together into a cohesive clump they are done. Otherwise stir a little longer.
Take the pot off the heat and let the curds settle for 5 minutes while you prepare your draining station.
Draining The Curds
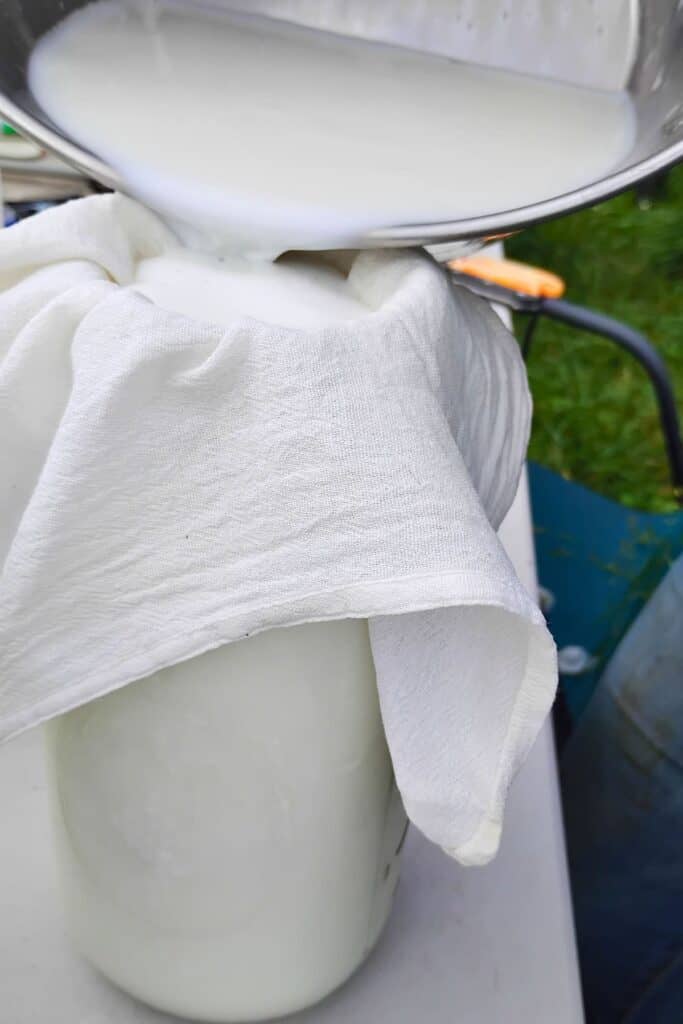
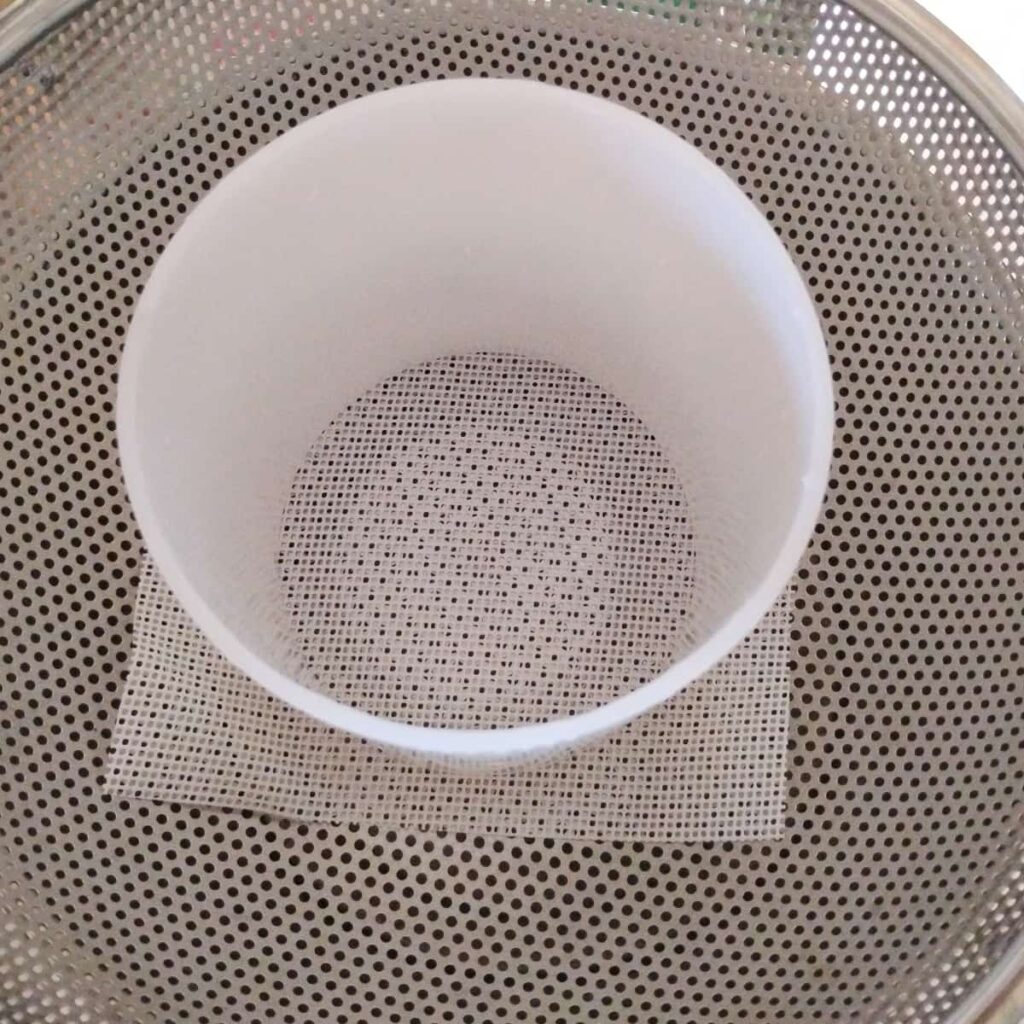
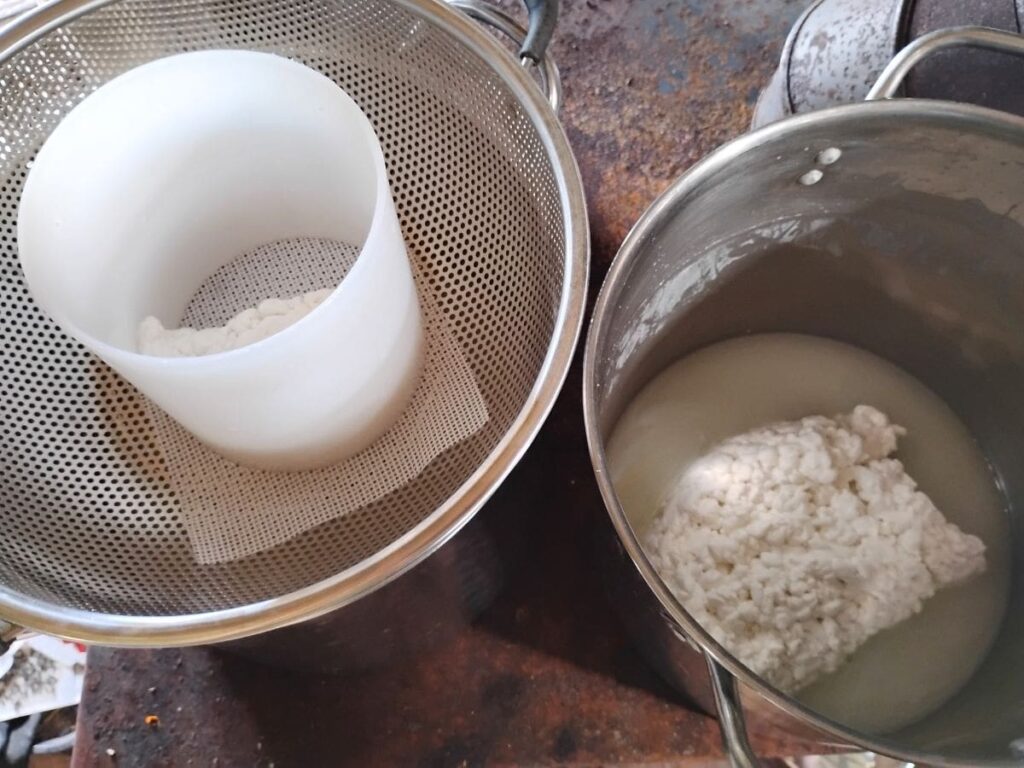
Grab your second pot and colander. Prepare your drainage form. Place a piece of butter muslin under it to prevent the curd from squeezing through the holes of the colander.
After the 5 minutes are up, you have two options:
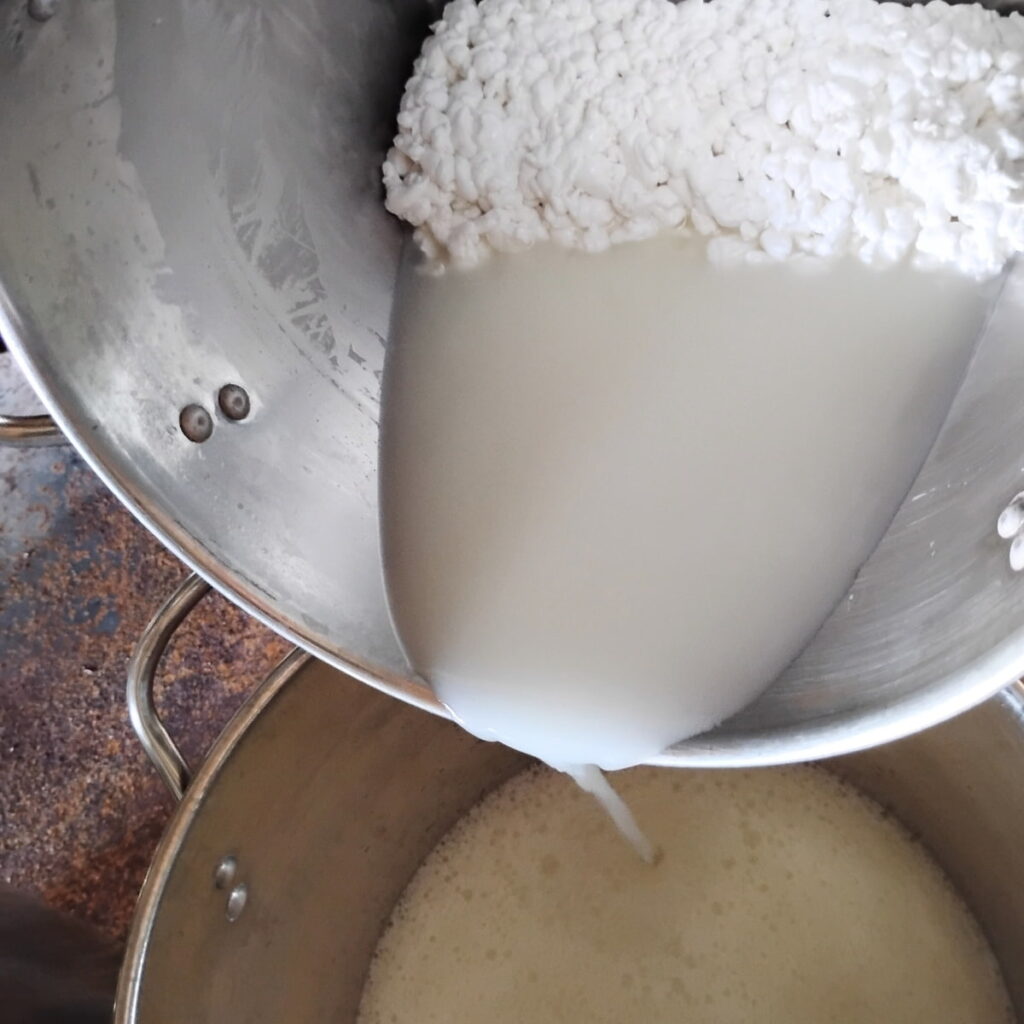
Method 1: Pour some of the whey out into the second pot. Careful so you catch the matted curds before they slide out too.
Now place the colander with drainage form over this pot full of whey and scoop the curd into the form.
Then pour the rest of the whey and bits of curd into the form.
Try to distribute them somewhat evenly.
Method 2: Alternatively, you can also line the second empty pot with a cheesecloth, pour the whey and curds into it, pull out the curds with the cloth, and squish it into the mold along with the cloth as a liner. I rarely use a liner for this recipe, but it can be helpful, especially if your form’s drainage holes are on the large side.
Set aside 2 quarts of the whey before proceeding for making the brine.
Place a follower over the curds if you have one to cover them and keep them warm.
Place a pint jar filled with warm whey into the follower to press on it lightly if you’re using a follower. Then I cover it all with a heavy towel or a upside down bowl to keep things warm and humid inside.
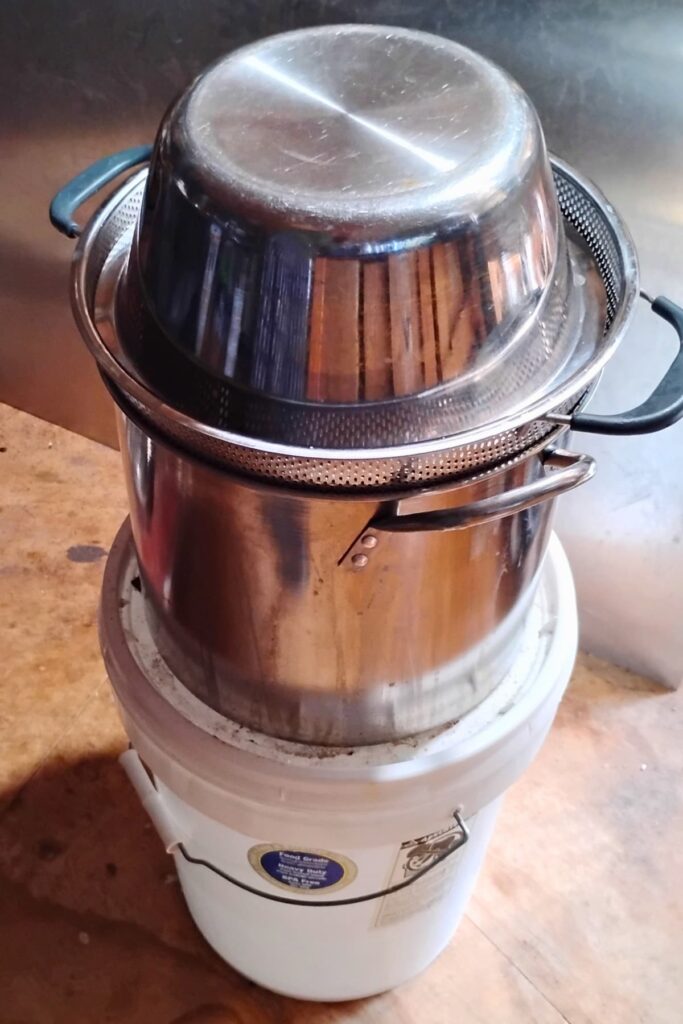
Place this pot on a heat source and heat the whey in it to 120 degrees while your curd is draining in the colander above it. Then turn off the heat, but keep it warm by turning it back on as needed.
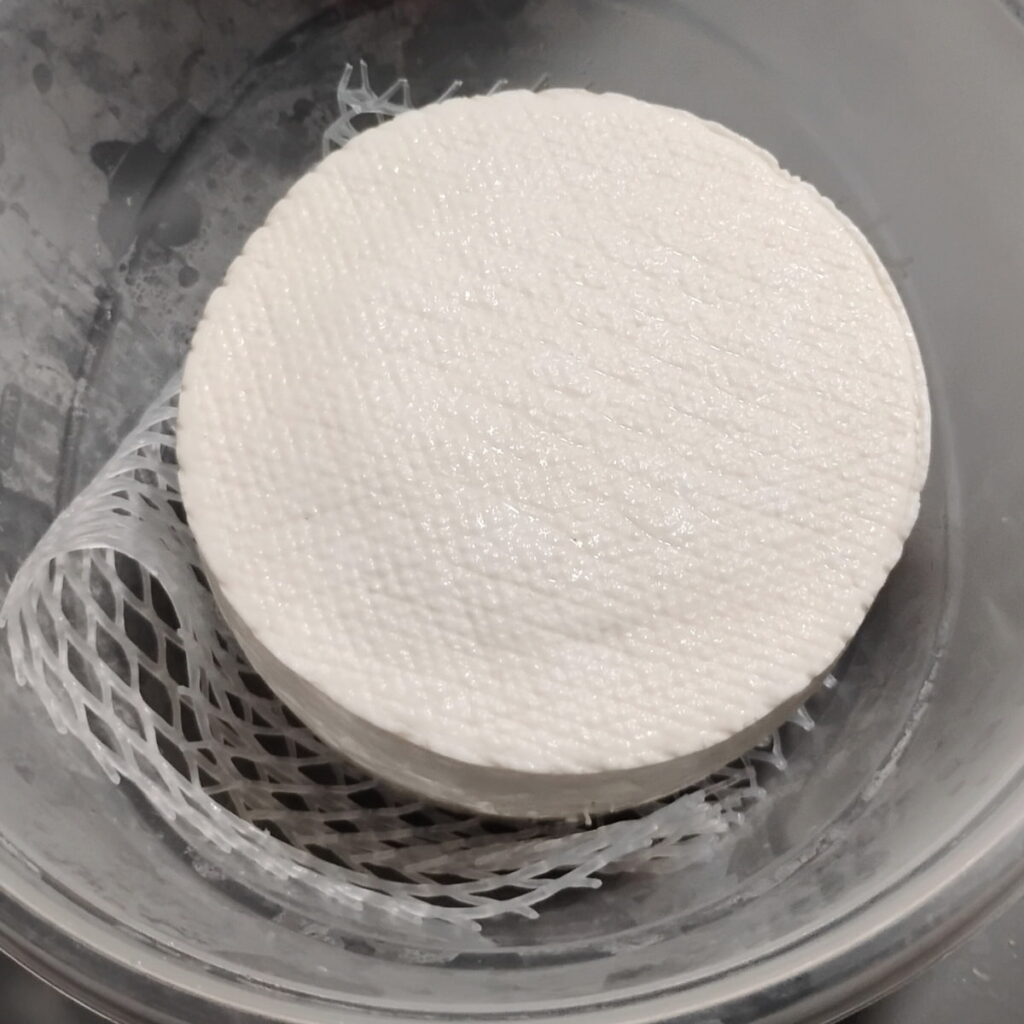
After 10 minutes, flip the cheese over, replace the follower, weight, lid, and towel and keep an eye on the temp of the whey below. If you’ve used a liner in your form, you can take it out now.

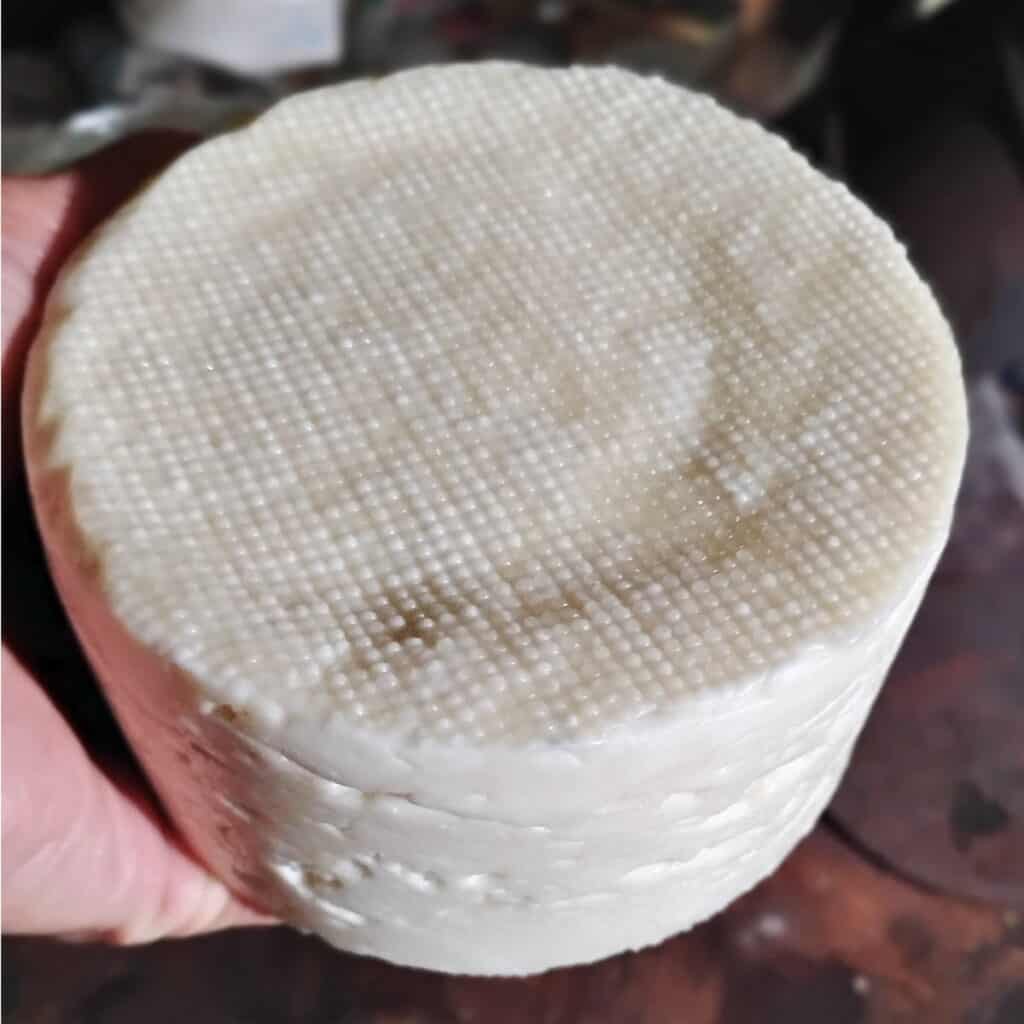
Flip the cheese half an hour later for the second time. It should start to look pretty smooth except for the imprint of the basket pattern.
Flip again every 30 minutes for the next hour and a half. After that flip it every 1-2 hours.
You don’t need to use the weight after the first 2 hours if you were using it at all.
After about 7 hours, your cheese can get salted or go into the brine. For me, that is normally about 7 pm -not a good time for brining. I’d have to get up in the middle of the night to take it out! So I let it drain in the form till the next morning. Or I could just salt it. Both methods are below:
Method 1: Salting The Cheese
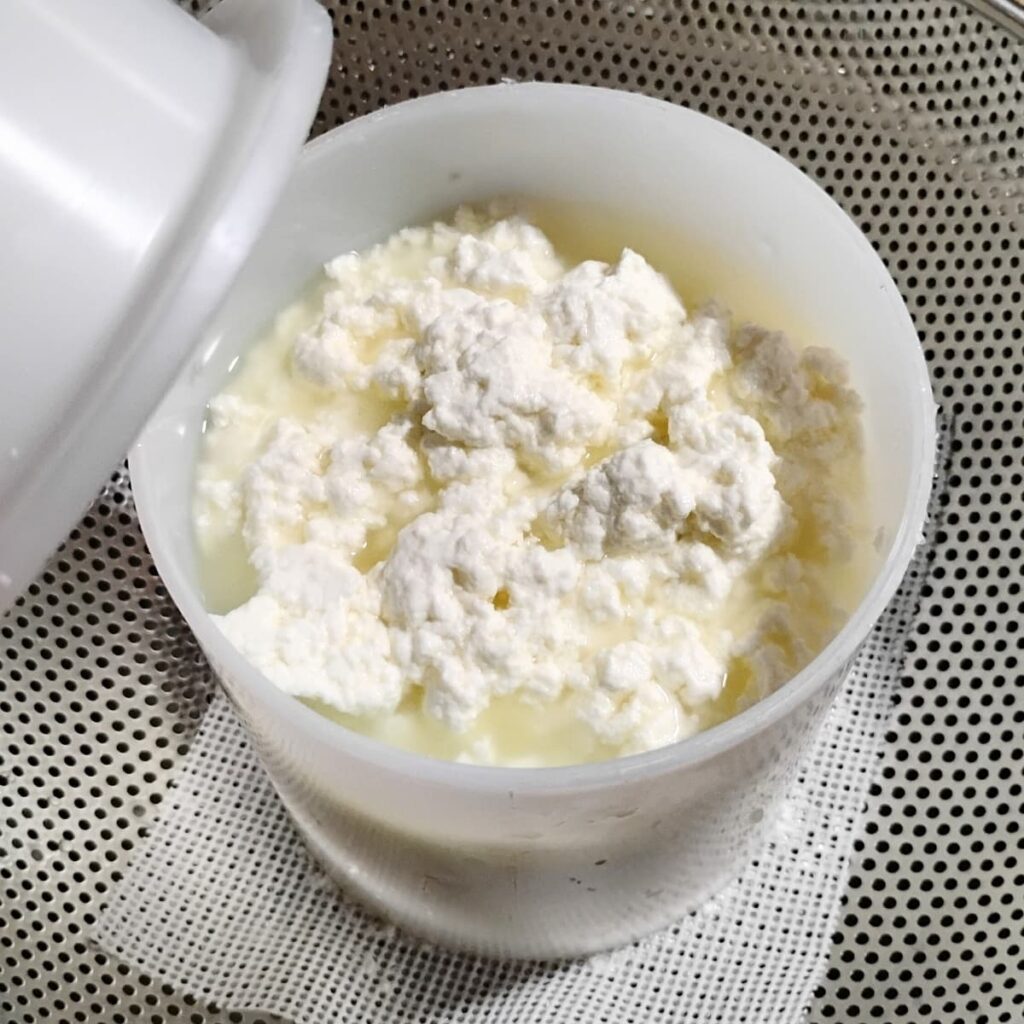
You can salt the cheese by just sprinkling it with salt generously all over. Flipping the cheese after 3 hours and salting it again. After 4 more hours, wipe it dry and let it dry on a rack for a day or two until it is dry to the touch. Then proceed with refrigeration instructions.
Method 2: Brining The Cheese
Find a cool place for brining. 50-55 degrees would be ideal.

Place the cheese into the glass container with the brine and sprinkle salt over the top. Flip it after 3 hours. Ideally, you’ll brine it for 4 hours per pound of cheese, but you don’t need to weigh it, just call it 7 hours of brining for this 2 gallon size and try to flip it once or twice in the brine. Always salt the surface that’s exposed due to floating. This will also add some salt back into your brine to keep it saturated.
Take it out, pat it dry, and let it dry at room temperature on a draining rack for a day. Place a food tent over it to keep the flies out or cover it with a cheesecloth.
Ripening in the Refrigerator
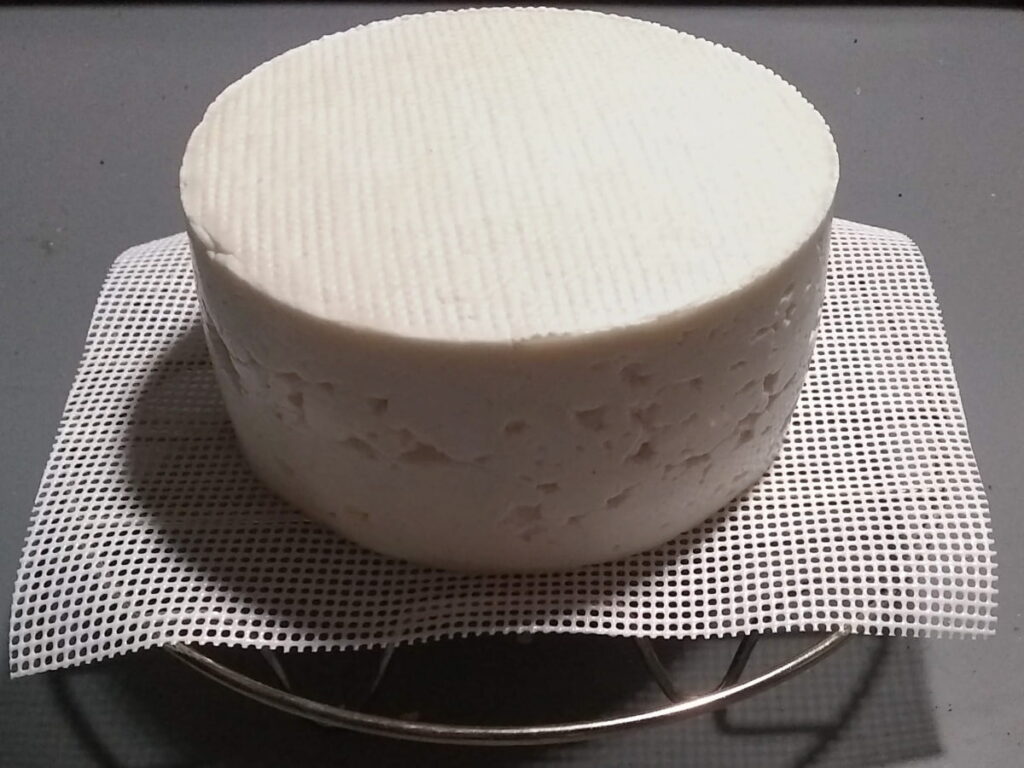
Once it feels dry to the touch, you can place it into the fridge to mature. Put it on a wooden board, or on some type of rack inside a plastic or glass container with some room to breathe. Flip it once a day for a week, then every two days for the next few weeks. After 2 weeks it will get a bit greasy on the surface. Wipe that off with salted whey, vinegar, or wine.
If it get’s moldy, just wipe off the mold, again use salted whey, vinegar or wine.
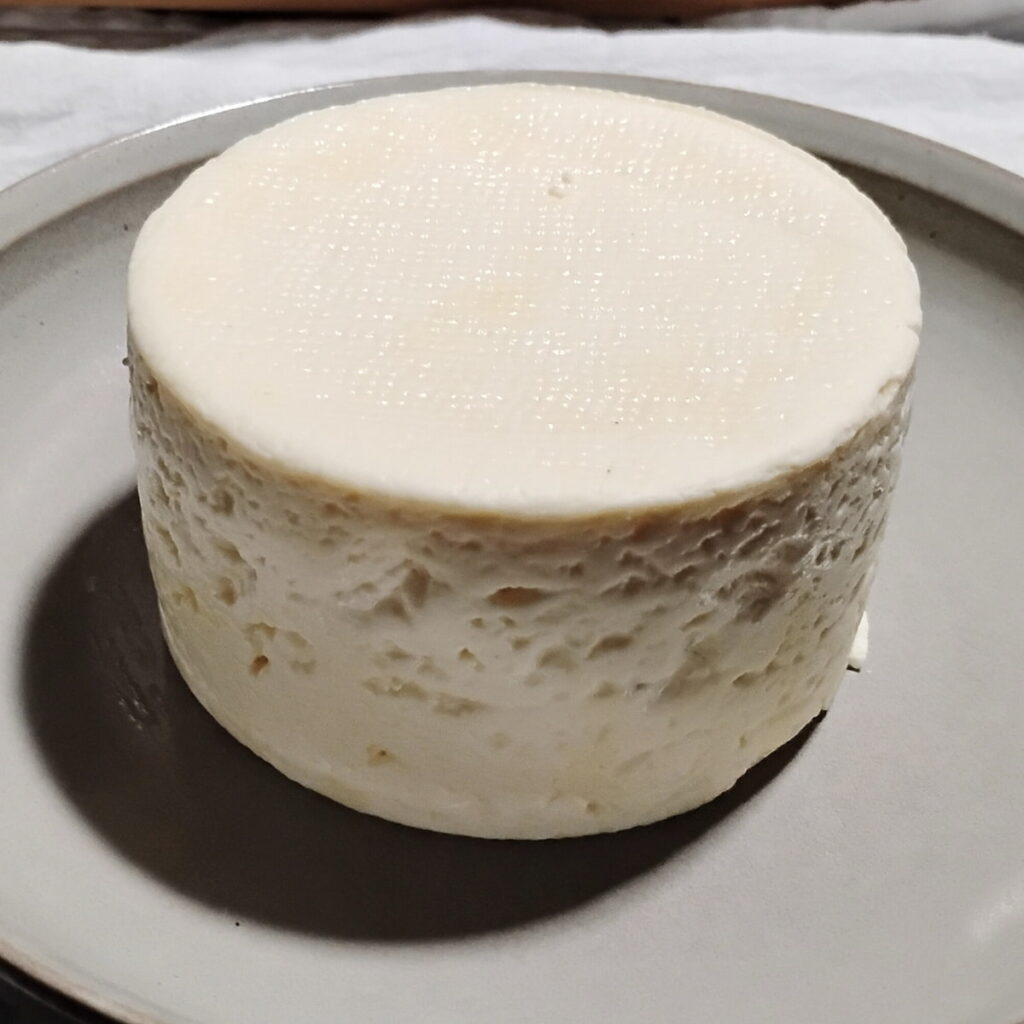
After 2 weeks you can taste it, but I’d wait for a month or two to eat it for the best flavor. Slice some off and enjoy.
Storage
This cheese can be stored and aged. It’s great after 4-8 weeks and you can go ahead and use it in whatever dishes you want or slice it to make sandwiches. I love to eat slices of it for a snack. It’s awesome with crackers or for grilled cheese sandwiches too. Find more ideas below.
You can also age it if you have extra cheese, and you have a few options for that. ‘
Encourage a natural rind
One is to just keep it in it’s container or just on a rack uncovered, and wipe it off a couple of times each week to keep mold from growing on it. This will encourage a natural rind to form. If you keep it uncovered, it will get drier eventually.
Vacuum packing
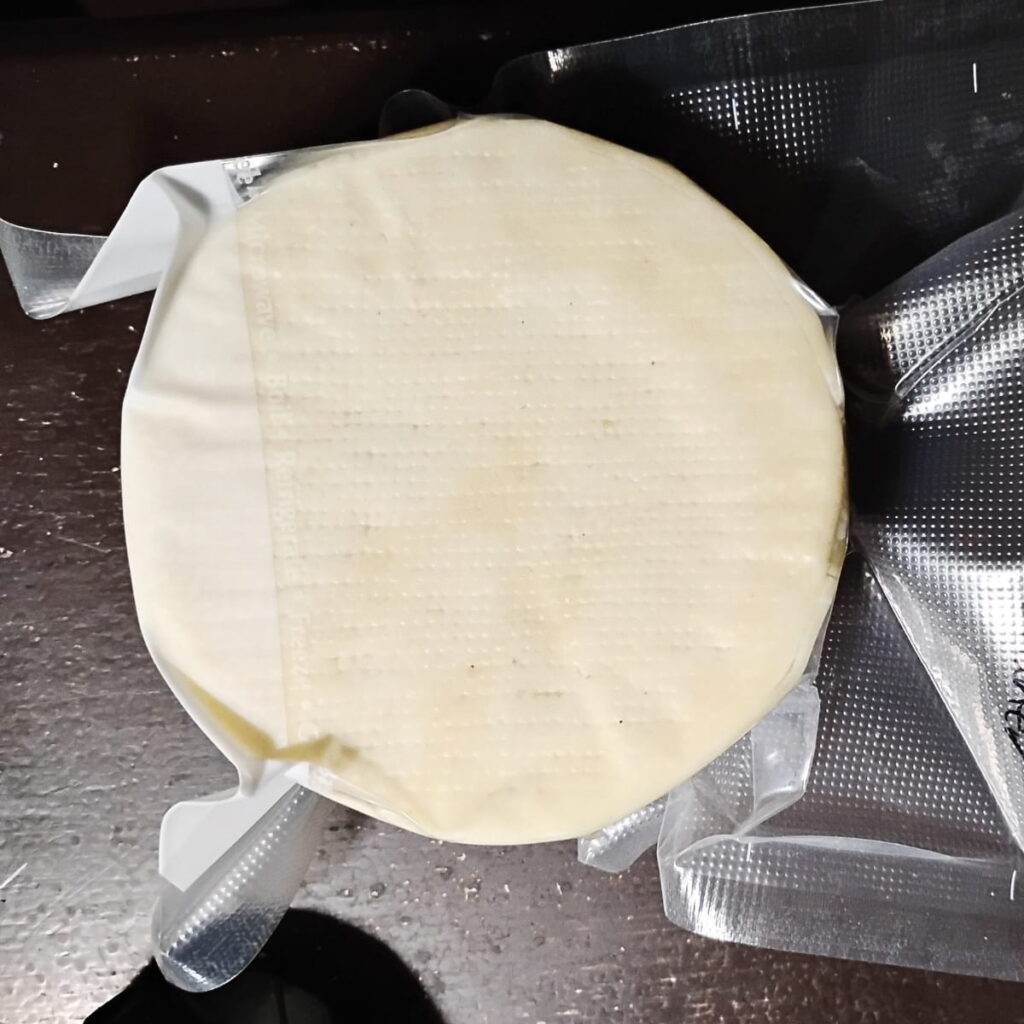
Another option is to vacuum pack it. This is what I do currently, but it is frowned upon by purists, and not the best option if you’re trying to reduce your use of plastic.
Anyway, I find it so hard to keep a close watch on the cheese once it’s in that fridge, that the natural rind method usually ends with a ruined cheese. Out of sight out of mind, lol. Vacuum packing makes mold-free cheese easy and it is similar to waxing and easy to do with a vaccuum sealer. Just double check the seal to make sure it is going to stay sealed up. If air gets into it, it will get moldy.
In WA I had a root cellar and I stored my cheeses in 5 gallon buckets after sealing them. This worked great and kept the mice out.
When you’re ready to eat some, cut the bag open, remove what you want and reseal the bag. Undoubtedly it’s the easiest, low maintenance aging method.
Waxing The Cheese
Your next option is waxing, and it is my favorite method although I don’t use it currently.
I would use a non-toxic cheese wax. My recommendation is pure organic beeswax. The colored cheese waxes have food coloring mixed in. I’d stay away from that. They are also made with paraffin wax, which is crude oil-based.
Heat the wax in a pot, dip half of the cheese into it, let it harden, dip the other half in, let it harden and repeat. Or you can brush the wax on. You will need less wax to start with when brushing.
Once waxed, you can keep it on a shelf in the fridge till you want to use it.
When you want to use some of it, slice off a piece and dip the cut side into warm wax a couple of times to reseal it. I find this a bit of a hassle and I’d get a cheap second, dedicated crock pot (I find them at thrift stores quite often). This way you can keep the wax in it, ready to heat when you need it. Or get an old pot and dedicate it. The wax can be reused.
I have stored some of my vacuum packed Bel Paese cheese for about 3 years in a root cellar and it was delicious. I can’t imagine that it wouldn’t be fine even longer, but have not tried it. It can also be kept in the fridge, a cold cellar, or cheese cave. Cheese cave temperature is generally 50-55℉.
How To Use Bel Paese Cheese
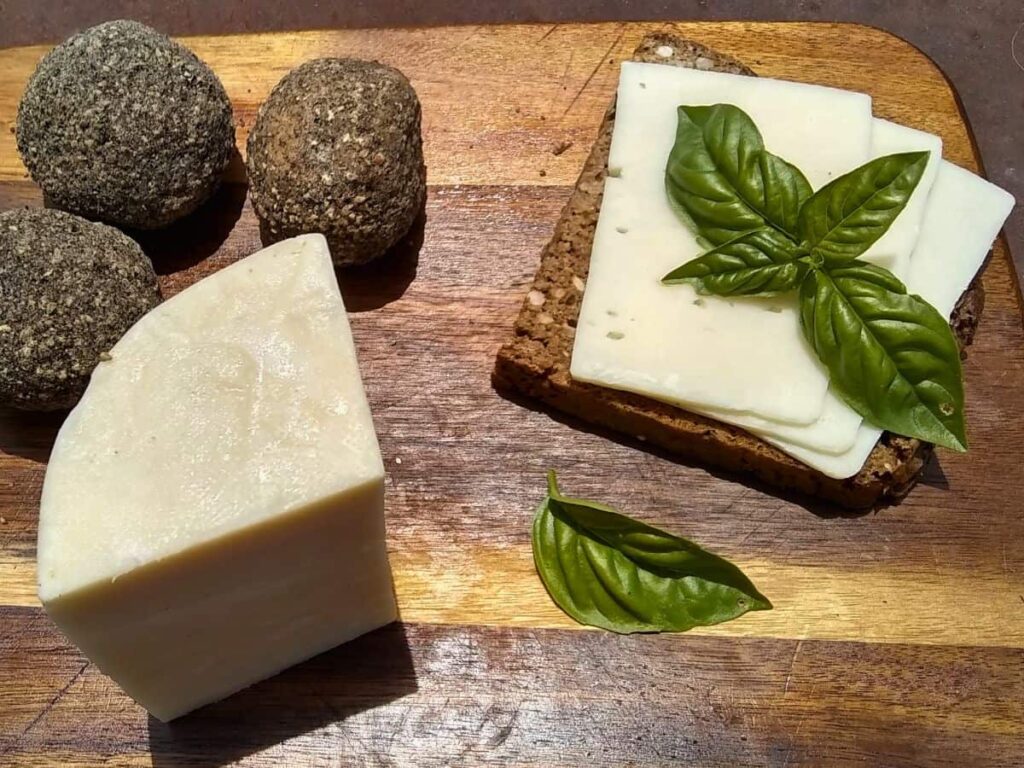
It’s wonderful on some seeded rye bread or plain no-knead rye sandwich bread.
It’s great in hot panini and foccacia sandwiches.
Try it in a grilled cheese sandwich or make a philly cheesesteak sub.
Use it like Provolone cheese in cold italian sandwiches or any cold-cut sandwiches.
Grate it and use it on or in casseroles.

I like to use it in jalapeño pie instead of mozzarella!
Use in place of mozzarella on pizza or pasta.

Eat as a snack by itself.
Try it fried as cheese sticks, like mozzarella sticks.
Your Questions Answered
What type of cheese is Bel Paese?
Bel Paese is a semi-soft slicing cheese with a smooth, texture and creamy flavor.
What does Bel Paese cheese taste like?
Bel Paese cheese is a mild cheese, I like to compare it to mild provolone cheese or a mix between provolone and mozzarella. It has a creamy and smooth flavor.
Where does Bel Paese cheese originate?
Bel Paese was invented in the Lombardi region of Italy, near Milan. It is now very popular all over Italy.
What cheese is similar to Bel Paese?
Bel Paese reminds me of mild Provolone cheese, German Butterkaese, or French and Swiss Alpine cheeses.
How long does Bel Paese cheese keep?
This cheese can age in your cheese cave, cellar, or in the refrigerator for years. Just be sure to protect it properly by waxing or vacuum packing, or by wiping it regularly while it’s aging unprotected. I have gone as long as 3 years and the cheese tasted fantastic!
Enjoy Your Delicious Bel Paese Cheese, The Beautiful Country Cheese!
I hope you get to make this Bel Paese cheese and I’d love to hear about it. I am certain that you’ll love this cheese as much as I do. It is easy to make and doesn’t take a lot of hands-on time. When I want to make a hard cheese but don’t want to bother with a lot of fussing, I always make this one. And it is delicious to eat, creamy, and perfect for snacking, slicing, and melting. It’s super versatile for use in all sorts of dishes, hot or cold. It’s delicious after a couple of weeks, but it can be aged for 6 months or longer for more flavor. This cheese deserves to be on your must-have list. Enjoy it!
Have you made this recipe? I’d love to hear your thoughts and I’d appreciate your ⭐⭐⭐⭐⭐ rating! Let me know what your favorite ever cheese is. And please don’t hesitate to ask in the comments if you have any questions!
Join the Food For Life Garden Community for more great recipes and homestead tips and ideas. I’m always adding new content. Don’t miss any new posts and learn more about my off-grid farm life.
Other recipes you might like
Make Cheese With Sourdough Starter from scratch. No raw milk required!
Bonnyclabber – What is clabber milk and its uses Learn to make bonnyclabber, the original cheese. Nature’s way of preserving milk. A tasty, creamy cheese that makes a really good frosting for einkorn zucchini bread.
Natural cheese making Process – Make your own mesophilic and thermophilic cheese starter and use it to make cheese the natural way. Make yogurt from scratch with your own homemade starter too.
Awesome Uses For Whey – Save the whey! And use it in dozens of ways. You’ll find something to do with whey for every single drop. It’s nutritious, versatile, healthy, and makes great fizzy sodas!
How To Make Sirene (Bulgarian Feta) -Try making your own feta-style cheese. Learn all about this wonderful and easy to make cheese and get the recipe!
Make German Quark cheese – Make authentic German Quark, also called Topfen. A versatile fresh, soft cheese that is a staple in German cooking.
Make your own chevre cheese from scratch – How to make super versatile creamy, spreadable cheese that is incredibly versatile. Replace store bought cream cheese with this healthy version!
Queso Fresco cheese recipe – The quickest, easiest cheese you’ll ever make and so versatile!
How to make your own sourdough starter – This forms the basis for any gut-healthy sourdough bread, that you can keep going for a hundred years or more.
The best Sourdough Rye Bread – Easy, lazy method that makes super delicious, moist, chewy rye bread to partner with your favorite cheese.
Sourdough Seeded Rye Bread With Spelt – If you are a fan of rye bread, you need to try this awesome seeded rye. Loaded with whole grain berries and seeds, awesome with cheese.
Make an ancient grain sourdough bread – The easiest sourdough sandwich style bread you can imagine. No kneading required and it bakes up nicely airy and chewy and tastes amazing.
Pin This Recipe For Later

Shop This Post
Equipment
Royal Berkey water filter unit
12 quart stock pot for larger batches, two is better or you can wing it with one.
Flour Sack Towels
Organic Flour Sack Towels
Skimmer
Thermometer
Long Frosting Knife
Measuring Cups
Micro Measuring spoons
Quart Mason Jar
Micro Measuring Spoons
Small cheesemold with follower
Glass Fermentation Weight
Organic Beeswax from Azure Standard
Vacuum Sealer with bags
Mesh Food Tents
Ingredients
Redmond’s Real Salt
Himalayan Pink Salt
Celtic Sea Salt
Walcoren Organic Kid Rennet
Walcoren Kid Rennet Tablets
Walcoren Lamb Rennet
Animal Rennet
Vegetable Rennet
Live Kefir Grains
Flora Danica
Calcium Chloride
Lipase Powder
Recommended literature for Cheese making
The Art Of Natural Cheese Making, David Asher
Milk Into Cheese, David Asher
Recipe Card
How To Make Bel Paese Cheese From Scratch With Raw Goat’s Milk
Equipment
- 2 12-quart stock pots – One will be used to mix and culture the cheese. The other is for draining the cheese.
- colander – I use this to place my draining basket into. It sits deep in my 12 quart pot where I can keep a cozy warm and humid environment for the Bel Paese during the draining phase.
- Cheese form – If you have a small cheese press form, you'll have a perfect size for this approx 5"x5". If not, you can easily create a form by being a bit creative.
- Follower – optional. This is what covers the cheese and will be used to hold a little jar with warm whey on it.
- Butter muslin – you'll need a piece under the cheese form and maybe as a cheese form liner if necessary.
- Thick bath towel – for wrapping your pot to keep it warm, or fill a sink with warm water.
- Pint canning jar with lid – I use this to pour some warm whey into it and rest it on top of the follower. It helps keep the cheese warm from above during the draining and weighs it down a bit.
- Skimmer – optional.
- thermometer
- Glass container for brining – optional if you choose to brine
- Half gallon jar – for saving the saturated brine later
- Rack or wooden board – for drying the cheese
Ingredients
- 2 gallons Raw goats milk – if you're using pasteurized milk, be sure to not use ultra-pasteurized. It won't work.
- ½ cup Starter culture – Use your raw milk clabber or whey from your last raw milk cheesemaking project. Alternatively use yogurt with live cultures, kefir, or starter culture made with sourdough or vegetable fermentation juice. See 'starter culture' section in the notes for more info!
- ¼ tsp Animal Rennet – for pasteurized milk, use 1/2 tsp rennet! Find more detail in the 'rennet' section in the notes.
- ¼ cup Non-chlorinated water – this is needed to dilute the rennet.
- ½ tsp Calcium chloride, optional! – Not needed for raw milk this is only necessary for pasteurized milk. This is also diluted in 1/4 cup of non-chlorinated water before adding.
For A Super-Saturated Brine
- 2 quarts Warm fresh whey
- 4 cups Sea salt – with no additives!
To Salt Your Cheese Instead of Brining
- 2 tbsp Sea Salt or more as needed. – choose this if you don't want to make a brine
Instructions
- Heat the raw milk slowly to 102-105 degrees while stirring occasionally. (108 degrees if its pasteurized or if it's cow's milk). Take it off the heat.
- Prepare the brining jar by pouring the 4 cups of salt into it. Set it aside for later.
Mixing The Ingredients And Incubation
- Add the culture to the milk and stir it in thoroughly
- If you're using calcium chloride, dilute it and add it now.
- Dilute the rennet in a quarter cup of water. Pour it into the milk and stir well for about 15-20 up and down strokes. Then stop and use your spoon to still the moving milk.
- Cover the pot and let it incubate for 40 minutes. Ideally you'll be holding the temperature, so keep it in a warm place and wrap it in a large, thick towel. If you have a sink, you can fill it with 105-110 degree warm water to keep your pot of milk warm after heating it. Add hot water to maintain the temperature as needed.
- After 40 minutes, check the curd. Is it thick? Stick a knife in it and see if it breaks cleanly. If so, it's time to cut the curd. Otherwise let it incubate another 10-15 minutes.
Cutting The Curd And Cooking The Cheese
- With a long knife cut lines about 2″ apart all the way down to the bottom of the pot. Then cut perpendicular lines 2″ apart all the way to the bottom.
- Let the curd rest for about 10 minutes.
- Cut the curd into smaller pieces, just criss cross diagonally or between the old lines, to make them much smaller. Another option is to use a wire whisk. Use it in a straight up and down motion across the whole pot.
- Let them heal for 10 minutes and then use a skimmer to cut across below the surface, going down in circular strokes to basically slice layers into the curd strands. This can also be done with a wire whisk held sideways. Your goal is to make 3/8" or pea-sized pieces.
- Now heat the curds up to 102 degrees (108 for pasteurized) very slowly, by adding hot water to the sink or placing it on a burner with low heat. Using a double boiler method is safer to avoid overheating the curds at the bottom, if you have a large pot to set your cheese pot into.
- Stir every few minutes while heating to keep the curd from sticking together and matting on the bottom and to keep the curds away from the direct heat of the burner below.
- After 20-30 minutes of stirring (your temperature should be 102 (108) degrees now, test to see if they will stay matted together in a clump when compressed with your hand. They should stick together, but still be easy to separate with your fingers. If they don't stick, keep stirring till they do.
- Take the pot off the heat and let the curds settle for 5 minutes while you prepare your draining station.
Draining The Cheese
- Grab your second pot and colander. Set the cheese form into the colander. Place a piece of butter muslin under it to prevent the curd from squeezing through the holes of the colander and set it aside.
- Use one of two methods to proceed:
Method 1
- After the 5 minutes are up, pour the whey out into the second pot careful and don't let the matted curds slide out too.
- Once most of the whey is poured out, reserve 2 quarts of the whey to make the brine and pour it into the glass jar over the salt to mix later, when you have a moment.
- Now place the colander with the cheese form into the pot with the whey.
- Quickly grab handfuls of the curd and place them into the form to drain. They must stay warm.
Method 2
- Line your empty second pot with a large cheesecloth.
- Carefully pour the whey and curds from the first pot into the cheesecloth of the second pot. Use your hand to support the curd and keep it from making a big splash when it slides into the second pot with the whey.
- Set the colander with the mold into the now empty pot.
- Grab the cheesecloth by the corners, lift the curds out of the whey and squeeze the whole package into your prepared cheese mold inside the colander that you placed over the first pot.
Proceed For Both Methods
- If you have a follower, place it over the curd right away and a pint jar filled with warm whey to press on it lightly and to keep the curd warm. Then I cover it all with a heavy towel or an upside down bowl to keep it warm and humid inside.
- Place this pot on a heat source and lightly heat the whey in it to 110-120 degrees while your curd is draining in the colander above it.
- After 10 minutes, flip the cheese loaf over, replace the follower, weight, lid and towel or bowl.Keep an eye on the temperature of the whey below. Don't let it get too hot. Once it hits 120 degrees, turn off the heat and just let it sit until the whey cools a bit before turning the heat back on.
- Flip the cheese half an hour later for the second time. It should start to look pretty smooth except for the imprint of the basket pattern. If you used a cheesecloth liner, you can get rid of it now.
- Flip again every 30 minutes for the next hour and a half. After that just flip it every 1-2 hours.
- You don’t need to use the weight after the first 2 hours if you were using it at all.
Brining Or Salting
- After about 7 hours, your cheese can go into the brine. If it's evening, just let it drain in the form till the next morning and brine it in the morning.
- Brining: Find a cool place for brining.
- Place the cheese into the glass container with the brine and sprinkle salt over the top. Flip it after 3 hours. Ideally, you'll brine it for 4 hours per pound of cheese, but you don't need to weigh it, just call it 7 hours of brining for this 2 gallon size and flip it once or twice in the brine. Always salt the surface that's exposed due to floating. This will also add some salt back into your brine to keep it saturated. If you find some gadget to keep the cheese from floating, you don't need to salt the top.
- Salting: If you don't want to make the brine, you can also salt the cheese by sprinkling generously with salt all over. Flip it after 3 hours and salt it all again. After another 4 hours, wipe it off.
- Dry the cheese until it's dry to the touch for a day or two on a rack or wooden board and cover with a fly tent or a tea towel. Flip it occasionally.
Ripen the cheese
- Once it's dry, it goes into the fridge to mature. Put it on a wooden board, or on some type of rack or cheese mat inside a plastic or glass container with some room to breathe.
- Flip it once a day for a week, then every two days for the next few weeks. If moisture builds up inside the container, wipe it dry.
- After 2 weeks your Bel Paese will get a bit greasy on the surface. Wipe that off with salted whey, vinegar, or wine.
- If it get's moldy, just wipe off the mold, and again use salted whey, vinegar or wine to do so.
- After 2 weeks you can taste it, but I'd wait for a month to eat it. Slice some off and enjoy.
Storage
- This cheese can be stored and aged. It’s great after 2-4 weeks and you can go ahead and use it in whatever dishes you want or slice it to make sandwiches. I love to eat slices of it for a snack. It’s awesome with crackers or for grilled cheese sandwiches too.
- If you have extra, you can opt to age it for months or years in the fridge, cheese cave, or cellar, and for that you have a few options:
A) Encourage a natural rind
- One is to just keep it in it's container or on a fridge rack uncovered, and wipe it off a couple of times each week to keep mold from growing on it. This will encourage a natural rind to form. If you keep it uncovered, it will get more dry eventually.
B) Vacuum packing
- Another option is to vacuum pack it. This is what I use currently, but it is frowned upon by purists, and not the best option if you're trying to reduce your use of plastic.
- Anyway, I find it so hard to keep a close watch on the cheese once it's in that fridge. And vacuum packing makes it easy to keep the cheese mold-free. It is similar to waxing and easy to do with a vaccuum sealer. Just double check the seal to make sure it is going to stay sealed up. If air gets into it, it will get moldy.
- When you're ready to eat some, cut the bag open, remove what you want and reseal the bag. Undoubtedly it's the easiest, low maintenance aging method.
C) Waxing The Cheese
- Your next option is waxing. Be sure to find a non-toxic cheese wax. My recommendation is pure organic beeswax.
- Heat the wax in a pot, dip half of the cheese into it, let it harden, dip the other half in, let it harden and repeat. Or you can brush the wax on. You will need less wax for this method.
- Once waxed, you can keep it on a shelf in the fridge till you want to use it.
- At that time, slice off a piece and reseal the cheese by dipping the cut side into warm wax a couple of times.
- If you like waxing the cheese, I'd get a cheap second crock pot (I find them at thrift stores quite often) and keep the wax in it, ready to heat when you need it. Or get an old pot and dedicate it. The wax can be reused. Always be vigilant when heating wax to not overheat it and cause it to combust.
- I have stored some of my vacuum packed Bel Paese cheese for about 3 years in a root cellar and it was delicious. I can't imagine that it wouldn't be fine even longer, but have not tried it. It can also be kept in a cold cellar or cheese cave. Cheese cave temperature is generally 50-55℉.
Notes
Tips To Make The Best Bel Paese Cheese At Home
- If you’re using Pasteurized milk, I recommend that you add calcium chloride to your milk. Pasteurization not only kills the good bacteria, but it also breaks the calcium in the milk and denatures proteins. For best results, add some calcium back in to provide better structure and cohesiveness in the curd. It can also improve the yield of any milk, but it is not necessary for raw milk.
- Flip your cheese shortly after pouring it into the mold. I like to flip mine for the first time after 10 minutes for a better texture in the cheese. After that every half hour for the next 2 hours and then once or twice more.
- Flip the cheese after it goes into the refrigerator to age once a day for a week and then about 2-3 times for the week thereafter. Once it develops a greasy film, wipe it with salted brine, vinegar or wine every few days. It’s good to eat after 2 weeks, but it’s best to wait about a month. For long term storage, I vacuum pack my cheese, but you can also wax it. Then stash it away in your fridge. Turn it once every few weeks.
- This cheese gets brined after forming and draining. If you prefer, you can just salt it, because it’s so small. That means covering it generously with salt on all the surfaces, flipping after a few hours and reapplying salt. You can do this overnight.
- I prefer using a saturated brine, because your brine can be reused over and over. Make it once and just keep using it. You will waste less salt and it makes less mess. I pour my brine into a quart canning jar and keep it in the fridge. Seasoned cheesemakers keep their brine for decades and claim it gets better and it becomes somewhat of a prized possession, much like an aged sourdough starter. It takes a lot of salt, but as long as you don’t dump it out, it’s not wasted. If you’ll never make cheese again, use this salt solution by the spoonful and add it as seasoning to bread, baked goods, soup, marinades, etc.
- My instructions call for 2 gallons of milk. That is my favorite amount of milk for this cheese. While you could make it with 1 gallon, it’s really not worth all the trouble and cheese ages better when the loaf is bigger. You could make it bigger, but I find that it’s more convenient to have smaller loafs of this in the fridge for stashing and for using. 8 gallon batches make some huge loafs that are a bit hard to find room for when you don’t have a root cellar!
Rennet
Use organic animal rennet if possible. Avoid “Vegetable” or “microbial” rennet also called Fermentation Produced Chymosin (FPC). In the U.S. cheese is most often made with genetically modified organisms, molds, or fungi that are lab-grown on GMO soy or corn bases. In fact, 80-90% of cheese you buy in the store is made with genetically modified, manufactured microbial rennet. Regular animal rennet is most often clean, but can also be made with genetically altered or manufactured materials, and the label does not need to reveal any of this. Honestly, I’d stick with organic or at least a non-GMO product. My go-to rennet is from Walcoren. It’s made the old-fashioned, traditional way from kid or sheep abomasum and it’s all natural and organic. You can find it in liquid or tablet form. I use the Walcoren Organic Kid Rennet and they also make Lamb Rennet. I have had mine for years and it still works. One jar will last a very long time in your refrigerator and if you plan to make cheese regularly, it’s a must-have item. Another option is this clean-ingredient, no-GMO animal rennet. It’s a high quality rennet in a smaller size bottle and therefore cheaper. I have used this for many years in the past before I found Walcoren. Aged cheeses are best made with animal rennet and not vegetable rennet, since vegetable rennet can impart off-flavors as the cheese ages. If you must go with vegetable rennet you can try a thistle based rennet that is made with clean ingredients, or make your own from bull thistle stamen, but be aware that your cheese might turn out bitter, especially if you use cow’s milk or age your cheese for more than a couple of months. Here is an Organic Microbial Vegetable Rennet, which is lab made and fungus based, but not GMO. It has some good reviews. If you’re using pasteurized milk, increase the rennet to 1/2 tsp!Starter Culture
Raw Milk Options
There are natural options for starter cultures to make Bel Paese Cheese. Bel Paese is normally made with part thermophilic, part mesophilic cultures. If you have clabber culture from raw milk, you don’t have to worry about any of that. It contains all the microbes you need that will work in warmer and medium temperatures naturally. The gist of making raw milk starter culture: Just let a pint of your raw milk clabber, use a spoonful of that to inoculate another pint of fresh, raw milk, repeat and after 3-4 rounds, you’ll have a clabber culture that you can use to start cheese with. To get more details about this process, check out this Natural Cheesemaking Process article. And you can learn more about making Clabber here. Whey: If you made cheese before with raw milk starter, you can also use the unsalted whey from a previous batch of cultured cheese. Raw milk clabber whey is what I use.If you don’t have access to raw milk
Whey: If you’ve been making cheese, just use some of your latest whey from your last cultured cheesemaking project. If it is a raw milk whey or yogurt whey you’re good to go. If you used mesophilic cultures in a previous cheese, then I would also add some yogurt to make this cheese along with your whey, use half the amount of each. Kefir: If you’re keeping milk kefir grains, you can use your milk kefir as a starter culture. It is what I used for years and it contains both mesophilic and thermophilic microbes. Yogurt: You could buy some cultured plain yogurt from the grocery and use it (be sure it contains live bacteria). Make cheese starter from either sourdough or fermentation juice as described in How To Make Cheese Culture From Sourdough. This requires that you have an Active Sourdough or any Raw Fermented Food in your fridge. Or take a few days and make some! You basically need to capture some wild live lacto-bacilli and introduce them to the pasteurized milk after growing them on raw food or flour, which is what you do with sourdough and fermented vegetables. Pasteurized milk is dead milk and needs some help to come back to life. I have tried making this cheese with culture made from Fermentation Juice Starter and pasteurized milk and it came out really nice but with lots of holes, sort of what you get when using Kefir. It tastes wonderful after a month of aging. Stay tuned to find out how well it ages over a longer term. I’m also working on a sourdough starter version. My first batch did not turn out so well and I think that was because I forgot to add calcium chloride to the pasteurized milk and I let it get a little too warm at one point. I do have a cheese from this test, but I haveHow To Use Bel Paese Cheese
It’s great in hot panini and foccacia sandwiches. Try it in a grilled cheese sandwich. Use it like Provolone cheese in cold italian sandwiches or any cold-cut sandwiches. Grate it and use it on or in casseroles. Use in place of mozzarella on pizza or pasta. Eat as a snack by itself. Try it fried as cheese sticks, like mozzarella sticks.Enjoy Your Delicious Bel Paese Cheese, The Beautiful Country Cheese!
I hope you get to make this and I’d love to hear about it. And I sure hope you’ll love this cheese as much as I do. It is easy to make and when I want to make a hard cheese but don’t want to bother with a lot of fussing, I always make this one.Shop This Post
Equipment
- Royal Berkey water filter unit
- 12 quart stock pot for larger batches, two is better or you can wing it with one.
- Flour Sack Towels
- Organic Flour Sack Towels
- Skimmer
- Thermometer
- Long Frosting Knife
- Measuring Cups
- Micro Measuring spoons
- Quart Mason Jar
- Micro Measuring Spoons
- Small cheesemold with follower
- Glass Fermentation Weight
- Organic Beeswax from Azure Standard
- Vacuum Sealer with bags
Ingredients
- Redmond’s Real Salt
- Himalayan Pink Salt
- Celtic Sea Salt
- Walcoren Organic Kid Rennet
- Walcoren Kid Rennet Tablets
- Walcoren Lamb Rennet
- Animal Rennet
- Vegetable Rennet
- Live Kefir Grains
- Calcium Chloride
Recommended literature for Cheese making
- The Art Of Natural Cheese Making, David Asher
- Milk Into Cheese, David Asher


This cheese is so versatile, I love having a few loaves in the fridge to cook with. It’s a great substitute for mozzarella and can be aged for a long time. Ask me here if you have any questions!
Absolutely love this recipe! Such great instructions! I’m excited to try this!
Thank you Mara, I hope you get to try it and hope you’ll love it!
This looks delicious and is making my mouth water! I need to get back into making cheese. I’ve only made Mozzarella and Ricotta, and years ago tried to make Parmesan, but it got moldy, and I freaked out lol. I love your thorough, easy-to-follow instructions, and the options you offer for using different types of milk. Thank you! This post has enticed me to get back into cheese making.
I’m thrilled if I could inspire you a little. And I hope you get to try this, it’s really a nice cheese to make without much fuss.
Thank you for sharing such a detailed and informative article. I have little experience with cheese making but this recipe looks approachable!
Hey Anna, it’s really pretty easy even if you don’t have experience. If you get to try it, let me know how it turned out and you can ask if you have questions any time.
I just want to come sit in your kitchen and watch you work, this looks amazing!
Haha, I think you’ll have the most fun watching me be a klutz, lol.