22 types of compost, best methods and uses. Use as fertilizer, top dressing, and mulch. Increase soil life. Grow humus. One will work for you.
This post contains affiliate links, which means I make a small commission at no extra cost to you if you click through and make a purchase. See my full disclosure here.
Defining Compost
There is compost and there is compost. They are different animals, let me tell you. All compost is not created equal. How then can you make the best compost for your application? Well, the best compost is always the one you have on hand because it is better than having none. In this post, I will introduce many different composting methods. So let’s dive into compostology.
Jump straight to Different Types Of Compost

According to Wikipedia, “compost is a mixture of ingredients used as plant fertilizer and to improve soil’s physical, chemical, and biological properties. It is commonly prepared by decomposing plant and food waste, recycling organic materials, and manure.”
According to me, compost is what happens when organic material rots and decomposes. We don’t have to make compost, it happens naturally, on its own, every day and everywhere, even in our kitchen. However, we can steer it in a desired direction and manage it to speed up the process. Or we can simply remove and carry the ingredients to do their decomposing in a dedicated location of our choosing. Then allow it to go through its natural process of rotting.
There is really no ONE best way to compost, there are just many different ways that can be used for many different purposes. Compost is your ticket to nutrient-rich soil, increased soil life, and creating humus. It eliminates the need for chemical fertilizers and promotes a healthy growing environment. Choosing the right types of compost can make a difference for your plants, so read on to find what will work for your situation.
My top pick for gardens is the hot compost method (#5) and I have a detailed post to describe how to make this fast hot garden compost. And my top pick mulching compost for food forests and gardens is #8. You can learn more details about it here.
What To Use To Make Homemade Compost

Technically, you could use anything that can biodegrade to create compost. What many people call garden waste or organic waste are the beginnings of riches. I don’t like to call anything ‘waste’ that can be composted. Any compostable materials are valuable resources.
Materials for composting include animal products, dairy products, plant-based material, old cotton t-shirts, worn-out linen towels, rotten food, manure, and more. But that is not to say that you should actually use all of these nor that you shouldn’t, in certain types of compost. Much depends on how you build the compost pile, what it is meant to do, and how long before you use it. Consider also whether you will actively hot compost, how large the pile will be, or whether you compost by fermentation.
For example, if you hot compost, you can add weeds that have gone to seed, because the heat in the compost pile will destroy them. This is not the case with a cold composting process.
Don’t Try To Compost This:
Researchers are testing if inorganic items like plastics and certain chemicals can decompose to create innocuous soil. And there really are organisms that will tackle these materials. However, I don’t advise that you try this for your garden beds. It is a very interesting topic though and I do keep my watch for more on this. To find microbes that could turn our noxious waste into useful and safe compost would be pretty cool.
But for now, I’ll stick to using materials that are safe to start with. And meanwhile, I try to minimize my use of plastics and other man-made and non-biodegradable materials.
How To Choose The Best Types Of Compost For Your Situation
To determine how you will compost, these are the things to ask yourself:
- What is the end use for it?
- How much space do I have?
- How fast do I need it?
- What materials are available to me?
- How much material do I have access to right now?
- What method would be easiest to put into practice?
The ‘Brown’ And ‘Green’ That Goes Into Different Types of Compost

Compost piles, which require a mix of browns, greens, and nitrogen, have a specific ratio that works best for that type of compost. So what is brown, green, and nitrogen?
Brown
In a nutshell, brown materials are mostly made of carbon, dead material, like fallen dry leaves, straw, paper, cardboard, woodchips, etc.
Green
Green Material is rich in nitrogen and includes freshly mowed lawn clippings, and fresh vegetables that still contain moisture. Food scraps, grass clippings, yard trimmings, coffee grains, and weeds are green as well. High nitrogen comes from legumes, fresh manure, and urine.
I go into more detail about specific materials, browns, greens and ratios in my post How To Make Your Best Compost. This is a great multi-purpose compost, well suited for vegetable gardens. You’ll find references to specific ingredients for some of the types of compost in the numbered list below.
Be sure to download my FREE guide to Composting Basics. It will explain the Carbon:Nitrogen ratios in detail and why they are important. It also features a list of materials with their specific ratios.
Bactrial Vs. Fungal Based Compost
In a nutshell, trees and perennials love fungal based compost, while annual vegetables love bacterial based compost. So how do you get one or the other? I will refer to this in the different types of compost below. But a fungal based compost is achieved by adding no food for bacteria to your compost pile. That means you pile up your carbon materials and leave out the nitrogen rich materials.
Fungus thrives in wood chip piles and dry leaves. If you add nitrogen materials, you’ll have some bacteria move in that thrive on a diet of 25:1 carbon to nitrogen ratio. This will create a bacteria based compost. All composts will have some of both present, but certain composts will be favored by one or the other.
A Word About Eggshells:

Eggshells take years to decompose. Until they do, they will not provide any significant amounts of calcium to the soil. If that is your hope, it is best to put the dried eggshells in a blender or mortar and grind them into a powder before applying to the compost or garden.
Eggshells are also great for deterring slugs in the garden, so you might want to sprinkle it directly around plants which are prone to slug damage. Finely crushed works fine for that purpose.
Idea: I add some ground eggshells in the coffee grounds basket of my percolator when making coffee. I hope it will help my bones and teeth. The acid in coffee can help leach out the calcium in the eggshell powder.
Beware Of Contaminated Material:

A word of warning: Use only safe materials that have not been treated with pesticides, chemicals or desiccants. Be especially careful when using straw and hay and vet your sources well. Hay can contain Grazon even if it was not sprayed on directly. Manure from cows that have been fed hay, that was treated with Grazon, will contain the chemical and if that manure is used for composting, it will remain viable.
If the contaminated manure was sprayed on a hayfield, it will be contaminated. When cows, that were fed Grazon hay, are grazing it and poop on it, the hay that is harvested from this field later will be contaminated. It is extremely hard to trace, since most often more than one party is involved, so you’ll have to do your due diligence in that regard.
Lawn Clippings
Avoid grass clippings from lawns that were treated with pesticides.
Sawdust and Wood Products

Use only Sawdust and wood chips that come from Logs and branches. Sawdust or wood chips from pallet wood and treated lumber are not safe to use in your compost.
If you use pallets to build your compost pile, check the pallets for a HT stamp. This assures that the pallets were heat treated to make them last longer and are not infused with chemicals. HT pallets are safe to use.
Some woody materials are especially resistant to decay and if you can separate these out to use otherwise (on walkways for example where that property would be a benefit), it will help your compost piles break down quicker. These include Oak, Hickory, Cedar, and Locust for example.
The finer your wood chips, the quicker they will compost. Coarse wood chips can make the process take a very long time. So if you want to make compost quickly, use only sawdust or finely ground wood chips.
Walnut products are not recommended for compost. Some sources advise against using any walnut material in compost piles. Some say it is ok to use in a wood chip mulch, which stays above the surface. Personally, I don’t worry about it.
Juglone, is a substance that is found in walnut material and is most prevalent in the walnut buds, hulls, leaves and roots. This substance can impede growth in some plants. Walnut trees that have been cut down and the wood turned into chips, after the walnuts have fallen to the ground, have less concentration of this chemical. If you get wood chips delivered, it’s hard to tell what it contains, but this is something to be aware of.
What Is EM-1 And How To Use It For All Types Of Compost
This may be unfamiliar to you. I mention it in a few of the methods below, so I want to just explain what it is that I’m talking about.
EM-1 is short for Effective Microorganisms-1. EM-1 is a registered and trademarked product that was developed by Dr. Teruo Higa, and is distributed exclusively by TeraGanix. Dr Higa developed this proprietary blend of microorganisms in his lab after much research and testing.
He selected this blend out of many combinations, for their effectiveness in breaking down organic material. He found the synergism in this particular blend of organisms stood above all the others and chose to produce it commercially. It adds these special organisms to whatever you inoculate with it and super-charges the decomposition process.
It is not necessary to add any special potions to your compost pile. There are many naturally occurring organisms that will work on your composting operation, just because they are already present in your environment. These native organisms are sufficient and, I believe, superior to any that are introduced. But EM-1 has proved to accelerate the process and will add millions of extra microorganisms to your compost and soil. If applied, it adds more diversity.
What Is LAB and How To Use It

LAB is short for Lactic Acid Bacteria. A preparation of LAB will act as an accelerator on your compost and can speed up decomposition for faster results. Lactic Acid Bacteria is a naturally occurring organism that we see in operation in many daily processes. Take cheese, sauerkraut and kimchi, fermented dill pickles, and sourdough. You can create all these with the help of Lactic Acid Bacteria or LAB.
The cool thing is, they exist in our environment and we can capture them for free. Then we can use them for preserving our vegetables, making bread, cheese, and compost. You can watch here, how to capture lactic acid bacteria for garden use and how to store it and use it. A great book on making and using LAB in gardening is JADAM, by master Youngsang Cho, I highly recommend it! I will post more about LAB soon. It is very versatile and useful for many gardening and household applications. Stay tuned for Food For LIfe Garden updates!
I will mention LAB in a few of the types of compost paragraphs, but know that it can be used in any compost to introduce beneficial bacteria as a starter or booster. However, it is not neccessary for making compost. If you have it go ahead and use it, if not you can still make great compost.
Choose Types Of Compost Based On The Size Of The Operation
For a large garden, you’ll go through a lot of compost each year if that is your only source of fertilizer and soil enhancer. I know people who use tractors to manage long windrows of compost because they need so much of it that it would be impossible to manage by a single person without equipment.
Large Scale
I won’t go into details about commercial composting facilities here. But they operate basically the same way on a much larger scale, managing many rows of long piles.
Then there are those who also make a large pile, but don’t turn it, and instead leave it to rot over a whole year or more.
For the rest of us who have to do without tractors or a huge amount of space to dedicate to composting there are many other options.
Ideal size for a backyard compost pile or bin
Compost piles that are built with the intent to produce heat, should be at least 3 feet by 3 feet square and 3 feet high. That is one square yard or meter. Smaller piles won’t heat up enough, and don’t hold the heat long enough, to achieve the end goal. This is a good size for a single person to complete in an afternoon and doesn’t use an overwhelming amount of materials. You can form a pile that is fairly cubic, or round with straight vertical walls. You can also make it in a bin.
Small scale
If you have just a tiny garden patch or some planters on your patio, then a barrel or compost tumbler, or even just a bucket in a corner might be enough. Explore #18 Bokashi and #6 Vermicomposting too!
In any case, and in my humble opinion, you can never have enough compost when you garden and it’s a good goal to create as much as possible! Simple as that.
Using Your Homemade Compost

Compost should only be incorporated into the soil after it has aged for a month or two. If your compost contains large clumps of incompletely decomposed material, you can sift those out and use them in a new compost pile as starter.
Or use your compost as a top dressing around your vegetables, without working it into the soil. There it can age a while longer and hopefully decompose fully before you want to incorporate it into the soil in the fall. You can also use it as a nutritious mulch that will feed your plants, keep weeds down and keep the soil covered.
Different Types Of Compost – An Overview

There are basically as many types of compost as there are compost piles. None equals another. Yet some broader groupings can be used to classify some of the many kinds that are rotting away in the backyards of our world. Compost is the backbone of any organic farming or gardening operation.
Don’t miss #5, my favorite way to make quick compost! And if you’re planting trees, take a look at #7.
1. Windrow Composting
If you own a tractor and need a sizable quantity of compost, windrow composting is a way to compost large amounts of material efficiently in rows. Like other types of compost, turn it every few days for about three weeks and then leave to age for another month or more. Size recommendations vary, but are a height-to-width ratio with dimensions in the span of 5-10 feet high and 10-20 feet wide. A tractor or backhoe is necessary to turn windrow compost piles.
2. Long-term Undisturbed Types of Compost

Have you ever raked up a pile of leaves or grass from your mowed lawn and left them in a corner of your yard to rot? You would have what I call a long-term undisturbed compost pile. These piles sit for a year or many and eventually you’ll find things growing in them because they have turned into soil. Think of piled-up manure, sawdust at a sawmill, a hay bale left out in the field.
Nature’s way to compost
Dig a little under fallen leaves in the forest, and you’ll find super rich looking, loamy humus that nature created by this method. It’s truly black gold and can’t be much improved upon. That is what goes on continuously in a forest and in all of nature, without any help.
What to watch out for with these types of compost
The one downside is that weed seeds in this kind of compost remain viable. As soon as the opportunity arises, they will go ahead and germinate. This can happen when the compost is disturbed, spread in the garden, or gets hit by sunlight.
If your pile contains just leaves, this is less of a problem. Throw in some mowed weeds and grasses and you might introduce those seeds to your garden when you apply the compost.
This type of compost takes a long time to decompose, so don’t expect to have compost in a month. It will take many months to a year. And the closer to ideal your carbon:nitrogen ratio is, the quicker it will decompose. Get my FREE guide to Composting Basics for details on Carbon:Nitrogen or C:N ratios including a list of materials with their specific ratios.
3. Leaf Mold
Leaf mold compost is a variation of the types of compost described in number 2. But it is just made of leaves. This can be easily created by collecting leaves from your yard and the road-side leaf bags in your neighborhood in fall. Just pile them up and let them sit for a year or two. It makes a nice, rich lazy gardener’s compost.
A quicker and more effective way to create leaf mold is by chopping the leaves before piling them up. Or just keep them in bags to rot away. Poke a few holes in the bags if they are made of plastic, moisten them and lay them in an out of the way corner for 6 months or so.
4. Add-on Types of Compost

Many people create these in their backyard. This kind of pile does not produce compost very quickly and often is a mix of finished compost and decomposing items.
How an add-on pile works
You create add-on types of compost by dumping some yard waste and food scraps into a bin or pile. Then you keep adding kitchen scraps or other materials as they become available over time.
How to use an add-on pile
It is best to use these types of compost as a top dressing, since they usually do not decompose evenly. This is not an ideal way to create compost for your garden. It is however convenient to have a way to compost everyday. The quality is questionable but works, if you don’t expect a perfect black gold compost.
You can add whatever is available each day, but you will want to mix up brown and green ingredients and finish with brown. If you add something green, cover it with something brown. An example for this would be to add vegetable peelings and coffee grains from your kitchen. Then cover with some raked up leaves, shredded paper, ripped up cardboard scraps, sawdust, or pine needles. This will prevent fly infestations and critters who like to pick out the tasty bits. It will also help to approximate an ideal Carbon:Nitrogen Ratio.
When you are ready to use it, your pile will have the benefit of a diverse makeup of ingredients. Thus the end product likely contains a wide variety of nutrients and microorganisms. Diversity is nature’s way of redundancy and the lesson we take is to keep things as varied as possible. Sift out the humus and leave the rest to keep composting, or use all as a top dressing on your garden beds or a mulch
If kitchen scraps are the only things you want to compost, consider also the Trench Composting Method, #12 below.
5. Quick 18-day Compost

This kind of compost is great when you need a finished compost fast. It is the most labor intensive backyard-size compost, but it can be made in about 3 weeks. Then just add about a month of aging. This compost will not contain viable weed seeds and is mostly bacterial in composition.
Making the 18-day compost
You create this multi-purpose compost by layering percentages of ‘brown’ carbon- and ‘green’ nitrogen-rich materials. When building the compost pile, you follow a fairly strict formula, although slight deviations don’t usually turn out detrimental. Don’t add to it once it is built. You will need to gather all the materials for one whole pile ahead of time and stock-pile it. Then use it all at once on pile-building day by layering browns and greens.
This Is The Ticket To A Weed-free Compost
If properly built, this pile will heat up to high temperatures, around 130 to 150 deg F. This will kill weed seeds and many pathogens and diseases. You need to turn it every few days so it remains hot. Mix the outside layers to the middle so all the ingredients get heated equally. Cover it, to keep the wind from drying it out and so the rain will not wet it excessively or leach out the good stuff. Covering also acts as pile insulation, keeping the heat inside.
Aging is important
This is my favorite way to create compost when I’m in a hurry. It makes great garden compost, but you should not plant straight into it right away. Like all other types of compost, it needs to age. Give it at least one month. Once aged it won’t burn your plants. And it won’t steal nitrogen from the plants as an unfinished compost might. If you want to use it immediately, use it as a top-dressing around the base of the plants. You can spread the un-aged compost on garden beds or work it into the soil in fall and leave to age till spring on-location.
Read my step-by-step tutorial on what to add and how to build an 18-day compost.
Coming soon is how to build my favorite ever compost bin. Use it to build many types of compost piles. Stay updated on new posts by receiving my Food For Life Garden Newsletter!
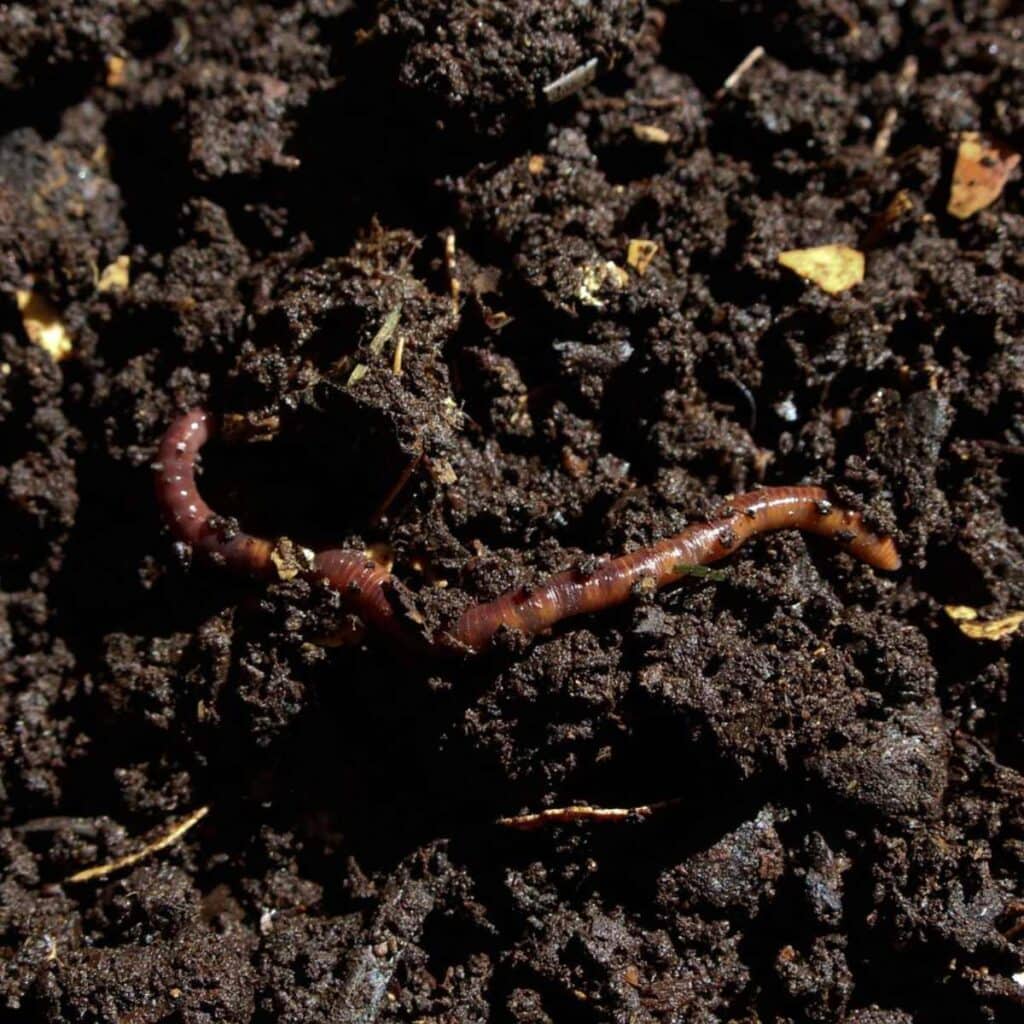
6. Vermicomposting

Another one of my favorites is vermicomposting, also known as worm composting.
How worm composting works
Worm composting is based on a food scrap feeding system, housed in a worm bin that employs specialized compost worms, such as red wigglers to process the material. The resulting worm castings are a rich source of nutrients and can be used in your soil as fertilizer. With a high concentration of nutrients, a little goes a long way.
Compost kitchen scraps right inside your kitchen
While most types of compost are made outside, and require a good amount of space, this one can easily fit into even a small apartment. You can turn any unused corner into a highly productive composting area. Use a few stacked 5 gallon buckets for a small scale, or plastic totes, or even a bathtub, for a larger operation.
When finished, mix a small amount into potting soil for potted plants or raised beds, or add it to regular garden beds. Turn it into compost tea and it becomes an especially efficient fertilizer. The tea also makes a great, super nutritious foliar spray.
A by-product of this type of composting is worm-leachate. There are different ways to make vermicompost and the wet method will produce a liquid that can be drained off daily, diluted, and used as fertilizer as well.
Coming soon: Learn how to make vermicompost with a DIY system. Sign up for updates!
7. Carbon-Based, Fungus-Dominated Types Of Compost

These types of compost are much like the pile-it-and-leave-it kind. The important distinction here is to use carbon based materials without the greens and nitrogen. You can use a mix of material such as wood-chips, sawdust, leaves, small branches, paper, or cardboard. All types of compost will have some fungus moving in, but most piles that use greens and high-nitrogen material, end up bacteria-dominated.
How to make fungal-based composts
This is my favorite way to compost, but it takes a long time to develop. The carbon-rich material does not break down as quickly as a pile built with veggie scraps, manure and hay. But the rewards for patience are many-fold. Pile up the materials, then leave it alone to grow mushrooms, in essence.
This kind of compost works best as top-dressing or mulch, since it might not be completely decomposed when you’re ready to use it. After you apply it, it will continue to break down. The small branches and wood chips in it can take years, especially when they are from cedar or hickory or other slow-to-decompose wood. But it will do wonders for your soil life as a mulch.
This will work especially well for trees and berry bushes, which rely on mycorrhizal relationships. Some vegetables, which form trade-relations with fungal communities and the hyphae that form in carbon-based composts, will also benefit.
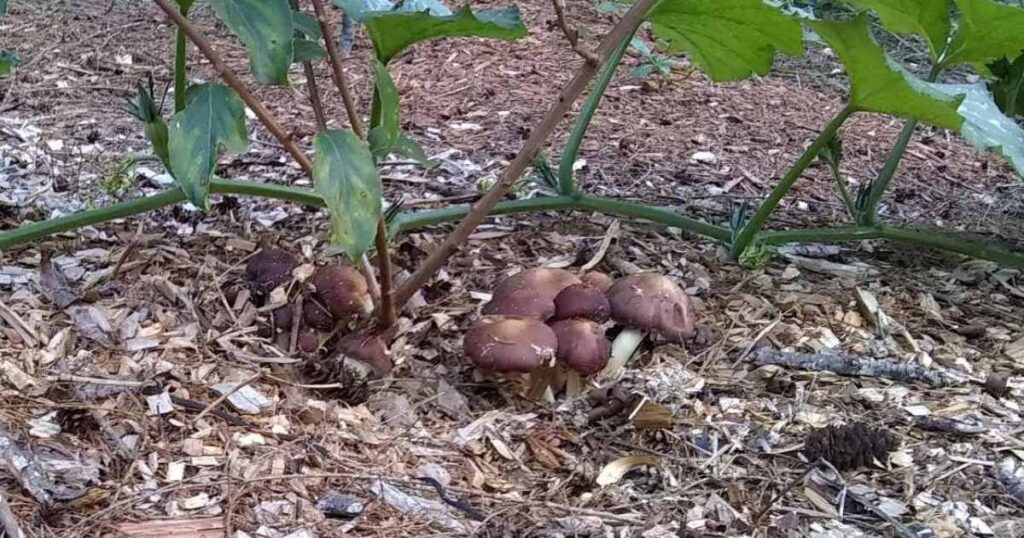
8. Wood Chip Mulch

Wood chip mulch is a form of the fungal-based types of compost. Cover an area with a foot or so of wood chips and let them compost in place. This eliminates having to handle the materials several times, and leaves the fungal development undisturbed.
How to use Wood Chip Mulch
Use this method when preparing an area for later planting, around fruit and nut trees, or where you want to plant trees in the future. You will introduce gazillions of microorganisms and fungal activity to the area, and as the wood chips decompose, they will turn into rich humus. They will also turn the ground below into humus as the micro-herd of critters burrow and tunnel ever deeper. If you suffer from dry weather conditions, this will go a long way toward conserving water.
Benefits of Wood Chip Mulch
Apply wood chips as mulch to receive many benefits.
- An in-situ compost system
- No need to turn
- Easy-to-apply
- Discourage and suppress weeds
- Encourage and shelter fungal activity
- Increase soil life
- Increase water infiltration capacity
- Keep soil moisture levels high and decrease the need for watering
- Prevent soil erosion due to wash-out from heavy rains or dust clouds from wind
- Add an aesthetically pleasing aspect
- Grow your own mushrooms in wood chips!
For best results, apply a thick layer of wood chips, at least 6 inches and better 12 inches deep.
Read here how I use wood chips in How To Prepare Your Soil To Plant Fruit Trees and my How To Make Mulch From Wood Chips post.
9. Manure-Based Types Of Compost

If you own livestock, you probably have plenty of farmyard manure that piles up. You can turn this into several types of compost. Any of these are really nice for your garden once finished. They usually finish fairly quickly due to the high-nitrogen content and the near perfect mix of greens and browns.
Making ruminant manure compost
You can easily make 18-day compost out of animal bedding if you turn it every 2 days. Ruminant manure, when mixed with bedding materials such as hay, straw, or shavings, will readily decompose. It is a near perfect mix on its own without adding additional material. If your manure is not mixed with bedding, mix it with brown materials such as straw, hay, sawdust or shavings.
I like to turn it two to three times after it gets hot, and then let it sit and do its thing. The less you turn, the longer it takes. But if I don’t need compost fast, I don’t like to disturb the activities inside the pile unnecessarily. Even when I turn it just a couple of times in the beginning, while it is hot, it will turn out great in a few months.
This compost should be made using the hot method, to kill any weed-seeds that were in the bedding material. Undigested manure can also contain weed seeds. Hot composting will sterilize the weed seeds.
Chicken manure compost
Chicken manure on its own, needs to age for several months before you apply it in the garden. It is especially high in nitrogen and considered ‘hot’, and it will burn plants when fresh. It is however a supercharger for any compost pile that uses nitrogen materials.
Use a small amount of fresh chicken manure as a compost accelerator or compost catalyst and it can help speed up decomposition of any pile.
Rabbit manure
You can use rabbit manure straight up as fertilizer pellets in the garden just as soon as you harvest them.
10. Deep Bedding Compost Made In A Barn

This is a variation of manure-based types of compost. A livestock operation that uses a barn for shelter, can adopt a certain method of bedding the animals, which is called deep bedding. I am much a fan of this. It is a great way to keep the animals warm and healthy in winter.
How to use deep bedding compost
Deep bedding is achieved by adding layers of bedding material to cover animal manure whenever necessary to keep the top layer dry and clean. However, after a year of adding bedding materials, remove the bedding and start over again. If you just keep adding, you’ll run out of headspace eventually. Usually, you clean-out in the spring after the cold season ends. Some of the bedding can remain to inoculate the new bedding with beneficial organisms.
Deep bedding is especially beneficial in colder climates. The bottom layers will decompose and generate heat in the process. It’s basically a compost pile. This will help keep the animals dry and warm due to the heat generated during decomposition. It will also help to promote beneficial bacteria.
How to use deep bedding
When the bedding is removed in spring, much of it can be used as compost in the garden. Scrape off the top layer that has not decomposed yet and make a compost pile out of that for later, or leave it in the barn as a starter. You can use the already composted bedding in the garden. What a great way to keep animals happy and healthy and add nutrients to your garden!
A word of caution is in place here. The heat that gets generated is unlikely to be hot enough to kill weed seeds. Therefore, if it is used in the garden, some weeds may sprout. I don’t worry about that, but it is something to be aware of.
Stay tuned for a future post on how to use the deep bedding method for livestock, where I will cover more detail about this subject.
11. Humanure Compost

Ahh, the ‘icky’ subject. It’s funny that we hesitate to include this rich, beneficial product in our lists of types of compost, just because it is human-based. In my opinion, a composting toilet is the very best way to deal with human manure. Better than flushing it down a drain, with gallons of water. That’s a waste of water and a waste of some great nutrients and future humus. You could call that ‘Humumus’, lol.
How a composting toilet works
Many off-gridders are very familiar with this practice. To the uninitiated, the concept here is to bypass using the flush toilet if you have one and deposit your business into a bucket instead. Cover with sawdust, chopped leaves, or other suitable material.
When the bucket is full, compost the contents as you would any other materials, but in a dedicated bin. Place carbonaceous materials to form a wall around the edges and dump your bucket contents into the center. Cover the top of the manure thickly with carbonaceous material, such as hay, straw, leaves, sawdust, shavings, or wood chips, and it won’t smell. There it will happily compost away.
For best results. Pee into a separate bucket and use it, very diluted, as nitrogen rich fertilizer in the garden.
Can You Compost Dog Poop Or Cat Litter?
You can also add those manures that are usually not recommended for a quick garden compost. This includes dog, cat, and pig manure. They are considered unfit for a regular compost pile since they might contain pathogens and harmful bacteria. Neither of which you would want to find on your vegetables. Use only natural cat litter that can break down if you are going to compost it. Litter made of grain, paper, and wood pellets is ok to use. Clay-based litter or litter that has deodorants added, is not.
How Do You Use Humanure after it has aged?
Any pathogens from animals and humans will be rendered inert with time. After filling your bin and calling this pile done, the recommendation is to leave it undisturbed for 2 years. Use it like any other compost after this waiting period.
If the idea of using it on your vegetables makes you squeamish, consider it for trees, hedges, flowering plants, or other plants where the edible parts won’t be in contact with it directly. But it would be perfectly fine to use in the garden at this point.
Insider tip for keeping your composting toilet odor-free:
A Composting Toilet, even a simple one made of a 5-gallon bucket, does not have to stink. Cover each deposit generously with some chopped leaves or dry sawdust. This will keep it odor-free. An extra step is to add Lactobacillus bacteria.
Each time you’re covering your deposits, give it a spray with EM-1 or LAB. Either of those will add beneficial bacteria that will help break down the contents much faster and it will also help with any odor. I keep a spray bottle with either one of these inoculants right beside my bucket, ready to use.
It also helps to pee into a separate bucket. Urine adds very high nitrogen content and that could cause odors due to ammonia off-gassing.
I won’t get into all the types of composting toilets here. And quite frankly, I don’t have experience with any of the fancy ones. However if you’re interested in trying the 5-gallon bucket system you can get a simple snap-on lid. Place another bucket with sawdust next to it. I’ve been using mine for 6 years now and counting. And if you can’t tell by now, I’m a very enthusiastic fan. Give the Composting Toilet a try!
I suppose, in a city the bucket system might be a little difficult to put into practice if you have no space for a compost pile. I’d love to hear your opinions on the subject in the Comments below! If you use a composting toilet in the city, what is your solution?
12. Trench Composting
A super handy way to compost is trench- or pit-composting, a process of direct composting. This increases nutrient levels in your garden. Most types of compost are already decomposed when you add them to the garden. With this method, you add the fresh ingredients directly to your garden beds at any time and they will decompose right there in the ground. This is an adaptation of an age-old method, where Native Americans buried fish at the base of their corn.
How trench composting works
Dig a trench next to your garden bed. Fill with kitchen scraps, grass clippings, charcoal from a wood stove, wood chips, paper, cardboard, and even animal-based food scraps like cheese, bones, feathers, fishskin, guts, etc. Cover with soil. It will turn into rich compost that slowly releases nutrients for your garden beds. If your scraps are animal-based, bury them a little extra deep, otherwise critters might try to dig them up. I like to put the veggie scraps in the garden and animal scraps a little deeper around trees.
The Farmer’s Almanac has a great post on how to Trench-Compost. Check it out if you’d like to delve deeper into the details of this method.
13. Sheet Mulching, A Type Of Compost That is Made In Situ

Unlike many other types of compost, this is done in situ. There is no need to take up any space for a compost bin. If your HOA opposes the use of compost bins, this would be a great way to get around the restrictions.
Basics of Sheet mulching
When you make this kind of compost, layer various organic materials, piled 6-12 inches high, on top of a weed barrier such as cardboard or newspapers. The idea is that the materials will break down over time and eventually you have a bed of incredibly rich garden soil. To keep your garden fed over time, just add more materials on top each year to act as mulch and to keep feeding the system. The best practice is to layer browns and greens in the correct ratio. Check out my guide to Composting Basics for details:
Prepare your planting area for next year by sheet mulching now
This system is great for preparing a raw piece of land without tilling for future planting. Just mow any vegetation very short, cover with cardboard, and top with the mulch layers. Pile it on thick!
With a little trick, you can also plant seedlings into it immediately. All you need to do is make a deep hole or trench in this thick layer of mulch and fill the hole with compost or top soil. Plant your seedling into that and voila, you’ve got an instant garden. You might also make a slit in the cardboard underneath so the plant roots can have access to the native soil below as they mature.
14. Hügelkultur

This is a variation of a long-term, no-disturb compost pile combined with sheet mulching, and it is also your planting bed. Most types of compost are made in one location and then carried to where they will be used. You can build this one and plant right on it, all in one location. It is a method of layering materials, made famous by the Austrian native, Sepp Holzer. When we refer to this in the American language, we usually omit the umlaut spelling of the word and call it Hugelkultur. Which is what I will do too henceforth, since my keyboard doesn’t have umlauts on it. The word hügel translates to “hill”.
How a Hugel bed is made
First, dig up the area you want to place the Hugel bed on. Remove the sod and topsoil from a rectangle that should be several feet (at least 5 feet) wide and however long you like. You will use the sod and topsoil again later. The width will relate to the height you desire.
The size of the bed can be anywhere from modest to huge. Sepp’s hugels are about 15 feet wide and up to 8 feet high. I built mine about 5 feet wide and 5 feet high. I find that easier to manage and much easier to build without power equipment. Many variations exist.
Hugelkultur structure
The basic structure of this type of composting is a bed of woody debris, rotten logs, branches, and/or wood chips. In a full size hugel, these are usually piled several feet high into the dugout. I prefer a mix of large and small pieces of wood for a large bed and just wood chips for a regular garden bed, which I call a mini-hugel.
Layer the woody parts with the retained sod and some nitrogenous material. This will provide food for the microorganisms, which will go to work on decomposing the wood. Next pile on leaves, straw, hay, shredded paper, etc. All of this gets covered with compost and/or topsoil and ‘tied together’ with long flexible branches, held down with wood ‘nails’ to keep the soil from eroding. Now you can plant into it immediately.
Eventually, the woody material breaks down, the pile sinks and turns denser. This creates a super-rich base that retains a lot of water and provides nutrients to the plants on top for many years.
My opinion on the Hugel bed that I built
- I like this concept but admit, building it is a lot of work. And I didn’t have a backhoe 🙁.
- I found that rodents like to use the pile as their home base.
- It took a few years for the advertised benefits to manifest.
- The first few years my pile dried out quickly because water drained into the loose structure underneath and became unavailable for the plants. This could be remedied I think by filling any gaps in the woodpile with soil or wood chips and adding a thick layer of hay or straw before piling on the topsoil.
The first few years did not give me stellar gardening results. But eventually, by year 3 for me, this method shines. It is a great system to use if you have drainage problems, or are in an area of frequent drought. This is also a way to recycle your brush pile and turn it into a treasure trove of nutrients for your garden.
My modified garden bed Hugel
I am currently working on a modified, very modest garden bed Hugel. To build it, I piled wood chips on the ground, about 10 inches deep. Then covered with a partly decomposed manure compost for nitrogen-rich materials. This I cover with my homemade raised bed garden soil, a mix of peat moss, compost, and pine bark. I plant right into that and cover the soil with mulch. This is a great way to fill a raised bed as well.
If you would like more details on how to build this type of compost pile, I recommend the video on Sepp Holzer’s website. The speakers are German but it is subtitled and the video speaks volumes, understandable in any language.
If you would like updates on my newly planted mini-hugel as well as details on making homemade raised bed and potting soil, sign up for my Food For Life Garden Newsletter. I’ll be alerting you on new posts and new recipes as soon as I make them public. Be the first to know about my best, exclusive content!
15. Johnson-Su Bioreactor
Here is a really cool concept of a compost that does not need to be turned. I have yet to try this, but it’s on my future experiments list. There will be an update once I get to it, which I’ll announce in my Newsletter.
How does a Johnson-Su Bioreactor work?
I have long been fascinated with this method of making a fungal-based compost that does not get turned. Dr. David Johnson, a Molecular Biologist, and his wife Hui-Chun Su-Johnson developed this way of composting. They developed it for a fairly large scale but you can adapt it for home use.
What is special about the resulting compost?
This technique produces a clay-like substance that can be used as a soil amendment. As such, it increases carbon content and helps retain soil moisture. It stimulates your plant growth and helps plants to grow more vigorous and stay healthier. Turn some of it into a slurry and mix this with seeds. The clay adheres to the seeds and can improve germination rates. If you are familiar with Masanobu Fukuoka’s great book, The One Straw Revolution, this might ring familiar.
Bio-reactor structure
The bio-reactor-build involves placing tubes, which have holes drilled into them at precise distances from each other, into a round fence-based compost bin. It needs to stay moist to keep the microorganisms alive and busy. The tubes will assure aeration, but can also cause water evaporation more easily.
Unlike with other types of compost, the base concept here is that aeration should be available for every 12” of soil thickness. Because of this, it will not have to be turned to remain aerobic. This method is a little more complicated than any others I have described here. It involves building a special compost bin with specific dimensions. It also involves drying all materials thoroughly, chopping them up, then wetting them again and filling the bin with a large amount of material. A big plus: You can add pretty much anything such as food scraps, leaves, bones, and other animal products.
If you want to build one of these, here is the Johnson-Su Bioreactor manual with all the specifications, written by Dr. David Johnson.
Here is a home adaption of the concept that is half-scale.
If you have built one or are going to, I would be thrilled to hear about your experience and how you like it. Please post your opinion or any tips in the Comments below.
16. Green Manure/Cover Crop Types of Compost

Of the many types of compost, this one differs in that it starts in situ as an actual planting. Sew into tilled ground or drill into a mowed field, a diverse mix of grasses, legumes, brassicas and other greens, right where you want to enhance the soil. Such can be a garden bed or a crop field. It can also be an area that you want to prepare for future plantings, like a future garden, an orchard or just a single tree site.
Cover crops get mowed low or crimped and planted into after termination. Some are planted in late summer and left to winter kill. This leaves the field ready to plant into in spring.
Benefits of a cover crop
A cover crop can enhance the soil in an area many-fold by
- adding nutrients
- mining of minerals from deep in the ground
- dynamic accumulation of nutrients by specific plants
- loosening hard-pan
- adding nitrogen
- suppressing weeds
- keeping the soil covered
- keeping the soil moist
- preventing water run-off
- Increasing microbial activity in the soil
- Attracting beneficial insects and pollinators
- Adding large amounts of organic matter
And there are uncountable micro-benefits that result from the many combinations of diverse plants. Using diversity in cover crops creates value that is greater than the sum of its parts!
I will be writing a post soon about How To Plant And Use Cover Crops, a guide to using the Green Manure method of composting. Stay tuned and sign up for my newsletter to get the heads up on this.
17. Hotbed Compost
Unlike other types of compost, this one serves more than one purpose. Here is a great way to get an early head start on growing things in your greenhouse while making compost. Use this method during the colder months in late winter to early spring. To implement this method outside, cover the bin with a glass window or a clear plastic covered frame. This is an old-time way to start seedlings from before the days of heat mats and grow lights. The bonus: create a nice compost as a by-product. This system utilizes the heat that the compost generates, to heat the greenhouse and to grow seedlings by providing bottom heat.
How to create a Hotbed
Build a frame inside the greenhouse or in a sheltered but sunny location outside. The ideal size is about 3 cubic feet or more. That’s 3 by 3 feet square and 3 feet tall (or it can be 3 feet wide and any size long, but make sure it is 3 feet tall). Now layer the same materials as you would in an 18 day compost pile and fill the bin. Moisten the ingredients thoroughly.
Cover with a thick layer of dry straw, hay, or other carbonaceous material for insulation. After about 3 days it will heat up enough that you can start growing even frost tender plants on it. If you do this outside, cover it with a large glass window (if necessary, size the bin to fit what you have). Build a frame with clear plastic stapled to it if you don’t have a window. Don’t forget to vent it on warm, sunny days. If hard frost threatens, close it tightly and cover it with a thick quilt or other insulation.
How to use a Hotbed
If you put compost or topsoil as your top layer, you can plant straight into it and get a month or two head start on your gardening. Cold hardy plants such as lettuce, carrots, cilantro, mustard greens and kale will work well. Wait for several days and test the heat before planting. Don’t plant if the temperature is so high that it will kill your seeds or seedlings. 70 – 80 degrees is ideal for germination.
To start seedlings, fill seedling trays or small pots with potting soil and plant seeds. Place the trays on the hotbed, on top of the insulation, to benefit from the heat generated within the pile. The pile should generate some heat for many weeks even after the initial high heat period. To keep your seedlings from burning up, in case your pile gets too hot, lay some wooden boards over the pile and under the planting trays. There will be enough heat for the seedlings, but this will prevent overheating. You can remove them later. On really cold days, cover the hotbed and seedlings to keep the heat in.
Other benefits of a Hotbed
Having a Hotbed in your greenhouse can also serve as a type of heat battery, just like water barrels. It will keep the temperature in the greenhouse a little higher at night, as if it were a heater. If you keep shelves in the greenhouse to grow plant starts, a Hotbed nearby can make all the difference during those occasional frost spells in early spring.
Use this as long as needed or as long as it keeps warm. Just as with other types of compost, let it sit to decompose and in the fall, spread the contents on your garden beds. Come late winter or early spring, start the process over.
18. Bokashi Method Compost

This method is different from other types of compost because you can do it right inside your kitchen. In a bucket. Deposit kitchen waste and food scraps into a Bokashi bucket including meat, fat, and dairy. This gets inoculated with a special blend of lactobacillus bacteria and fungi, which will induce fermentation for predigestion of the material. The process is anaerobic, excluding oxygen. This results in a faster breakdown of the material and elimination of odor.
How Bokashi compost works:
In essence, you’re making a type of kimchi. This compost does not require turning. When the bucket is full, you can either bury the contents in your garden beds ala the trench method, beside a tree, or add it to your compost pile. The fermented contents can also be fed to worms in vermicomposting.
Bokashi is a commercially marketed grain bran that was inoculated with effective microorganisms also referred to as EM-1. This blend of bacteria and fungi was developed in Japan. This specific selection of microorganisms works especially well in synergy, at inoculating and breaking down organic matter. Just sprinkle the inoculated bran into your food scraps and replace the bucket lid to keep oxygen out.
A Bokashi system is available for purchase, including all components necessary to get started. You can achieve a similar effect without investing in the bokashi system, by adding home-made LAB to a bucket of food scraps.
Alternatively, if you already ferment foods or make cheese, add some active fermentation liquor or whey to the bucket as a ‘starter’. Your goal is to predigest the food scraps using an anaerobic method that does not develop a putrid odor and prevents undesirable bacteria from taking hold. Be sure to close the bucket tight to keep bugs out.
19. Compost Tumbler
There are so many options out there if you’re in the market for purchasing a composting tumbler. If you have to please an HOA or you don’t have space for a compost pile this is a great alternative. It is also less labor-intensive than making many other types of compost.
How to use a compost tumbler
Add three to four parts of brown material to one part of green. If you have a lot of food scraps, that means sourcing at least 3 times the amount in carbon material, such as hay, straw, shredded paper, cardboard, brown leaves, or sawdust.
A nice finished compost takes about 2 months to make with this method. The resulting compost is ready to use and sow seeds into. One month to fill and tumble and one month to age. I recommend you get a dual-chamber tumbler. Add fresh materials to chamber one while the previously composted material in chamber two has time to ripen and finish. Take the aged compost out of chamber two and start filling it again while your chamber one material ages.
Potential problems to consider:
The compost won’t get hot enough to kill weed seeds or pathogens. The chamber is too small to generate the heat necessary.
Some people report that it is not waterproof. That means rain can get in and turn the compost anaerobic, wet and stinky. This could possibly cause dripping of leachate, which in turn could ruin your floor if you keep it on a patio for example.
There could be a potential fly problem during decomposition, which would be undesirable if you keep the unit close to your back door.
20. Types Of Compost Tea
Turn any compost into compost tea. There are two camps of followers, who have contradicting beliefs as to the correct method to use. One side advocates aeration during the preparation, the other believes that it has greater benefits to use an anaerobic process.
How to make compost tea
There are more followers of the aerobic procedure. I haven’t decided yet which side to join. I feel that both have their merits, but since I don’t own an aerator yet, I’ve always just used the anaerobic method. However, there is an aerator on my wishlist and I will provide an update on its use and results once I get it and try it. Sign up for Weekly updates here.
In either case, the purpose of compost tea is to make an easy-to-use, fast-acting, highly nutritious liquid fertilizer and foliar spray. Use it to boost plant vigor during the growing season. It is also a way to stretch compost a little farther if you’re running low. The procedure involves submerging a bag of compost in a bucket as if making tea. There it remains for several days to leach the nutrients from the compost into the water. Swish it around every now and then. Remove the ‘tea bag’ and the remaining liquid, or compost tea, is ready to apply.
Be sure to dilute it well for use in the garden. The recommended dosage is 1 part compost tea to 10 parts water.
21. Stinky Compost Tea

This differs from other types of compost because you submerge the fresh compost material in water. This is similar to an anaerobic compost tea. But you make it from fresh ingredients. I love this method for composting weeds that have gone to seed, which might be an issue in a compost pile that doesn’t heat up enough.
How to create a stinky compost tea
Fill a bucket or barrel with plant material. You can use any fresh material such as weeds, grass clippings, leaves, food scraps, etc. Weigh down the material with a rock, large plate or other weight and add water to cover the contents. Let it ferment for three weeks.
Comfrey and Stinging Nettles are my plants of choice for making this tea. Both contain a high amount of minerals and other nutrients and both are usually vigorous growers. This makes a rich fertilizer for your garden.
Let it not be said that I didn’t warn you, so here is my advice. Keep it far away from your living space and any neighbors that you want to remain friends with. It will stink to high heavens. See for yourself if you don’t believe me!
How to use stinky compost tea
Once it has fermented for at least three weeks, and up to six weeks, start using it in well diluted form, 1:10 with water as a liquid fertilizer. You may also use this diluted tea as a foliar spray, for boosting plants that suffer disease or for getting rid of pests as needed. Nettle tea can help deter aphids and mites, as well as powdery mildew. Use a 5% solution in this case.
Nettle tea can also be made by boiling water and adding nettles. Let them simmer for 10 minutes, then strain and dilute. I have never used this method, but it sounds more appealing to the sense of smell, lol.
22. Comfrey leachate
There is a way to make a very rich liquid fertilizer, which contains lots of minerals and other nutrients but doesn’t stink so bad. This is a Charles Dowding method. It is also an anaerobic composting procedure. You would create it in much the same way as other types of compost, just on a smaller scale.
I have not actually tried this method, but came across the concept recently and thought I’d share it here. It is on my list of things to try soon, because it sounds really cool and I’ll bring you an update on my Email List when I get to it.
How to make Comfrey leachate
Cut a large bunch of Comfrey, smash and bruise the leaves, and press them tightly to a large flower pot or bucket with some holes. Set inside another, larger, bucket slightly raised off the bottom with a rock or similar and cover with a lid.
How to use Comfrey Leachate
After 8-10 weeks, you should have a nice brown liquid collecting in the bottom bucket that can be diluted 20:1 with water for fertilizing your garden or 40:1 for house plants.
Add the spent plant material to a compost pile, bury it in garden rows, or use it as mulch.
Comfrey Ferment
This is a similar technique that I recently discovered. Here you just pile the comfrey in a bucket, cover with a large heavy object such as a rock. Put the lid on the bucket and let it ferment for several weeks. This also yields a leachate which can be used in the same way as above.
Well, there you have it!
…and if I think really hard, I know I’ll come up with more. If composting thrills you as much as it does me, let me know in the Comments below!
To learn more about subjects such as composting, growing, and preserving your food, join my Email List to stay updated weekly on the latest and greatest content.
I would also recommend you get my FREE guide to Composting Basics, where I delve into detail about the carbon:nitrogen ratios and why that is important. It includes a list of specific ratios for different materials and how to apply that knowledge in a practical approach.
More Related To Making Compost:
How to make mulch from wood chips for your garden Read about the many ways that wood chips can help you with your garden and your food forest.
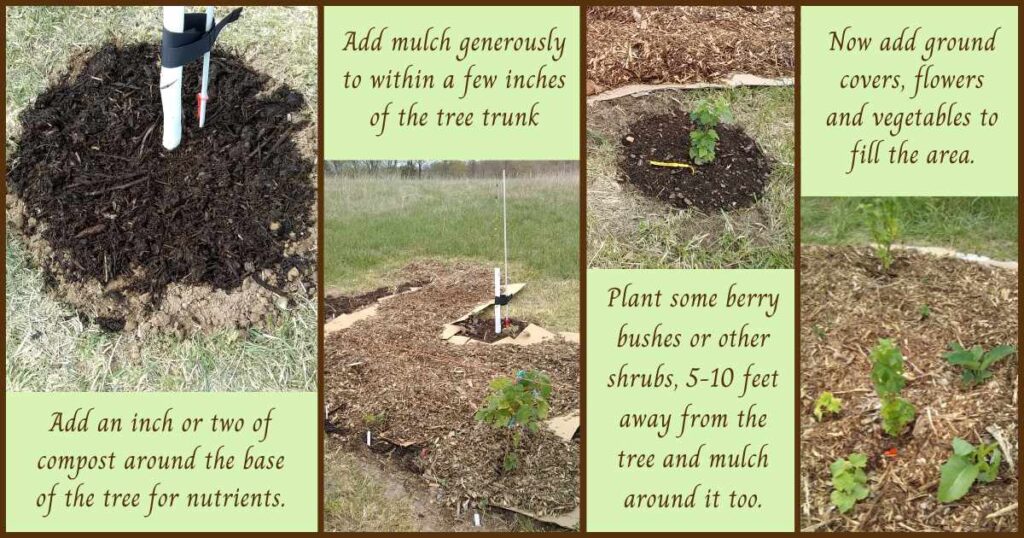
Plant a Tree Guild, Grow A Food Forest – How to grow a food forest starting from scratch with a tree guild. Grow a lively ecosystem for your trees!
Grow mushrooms at home in your garden This is one of the most rewarding experiences in wood chip gardening. Grow your own mushrooms intentionally. It’s easy and they taste so delicious!
How To Get Bigger Garlic – What to do to get big and healthy garlic bulbs. When and how to plant and harvest.
How to prepare my soil to plant fruit trees How to prepare your planting hole, what to put in it and how to give your tree the best odds for growing up strong and healthy.
How to make 18-day compost The best compost for your garden beds in less than 3 weeks.
Pin this Post

Shop this post
Here are some clean, no-GMO cover crop sources, most carry an organic selection:
Johnny’s
Hearne Seed
High Mowing
Eden Brothers
Peaceful Valley
Hudson Valley
Camping toilet snap-on lid
EM-1
Bokashi System
JADAM
[pt_view id=”d25d36cip0″]