How To Make Fermented Garlic Scapes
Fermented Garlic Scapes are a fantastic and delicious way to preserve your extra garlic scapes for use in meal preparation all year long. In this recipe we'll make fermented garlic scapes that will stay tasty in your refrigerator for a year or more (2-3 years in my fridge!). I'm sure you'll agree that fermenting is the best way to preserve your vegetables.
Equipment
- 1 quart sized mason jars - One wide mouth quart jar for fermenting. You can also use a hinged top Fido jar.
- 1 pint or quart mason jar - for mixing your brine.
- Fermentation weight - I recommend you use a glass fermentation weight. They are made for this job and do it well! If you don't have one, use a cleaned and boiled rock, a baggie filled with brine, or some other food-save, non-corrosive item you have on hand, that will keep the ingredients submerged in the brine.
- Fermentation Lid - If you're using a standard wide mouth mason jar, use a fermentation top or airlock lid. It makes fermentation so easy and maintenance-free. Or you can either just use a cloth, secured with a rubber band, or a 2-piece canning lid, or a plastic lid that is made to fit the jar.
- Chopping board and knife
- Wide mouth funnel (optional) - Not necessary, but very helpful.
Ingredients
- Garlic scapes
- Sea salt - I recommend Redmond's Real Salt, Himalayan pink salt, or Celtic sea salt. Be watchful of additives. Table salt and even some brands of sea salt and kosher salt can contain additives, so check the box label.
- Filtered water - Avoid chlorinated water!
- Pickling Spices (optional) - Use a traditional pickling spice mix, about a tablespoon per quart. Or just add what you have, coriander, black pepper corn, dill seed, mustard seed, hot pepper flakes, sliced turmeric or ginger, or fresh dill sprigs.
Instructions
- Prepare the Garlic Scapes: First, remove the fibrous tips from your scapes, cut them off just above the flower bulb. You can remove the flower bulb too if you prefer, they can get soft during fermentation.
- Slice the scapes, cut them into sections or leave them whole.
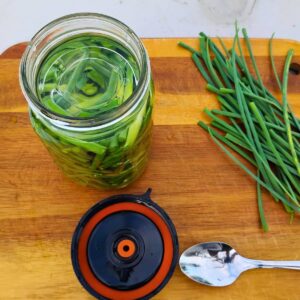
- Pack the pieces into your mason jar. It should be near full, to about an inch below the rim. They will compress a bit more once you add your weight.
- Make the Brine: Add the salt to the water in a separate jar. You'll probably need just over a pint of it. Stir or shake well to dissolve the salt.
- Pour the brine over the garlic scapes. They need to be submerged. If you have leftover brine, you can save it for another ferment or use it in your next soup or bread dough instead of salt.
- Weigh down the Ingredients: Place a glass fermentation weight on your garlic scapes. If you don't have one, you can use a boiled, clean rock, a baggie filled with marbles or brine, or some other food-save, non-corrosive item you have on hand.
- Seal the Jar: If you are using a mason jar, I highly recommend a fermentation lid. They are self venting and are so easy to use. No maintenance necessary. If you don't have one, you can use a 2-piece mason jar lid. But you'll need to remember to burp it once a day. Or you can try to screw the band on very loose, so it can self vent. But keep an eye on the fermentation to see if a yeast layer forms on top, which is harmless, but should be skimmed off or it can give your fermentation an "off" flavor.
- Fermentation: Place your jar in a dark place with a bowl under it, at about 70-85 ℉. This temperature should be maintained over the course of the next 3 weeks. Some fluctuation is fine, but avoid prolonged lower or higher temperatures. For more details on fermenting and why this is important, visit my lacto-fermented vegetables page, a beginner course on fermenting.
- Check your fermentation: After 2-3 days, your fermentation should start to look active. Bubbles are forming, maybe a bit of overflow, and a cloudy brine. The garlic scapes will start to take on an olive color.If you are impatient, you can smell and taste them now and use them if you prefer a light fermentation. For a full fermentation, leave it alone for 3 weeks. They will get more acidic and have increased probiotic activity. That means more probiotics for your gut.
- Time to Store: After 3 weeks, they can go into cold storage, but before you put them away, open the jar and smell them. They should have a pleasant tangy scent and be firm and crunchy. Now taste them. If they are nicely tangy and you like them that way, you can place a sealing lid on the jar and refrigerate them at this point.Fermenting them for three to four weeks for a full fermentation yields the highest health benefits.
- Is it Safe To Eat? Fermenting is very safe, but as with anything, there is a chance that something goes wrong. If for some reason your ferment has mold in it, smells putrid or seems slimy or mushy, you don't want to taste it. Something went awry. But it will still make great food for your compost. If it looks, feels, and smells good, it's fine to taste and eat. You'll know if it's bad.It's very unlikely that anything will go wrong, if you followed the instructions and used clean equipment. But when you're dealing with food, stuff can happen. Maybe your temperature was too low or too high or your garlic scapes had been treated with pesticides. It's always a bummer, but remember, while it can happen, it is not the norm. Don't be discouraged and do try again.
- Long term storage: Replace your fermentation lid with a standard sealing lid. I like to use the standard flat metal piece of canning lids and cover it with a white plastic canning jar lid from Walmart. This makes a great seal and the plastic won't corrode. Now place the jar into the refrigerator or your root cellar. Keep it somewhere where it's fairly cool, or it will keep fermenting and eventually turn soft and not very appetizing, and eventually it will become inedible. This can take a many months at room temperature, but if you don't plan to eat them soon, it's best to keep them cool, under 60 degrees. This way your scapes should be good to use for at least a year or more. Use as needed.