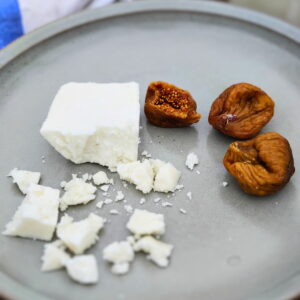
Make Traditional Bulgarian Sirene cheese, a feta-like cheese at home. No cheese press required! A Bulgarian white cheese, salt brined and aged for fantastic flavor.
Cheesecloth - Do not use the kind from the grocery aisle. It won't work. Use a flour sack towel, tea towel, piece of muslin, butter muslin, or cheesemaker's cheese cloth. Cloth diapers work really well too for one gallon batches.
Measuring cups
Measuring spoons
colander
Board or plate - To place on your cheese for pressing.
Weight - This can be a heavy bowl, clean rock or water jug.
Large bowl - For catching the whey
2 quart mason jars - one for brine and one for aging the cheese
Ingredients
1galMilk - I highly recommend using raw milk, but pasteurized is fine. Avoid ultra-pasteurized (UHT) milk.
⅛cupMesophilic starter culture- Homemade clabber starter culture,, backsloppped whey from your last cultured cheese making, kefir, buttermilk, or the appropriate starter culture powder (use half as directed on the package label). Please check the notes for more details!
⅛cupThermophilic starter culture - such as yogurt with live cultures, or the appropriate starter culture powder (use half as directed on the package label). Please check the notes for more details!
⅙tspRennet kid or animal rennet - Do not use junket rennet. If you have rennet tablets, use ⅛ of the tablet.
¼cupFiltered water to dissolve the rennet- Avoid chlorinated water such as tap water.
¼cupSea salt- for the brine and some more to sprinkle on the cheese. Important: use a salt without additives! It should only say salt on the label, so avoid table salt.
Optional
Lipase Powder - Add lipase to intensify the sharp flavor of the cheese if you like. Add 1/16 - 1/8 tsp per gallon of milk. Dissolve in 1/4 cup of filtered water half an hour before adding to the milk at the same time as the culture.
Calcium Chloride - Calcium chloride helps your curds set more firmly helps with drainage and can increase your yield. Especially helpful when you work with pasteurized milk which has a weak calcium content. Use 1/4 tsp per gallon of milk and dilute it in 1/4 cup of filtered water before adding. Add 1/16 tsp to the brine too.
Instructions
Before you start
There are some more details in the notes about brining and prepping, so check there if anything here stumps you. You'll also find details about different starter cultures you can use. If you're just starting with cheese making, and you don't have raw milk, I'd recommend using yogurt and buttermilk with live cultures from the grocery store to get you started on making this cheese.
If you're going to use lipase powder, stir it into some water to hydrate before you start so it can soak over the next half hour.
Warm the milk
Slowly warm the milk to 95 degrees. This will activate the thermophilic bacteria if you start with raw milk.
Add culture And Acidify
Pour your culture into the milk and stir well. If you use freeze-dried culture, sprinkle it over the top and let it hydrate for 2-3 minutes before stirring it in. If you're adding clumpy yogurt, you can stir it into a little milk to break it up before adding to the pot.
If you decide to use calcium chloride and/or lipase powder, add them at this time. They both need to be diluted.
Let the milk acidify for an hour if you have time. I prefer doing this, but it is not necessary.
Wrap the pot into a thick towel while the milk acidifies to keep it evenly warm.
Add rennet
Dilute the rennet in ¼ cup of filtered water, pour over the milk and stir well with the skimmer but not too vigorously to mix everything. I count 20 up and down motions when I stir. You don't want to stir too long, since the rennet will start setting up the cheese almost immediately and if it gets disturbed, it can't do it again.
Use your utensil to stop the motion of the milk as best as possible. Place the lid on the pot and let it stand for the next 1-2 hours where it won't be disturbed.
I like to wrap a towel around it to keep the temperature inside the pot warm for as long as possible, to keep the temperature more even throughout the milk, and to keep any fruit flies away that seem to find their way into an uncovered pot somehow.
As the milk ferments and the rennet enzymes go to work, it will become more acidic, form a yoghurt-like curd and sink below the whey surface.
Check And Drain The Curd
After an hour, check on the curd. Has it solidified? Do you see a soft cake in a pool of whey? If you tilt your pot slightly, can you see a clear edge of curd? If so, it is ready to drain. If not, leave it alone and check on it every 15 minutes till it looks good.
Keep checking, you don't want to over-ferment it, but you also don't want to cut into it too early, or you'll lose a lot of the solids to the whey and you'll end up with a hard cheese. It should be about the consistency of regular yogurt.
Cut the curd
Now you need to cut the curd to help release the whey. Take a long knife and cut a grid into the curd by making a long cut all the way to the bottom of the pot and accross, then cut 1-2" away from this one and so on. Make the same cuts now perpendicular to the first cuts. We want fairly large cubes.
Leave the curds to heal for 15-30 minutes.
Drain the Curd
Line a large bowl or pot with a damp cheese cloth (use filtered water to wet the cloth).
Take your skimmer, a shallow bowl, or a ladle. I misplaced my skimmer and my ladle was in a pot of soup, so I used a measuring cup, which worked quite well.
Start scooping the curds into the cheese cloth. This acts as horizontal curd cutting.
Once you have all the curds transferred, its time to drain them.
Draining The Curds
Take 3 corners of the cheese cloth into one hand and take the fourth to go around the outside of all of them. Tie a knot and double knot with another corner.
Put it on a hook and carefully lift it by the hook to make sure it holds.
Then and hang from the ceiling, a cabinet knob, or a long wooden cooking spoon or dowel that's resting on the edges of a large pot. The whey should run out as a small and steady stream. Let it pre-drain for an hour and a half.
Pressing the Cheese
Squeeze your curd a little and take a string to tie it up.
Tie it into a tight ball just above the curds.
I like to pour off all the whey into the fermentation pot before I do this, and at the same I save a quart of the whey to make the brine later and a cup or two for my next batch of cheese.
Now put a board or a plate onto the cheese and place a weight on top. I just used a bowl full of water with a lid so it doesn't make a mess if it tips over. You can use a clean rock too, or a jug of water.
Press the cheese for 6-10 hours or overnight and up to 24 hours.
Prepare Your Brine
Make your brine when you salt your cheese. Your brine will be made with the same whey that was draining from your cheese. Add ¼ cup of salt to a quart jar to make a 7% salt brine.
Pour enough whey to fill the jar. Stir well to dissolve. Seal it with a lid and let it sit beside your cheese to ferment at the same rate.
The temperature of both needs to be the same for them to acidify at the same rate. If you have pH strips, you can measure your pH before brining. It should be about 5.0 or a little less.
Salting The Cheese for Immediate use
Unwrap the cheese and taste it if you like. Now it needs to get salted. If you want to eat it fresh and not age it, cover all surfaces with salt and put it in a deep plate, on a tilted board or a rack to drain some more. After a few hours you can eat it. Wrap the rest up and it should keep in the fridge for a week or two.
Salting The Cheese For Aging
You'll want to age the cheese in brine to make it feta-like, so you need to follow a few more steps.
Cut the cheese into chunks that will fit into your aging container. I like to use a wide mouth mason jar. Its opening is not that big, so keep that in mind.
Salt all the edges of every chunk lightly and set it on a draining mat on top of your colander, a cooling rack or other rack. It needs to drain freely. I find that it dries best when it has much airflow around it and prefer to place it on a rack.
Drying The Cheese
Over the next 3 days, flip every day one or two times and lightly salt the wet surface some more. Once the cheese is dry to the touch, it can go into the brine. If it's not dry yet, keep it out until it is. I use a screen tent to keep the flies out.
Brining The Cheese
Place your dried chunks of cheese into the aging jar and pour the prepared brine down the sides into the jar to fill it up to the top. I like to place a weight on top if there is room, to keep the chunks below the surface of the brine. This will prevent mold to grow on it.
Now seal the jar well and age it for 2 weeks at cheese cave temperature (50-55 degrees), in a cellar or in a cool spot in your house. After that you can put it into the refrigerator to age longer. It should keep for at least 6 months this way.
Notes
Brine-Aged White Cheese and Feta Making 101
Cheese Cultures
Most feta and feta-like cheeses use both, thermophilic (heat loving) and mesophilic (medium temperature loving) bacteria. This is because feta starts out at a higher temperature. This is where the thermophilic bacteria thrives and dominates. As it cools, it will turn on the mesophilic bacteria in the milk or starter culture. Then the thermophilic activity will slow down while mesophilic activity will increase and dominate.In Bulgaria, when raw milk is used, it is used straight from the animal, still warm and neither heated nor cooled. Bulgarian thermophilic yogurt is added, or just a clabber culture. The yogurt is used as a starter culture to add thermophilic bacteria to the milk. And the cheese maker relies on the inherent mesophilic bacteria, that naturally reside in the raw milk, to help acidify the milk at room temperatures.If you have access to raw milk to make your own clabber starter, or when using kefir, these cultures all have thermophilic and mesophilic bacteria existing within that can be used. So all you need is your homemade clabber culture or kefir to make this cheese. You can add yogurt as a starter as well, to give the cheese a certain direction, but it is not necessary.However, if you don't use raw milk and buy a specific freeze dried culture, they are specialized and can't switch on any bacteria that is not included. So you'll need to buy two cultures to make this cheese, or one specific mix that includes both. Below I'll outline the different options and end with a recommendation.
Make Your Own Starter
If you have raw milk available, you can make your own starter culture by letting your milk clabber. These days, clabber is my favorite culture for all the cheeses I make, soft and hard. It makes better cheese, that is uniquely your own, it introduces a diverse mix of bacteria, it is full of live enzymes to help flavor your cheese, it is easier to digest and, for some people, the only way they can have any dairy at all. And if that's not enough, it saves you money.Even if you make your cheeses from pasteurized milk later, having your own raw milk clabber to start with will give you many advantages by being able to transfer all these living milk benefits into the dead milk from the store. So I find that it would be worth locating a source of raw milk from animals raised on pasture, to make your own starter.This homemade clabber starter culture will act as both, thermophilic and mesophilic starter, so you only need this alone if you make starter with raw milk from scratch.You can find out how to make your own mesophilic culture in my article about the natural cheese making process.
Whey
In the days of our great grandparents, when cheese was made pretty much daily to preserve the milk, fresh whey was always available and it was the starter culture they used to start the next batch of cheese. You can adopt that practice.And so the easiest and most traditional way to culture your cheese is by using active whey from a previous batch of cheesemaking. So save some of the whey from this batch and use it for your next batch! You can freeze it if you don't make cheese often. It will stay good in the freezer for 3-6 months. When you make your next batch of feta, you can use just the whey from this one, no need to mix two cultures. The bacteria for each is already in your whey!Use a quarter cup of whey per gallon of milk. Of course, if you're new to cheese making, you'll have to make your first cheese to get whey, so here are your other options.And the more you make cheese and use the whey from one batch to start another, the more distinct your cheeses will become. They will have terroir. Yours! 😍.
Kefir
I used milk kefir for years in all my cheese making and it yielded some beautiful cheeses, so I can recommend it, especially if you like drinking cultured milk. It's an easy way to keep a lively probiotic cheese making culture at home, ready to use, and to have your daily cultured probiotic beverage.Kefir does have yeasts in it, and so your cheeses will get a bit of carbonation, which makes for small holes in the cheese. It contains the most diverse mix of bacteria and yeasts, a few of which some people might not be able to tolerate, but for most it can be great for your gut health.If you don't have kefir and you're interested in starting your own kefir at home, I recommend you get live milk kefir grains. You don't need to mix cultures when using kefir. Kefir can act as both, thermophilic and mesophilic cultures.
Grocery Store Buttermilk
Buttermilk can be tricky, because not all commercial buttermilks contain live cultures, so be sure to check the label. Use 1/4 cup of buttermilk per gallon of milk. If you use buttermilk culture, you'll have to add a thermophilic culture too, such as yogurt.
Grocery Store Yogurt
Use any plain yogurt from your grocery with live cultures in it. Greek yogurt works too. Look for a natural yogurt without any strange things added. Use thermophilic yogurt and a mesophilic culture like buttermilk together in this recipe. Bonus points, if you can find bulgarian yogurt.
There are so many cultures to choose from. Some are made especially for Feta cheese, and they will include both, thermophilic and mesophilic bacteria. I like to purchase my cultures separately so that they will be useful for more than one purpose. I rarely use purchased cultures anymore, but here are some I have used quite a bit in the past.A multi-purpose culture I like is flora danica. It is one of my favorite purchased cultures that yields a buttery, creamy soft cheese. This culture is versatile and you get a large package that will last through a lot of cheese making batches especially if you make a mother culture, which can make it last even longer. It will keep in the freezer for years. It does add just a bit of carbonation, which will introduce some small holes throughout the cheese. This culture covers the mesophilic component. Dosage for flora danica is normally ⅛ tsp per gallon of milk (¼ tsp up to 5 gallons). But since we are using two cultures, use only 1/16 tsp per gallon of milk, and 1/16 tsp of a second culture. Add a yogurt culture or 1/8 cup of plain yogurt for the thermophilic part.Here is a specific feta culture that combines both, mesophilic and thermophilic bacteria, so you only need this one for this recipe.
Summary on Choosing a Culture
So with all these choices, which one should you use??Well, I suggest using what is easiest for you to obtain when you're starting out. If your local store sells cultured buttermilk with live bacteria, by all means, use it and add plain yogurt from the same refrigerator case.And if you're already maintaining a milk kefir, that would be a great choice on its own.In case that you need to purchase a culture, Flora Danica is a great culture for many soft cheeses, sour cream or semi-soft cheeses. Just add 1/8 cup of store-bought yogurt or a freeze-dried yogurt culture for the thermophilic part.If you don't care to mix cultures, you can get a specific feta culture.If you have raw milk, making your own clabber starter culture is hands down my top recommendation!
Your Feta Must Be Prepared For Brining
Before you place your cheese into the brine, you must dry out the surface, or it will dissolve into the brine. So after draining your cheese, you'll first dry-salt the cheese by salting all surfaces to pull out all the whey, and then it needs to dry at room temperature for a few days on a rack. Only when the surface is dry to the touch, and after a few more days of maturing, should it be placed into the brine. If you want to cut your cheese into chunks, so it fits into a mason jar or other glass jar you have, do so before salting and salt every exposed surface after cutting.
The Brining Process
Making a brine for brining cheese is a bit of a science in itself. If you just add salt to water, call it a brine and put your cheese in it, you'll probably get a surprise next time you check on it and find a slimy, soft and mushy mess instead of that nice firm piece you added a few weeks ago. This is because the brine needs more than salt. It needs to have the same calcium content as the cheese, and it needs to have the same pH. Most cheese making instructions tell you to measure the pH of the cheese at the time of brining and add vinegar to the water until it has the same pH. Then they tell you to add calcium chloride, to make the calcium content about equal to that in the cheese. Pretty complicated.There is a better 'whey'! And, as you might guess, the secret is in the whey! I learned this from David Asher's book, The Art of Natural Cheesemaking and it's brilliant! Here is what we'll do: The whey that drains from the cheese curds, will have the same pH as the cheese, nod your head yes! We will salt the whey and keep it at the same temperature as the cheese until the cheese is ready to be brined. There are a few days' time as you'll see later when you follow the recipe. But as the whey ripens alongside the cheese, the pH will be the same. And the calcium content of the whey is also technically the same as that of the cheese. So no need to make any complicated calculations for adjusting the pH or worrying about the correct amount of calcium chloride to add. Using the whey for a brine, makes the process super simple.
Brine Maintenance
As the cheese ripens in the brine, keep an eye on it to make sure that the cheese chunks stay below the surface and if there is a bit of cream rising to the top, be sure to skim it off, this is where the mold can grow.If I find some mold starting to grow on the floating cream, as long as it doesn't start growing into the cheese, I just skim it off and let it continue to ripen. Use your own judgement here. If in doubt, throw it out. I like to keep a glass fermentation weight on my cheese to keep it from floating up to the top. Makes for less of a chance that it will get contaminated.
Draining Area
I hang my bags of cheese from a hook. For this, I keep a rope with many loops that hangs from a rafter and this way I can put the hook into one of the loops and easily raise it up if the bag starts touching the brine.You'll also need to set up a pressing station. You don't need a cheese press for this cheese. We'll just tie the cheese up tightly in the cheese cloth and put a weight on it, which will press out the the whey and firm up the cheese.For this I use a pot or bowl, place a colander in it, add the bag of cheese, put a board on top and a weight, such as a rock, a jug of water, or a full canning jar. You'll want the weight to be about half of what the weight of the cheese is, but I don't weigh mine.
Enjoy Your Bulgarian Sirene Cheese!
That's all there is to it. This is so easy and, after excercising your patience a little, you'll have some delicious homemade brine-aged cheese to use as a substitute for feta cheese in recipes. Sprinkle it over salads, on pizza, over casseroles, blend into a dip, or make savory cheese pastries. Sirene is a very popular cheese in Bulgaria and other countries. And I think there is a great chance that it will become popular in your household too. Give this simple and delicious cheese a try!
Keyword aged cheese, aged soft cheese, brined cheese, bulgarian cheese, bulgarian feta, easy cheese, sirene, white cheese