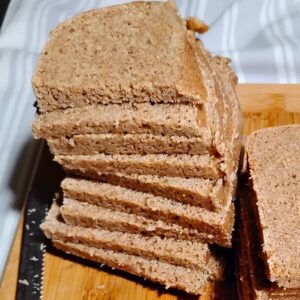
Unloaf Fresh Milled Sourdough Rye Bread With Kamut And Whey Recipe
This rustic fresh milled unloaf sourdough rye bread is so easy to make and yields the best chewy yet soft rye sandwich bread you can imagine.I normally double this recipe when I make my large loafs. I like the slices big!
Equipment
- Grainmill
- A non-reactive bowl or other container - for mixing the dough.
- A bowl or banneton - for the final proof. This will keep a give a nice shape to your loaf and keep it together during the final proof.
- Danish dough whisk - for mixing the dough. This is a super handy and functional tool that is perfect for mixing a heavy dough. I feel it's essential for making a no-knead bread dough.
- 5 quart Dutch oven - for baking the bread. I use an old cast iron Dutch oven, but any 5 quart Dutch oven will do.
- Flour sack towels - for wrapping the bread after baking and for lining a bowl for the final proof.
- Parchment paper - for baking the bread in a Dutch oven. You can also use a silicone bread sling instead.
Ingredients
- 320 g Fresh milled Khorasan flour - Or buy whole grain kamut flour. Sources for grain are listed at the end of this post.
- 320 g Fresh milled rye flour - Or dark rye flour. Sources for grains and flours are at the end of this post.
- 450 g Whey +/- - Can be replaced with water
- 18 g Sea salt (1 tbsp)
- 175 g Sourdough starter culture - Active!
Optional:
- 2 tbsp Caraway seeds, whole or ground +/- - Use less or omit if you don't love caraway seed.
Instructions
Mix The Dough
- Pour the sourdough starter into your mixing bowl.
- Add the whey. (If you have salted whey from cheesemaking, you can use this and just reduce or omit adding more salt). I taste the dough at the end to see if I have good saltiness. Mix both together.
- Add the flours, salt, and ground or whole caraway seeds.
- Mix well with the Danish dough whisk or a heavy duty wooden spoon.
- Cover with a damp towel or a loose lid to autolyse for 30 minutes.
- Check the dough's hydration. It should feel sticky and well hydrated, but not soupy. Adjust the flour or add more whey to get the right consitency, if neccessary.
Bulk Proofing
- Let ferment at warm room temperature (75℉) for 4-6 hours till about doubled, then refrigerate for a long ferment. Or if you'll be making the bread without a longer ferment, keep it at room temperature until doubled and up to 12 hours before baking. Let the dough tell you when it's done. It should be doubled or more, bubbly and your fingerprint should make an indent that stays. I prefer the first method with refrigeration for the best flavor.
- So I recommend refrigeration for 24-48 hours after an initial 4-6 hours at room temperature to get a full long-ferment for lowered gluten, great flavor, and better digestibility. This is also helpful for making the dough easier to handle when you're ready to bake. It can also prevent spreading of the dough inside the pan before the crust forms.
Easiest: Baking it straight from the bulk ferment. >> Skip this step if you want a prettier loaf.
- After about 24 or more hours in the refrigerator (up to a week), you can proceed to bake the bread.For the hot oven method, preheat your oven now for 20-30 minutes at about 450 degrees with the lidded Dutch oven in it. Skip that for the cold oven method.When you are ready to bake, take your dough out of the refrigerator. It will be easiest to handle when cold.
- Now you can just gently loosen the edges of the dough away from the sides of the bowl with a stiff spatula. Go all the way around once and get that spatula down to the very bottom.
- Now dump it on a piece of parchment, careful to not deflate it. And then it goes into the hot Dutch oven immediately and into the baking oven. Proceed to 'Baking The Loaf'
Optional step for a prettier loaf:
- With wet hands, form a loaf by pushing the sides down to tuck them under. Work your way all around the loaf several times, forming it as you go, until your loaf will firm up some. Careful not to tear it up at the top and don't tighten it too much. This will take some care, you'll have to be gentle.
- When you're done, coat the dough ball in some flour inside the bowl to keep it from sticking.
- Place a towel on the table and flour it lightly.
- Place the loaf on it with the seam side up and dust with a little more flour.
- Grab the corners of the cloth and pick the dough up to place it into a bowl that's the same size or just slightly bigger than your dough ball in width.
- Cover the dough ball with the corners of the towel to keep it moist in there. Sprinkle or spray the cloth with a little water for humidity. I like to put a lid on it too.
- Let it ferment at room temperature (about 75℉) for another few hours. You'll want the dough to grow in size and when you push your finger into it, it should spring back just slightly, but leave a clear indentation. If it's over-proofed, a finger poke will not spring back at all and the dough will start to deflate. If it's not proofed enough, your fingerprint will spring back without leaving an indent.
- An over-proofed dough will not work well for making the bread, so check the troubleshoot section on what to do.
- An under-proofed dough just needs a little more time, or maybe a warmer spot.
- When it has finished proofing, invert the dough onto a piece of parchment and proceed to bake it or place it into the refrigerator for a few hours or another day. (In that case cover with a lid or a plate).
Baking the Loaf
- Place your loaf seam side down in the center of a large square of parchment paper.
- Score the top with a very sharp knife (it helps to dip it into cold water) or use a lame, which is a special bread-makers tool and consists of a handle with a razor blade. It's best to make a diagonal cut, not straight down, but I find that hard to do with a knife and I don't have a lame. You can omit this when you make the lazy way bread, it will not have a pretty surface to score.
- Just a single slit all the way accross is fine, or make a cross or a pretty pattern. This helps to achieve a better oven spring and so the bread can expand easily while baking without cracking randomly. Place the parchment with the bread into the hot or cold Dutch oven.
- Now here is the scoop: You can bake this loaf in a hot Dutch oven or a cold one. It really depends on your preference most times, although there is a hot debate about it. A hot oven more mimics the old way of baking in a stone hearth, where the bread was placed directly onto the hot stone. I prefer the hot method. Here are both methods:
Hot Oven Method:
- Preheat the oven to 450℉ with the Dutch oven in it. (Important: If you have a ceramic coated Dutch oven refer to the instructions that came with it on how long and at what temperature you can preheat it without damaging your ceramic coating). When using a cast iron Dutch oven you'll want to preheat for about 20 minutes with the lid on.
- With oven gloves on, take the Dutch oven out of the hot oven and place on a heat proof surface. With gloves on, take the lid off.
- Grab the parchment with your loaf by the corners and place it into the center of the Dutch oven.
- With gloves on, cover the pot with the hot lid and close the oven to bake the bread for about 40 minutes. Turn down the temperature to 400℉. Thump it and feel and hear the feedback. Does it feel and sound hollow? If yes, take the lid off and bake for another 20-30 minutes for a nice colored crust. If no, leave the lid on and bake for another 10 minutes or so.
- When done, the bread should sound hollow when you snap your finger on it. The internal temp should measure about 195℉ or higher.
- Take the bread out of the pot using the parchment as handles. Careful to not rip the parchment and to not burn yourself. Let it cool on the wire rack for a few hours before cutting into it. For a slightly softer crust, wrap it in a tea towel or flour sack towel, and you can keep the parchment on in that case.
Cold Oven Method:
- Place your loaf on a piece of parchment, seam side down, and lift it into the cold Dutch oven. Put the lid on it and stick it into the cold oven. Turn the heat to 450℉.
- Bake the loaf for an hour or till it looks done and the internal temp reads about 195℉.
- Remove the lid and bake for another 20 minutes or so to brown the top and get a nice colored crust.
Soft Crust Baking Method (Optional)
- My Method Yields A Nicely Dense Loaf With A Soft Crust:
- I use double the amount of dough for a big loaf so I don't have to bake as often. And I prefer to fill the Dutch oven about 3/4 full. This way the bread turns out a little denser because it is kept confined. And I like generously sized slices with no hard crust.
- I mostly use the hot oven method.
- Start with a hot Dutch oven. Keep the lid on during the whole duration of baking. It will take about an hour to bake the bread or 1½ - 2 hours if you double the amount of dough.
- Before closing the lid to bake the bread, cover the dough with a round piece of parchment the size of the pot circumference. (I have a piece cut that I use over and over every time I bake. I just dry it, brush off the crumbs and use it again).
- Now cover the parchment with a wet piece of cloth, either cut to size or just a square that will cover the whole surface. (Tuck it in on the corners if it's square). I put the cloth in a pint jar, pour water over it and let it soak in and then squeeze out some of the excess water and lay it across my round piece of parchment.
- On goes the lid.
- I bake it for a half hour on high. This is hard to tell on a BBQ, but I try to get to about 450 degrees or to start. This will promote a good oven spring. Then I turn off the burner directly under the pot and leave the other two on to lower the temperature. This would be about 400°F in an oven.
- After another half hour I add a little more water to my cloth if neccessary, to keep it humid inside the pot, and turn the pot a quarter turn. I bake it for another half hour to 45 minutes and check for doneness. Normally it's done by then.
- I just click my finger on the top crust and you can tell that it's done when you get a hollow sounding response. But you can also check with a thermometer to be sure it's about 195℉ or a little more in the center.
- The top of the bread loaf will look wet, but don't worry, it will dry up after wrapping it and letting it rest for a day
- I take the bread out of the Dutch oven and peel off the parchment. Then I dampen a clean floursack towel and wrap the loaf well, place it back onto the parchment paper on the rack, and leave it to cool overnight that way.
- Next morning it's ready to get sliced up.
- This bread will stay good at room temperature for a couple of days, but I usually slice it up on the day after baking and place any bread that I won't eat within 3 days into the freezer.
- The rest goes into the fridge to keep it from getting moldy. Storing bread in the fridge is not ideal and frowned upon in the artisan bread niche, but I think it still tastes awesome anyway. And I like to toast or fry it, which refreshes it, and makes it taste even better than fresh baked.
Storage
- This bread is best kept at room temperature in a bread bag for no more than 2 days. After that it should be frozen or refrigerated. It will be good frozen for up to 3 months, but squeeze out the air and make sure it is cooled down before packaging it. Refrigeration is not ideal for bread normally, but I find this kind does just fine. You can toast or fry the slices to get that fresh baked taste back.
Notes
Tips To Make The Best Fresh Milled sourdough Rye Bread
- Mill your flour right when you're ready to mix up the dough. The nutrients diminish pretty quickly once milled, that is why fresh milled is so superior, you can capture all these before they disappear.
- Your dough will be pretty moist, which is intentional. But if it's too soft, let it rest for a half hour and check again. If neccessary, add a little more of the Kamut flour. If it's not moist and feels like a brick, you'll need to add more of the whey. Once it's nice and soft and still tacky it's ready for the bulk fermentation.
- I'm listing a few methods for making this bread and you can choose which you prefer. You can just dump your bread onto parchment to bake after the first bulk fermentation and call it good, or you can form a loaf at that point and leave it in a bowl for a second fermentation before baking. This will yield a prettier loaf that you can score for an artisan look. And you can do it my way which will yield a moist dense bread with a soft crust.
Tips For Baking In The BBQ
This is useful in the summer when you don't want to heat up your house or if you don't have an oven. I live in a tiny yurt and there is absolutely no room for an oven. And presently, I don't even have a covered outdoor kitchen. I do all my baking in the propane BBQ and most of my cooking on a camping burner outside. (If it's really windy out, I cook inside on a small electric hot plate). I take the shelf out of the BBQ and place some aluminum foil over the bottom rack to diffuse the heat. Then I put a 4 inch high medium size cake ring on the rack on top of the foil, and place the Dutch oven on top of that ring. I also close that huge back opening partly with aluminum foil to keep more of the heat inside the grill. To bake bread, I start out heating the three center elements inside the BBQ on medium low to medium, a little higher if it's windy or freezing out. The thermometer in the lid is useless for baking. It often reads 500 degrees, but it acts like it's 350 degrees when I go to bake. I guesstimate the temperature. Now I preheat the grill and Dutch oven for about 15 minutes unless I choose to use the cold method. When I'm ready to bake, I add the bread and do my 'soft crust routine' before closing the lid. I keep all the burners on for the first half hour and then turn off the middle burner and just keep the two side ones going so the bottom of my bread doesn't get too dark and thick. I also like to turn the Dutch oven once in the middle of baking to bake the bread evenly. The front and back don't heat evenly.Troubleshoot
What To Do When The Dough Is Over-Proofed? If it's not deflated yet, you can go ahead and bake it, just handle it carefully and use the hot oven method for best results. If the bread has started to deflate, unfortunately it won't make a good loaf of bread. Don't try to bake it, it will turn out like a brick. Instead, you can add the same amount of flour and water or whey that the recipe calls for, knead it in, form two loaves and put them in bowls, seam up. Now cover with a damp towel and leave in a warm spot for a few hours till almost double, then bake it or refrigerate for a long ferment overnight. You can also freeze one of the loaves, and when you want to make bread, defrost in the fridge and bake it. (You can also use it for making Pizza)Enjoy This Delicious Fresh Milled Sourdough Rye Bread
I hope you give this fantastic bread a try and I'm sure you'll love it. If you love a good rye sandwich and if you love a great toothsome bread to go with your cheese, then this is for you! Nothing fancy, just wholesome goodness that you can enjoy every day and know that it will support your health and offer nutrition that you can't get from the fluffy white packaged stuff that some call bread. This fresh-milled unloaf sourdough Rye bread is just plain awesome. Enjoy!Resource Links
Sources of grain or flour:- Bulk organic einkorn berries or einkorn flour at Azure Standard*
- Bulk organic khorasan berries or khorasan flour at Azure Standard*
- Bulk organic rye berries or dark rye flour at Azure Standard*
- Bulk 25 lb organic Kamut® berries at amazon
- 10 lb organic Kamut® berries or Kamut® flour at amazon
- 25 lb organic rye berries or 3 lb dark rye flour at amazon
- 6 qt Cambro Bread dough proofing bucket
- 3 qt Saucepot
- Danish dough whisk
- Mockmill Electric grain mill
- Country Living grain mill Manual grain mill
- Sourdough baking kit
- Cast iron dutch oven
- Enameled dutch oven
- Flour sack towels
- Organic flour sack towels
- Parchment paper
- Cooling rack
- Redmond’s real salt
- Himalayan pink salt
- Celtic sea salt