No-Knead Seeded Rye And Spelt Bread With Fresh-milled Flour
No-knead German-style dark seeded rye bread that's loaded with whole grains, seeds, and nutrition. Chewy, dense, moist, awesome with cheese.Check the resources at the end of this post for links to equipment and ingredients. You'll find my favorite flour sources there as well as amazon links.
Equipment
- 3 quart pot - for soaking and cooking the whole grain berries.
- Large 6 quart container with lid - for mixing the dough and fermenting it. Use a plastic, glass, or stainless steel container. A stock pot works.
- Danish dough whisk - or a sturdy wooden spoon
- Dutch Oven with lid - for baking the bread
Ingredients
Ingredients For The Soaker Grains
- 1 cup organic Rye berries - or whole grain of your choice
- 1 cup organic Spelt berries - or whole grain of your choice, or cracked grains
- 10 cups water, divided - soak the grains in 6 cups of water and cook them in the 4 cups of water.
- 1-2 tbsp Vinegar - or lemon juice or sourdough helps to neutralize the phytic acid in the grains and softens them.
Ingredients For The Bread Dough
- 400 g fresh milled Rye flour (2 cups of whole berries)
- 400 g fresh milled Spelt flour (2 cups of whole berries)
- 230 g Sourdough, fed and active - about 1 cup after stirring.
- Cooked soaker grains
- 1 cup Sunflower seeds
- ½ cup Chia seeds
- ¼ cup Caraway seeds - ground or whole
- ¼ cup Flax seeds - fresh ground - plus optional ¼ - ½ cup whole flax seeds
- 2 tbsp Sea salt - must be additive free
- 2 cups Water or whey - or more if needed (I ended up using 2 ¼ cups, but the exact amount will depend on your dough consistency and can vary)
Optional
- ½-1 cup misc additional seeds - add to your bread dough if you want more seeds. Some ideas: any other seeds you love, such as poppy seeds, pumpkin seeds, hemp seeds, and sesame seeds. German breads often use millet in the mix too.
- ½ cup misc seeds - sprinkle on as a topping if you like
- drizzle olive oil - used for the top of the loaf, if you add seeds as a topping.
Instructions
Day 1: Soaking The Grain Berries And Feeding The Sourdough In The Morning
- Place the rye and spelt berries in a 2 quart pot.
- Add the 6 cups of water and the vinegar, sourdough, or lemon juice, stir, cover, and let it sit overnight.
- Take your sourdough starter out of the fridge and give it a feeding. Let it sit for 8-12 hours, then feed it again.
Day 2: Cooking the grain and mixing the dough
- In the morning on day 2, drain the grains, then add 4 cups of water and cook them for an hour or till soft.
- Let them cool on the counter or in a bath of cold water for an hour or two.
- Once the grains are cooled, start mixing your dough.
- Place the sourdough into the mixing container.
- Add 1 cup of whey or water and mix well.
- Add the cooled grains and stir everything.
- Pour all the seeds, caraway, and the salt over the grains.
- Mix well with the dough whisk or a large wooden spoon.
- Add the flours.
- Add another cup of whey or water.
- Mix everything really well with the dough whisk.
- Add more water or whey if needed so you get a dough that will be sticky and pasty, but should be kneadable. You don't have to knead it though. Just mix it really well with the Danish dough whisk.
- Place a damp towel over it or a lid.
- Let it bulk ferment on the counter in a warm room until doubled.
- Seal up the container and place it into the refrigerator or a cool root cellar, preferably for two days.
- There it can remain up to 7 days, but it will get quite tart and get a strong sourdough taste if you leave it that long. My favorite chill time is 2-3 days. This will develop a good sourdough flavor.
Day 4 or 5: Baking the bread
- Heat the oven to 400 degrees with the dutch oven in it and heat it through for 20-30 minutes.
- Prepare a square piece of parchment on the counter next to your oven.
- After about 20 minutes, get the dough out of the fridge and, using a spatula or your wet hand, loosen the dough from the sides of your container, reaching all the way to the bottom of the container. I lay my container down to do this. Go around once and then dump the dough onto the parchment, careful not to deflate it.
- Take the Dutch oven out of the oven with oven mitts on and place it on the stove top.
- Take the lid off with hands protected. Place it on a heat-proof surface.
- Grab the parchment by the 4 corners and carefully place it into the Dutch oven.
- If you are going to use a topping, drizzle some olive oil over it and sprinkle with your choice of topping. Lightly press it in.
- For a softer crust, I wouldn't add a topping. Instead, cover the top with a round, cut to fit, piece of parchment and a piece of wet cloth. Place the lid on the pot, put it into the oven, and bake for 20 minutes.
- Turn the heat down to 325 degrees and slowly bake it for about 2 more hours. After about 1 more hour, pour a little more water onto the cloth to keep it humid in the pot. Put the lid back.
- Check the internal bread temperature, it should read at least 205℉ - 210℉. You can also tap the loaf to hear if it sounds hollow. This loaf is dense, and it won't sound like an ordinary bread, but it should return a slightly hollow response.
- If you added a topping, remove the lid and let the topping toast for another 15 minutes. You can just use your top burners for this if you have that option.
- When done, take the loaf out of the Dutch oven by grabbing the parchment corners. Place it on a rack and take off the parchment.
Let it rest!
- Wrap with a dry or damp towel and let it 'cure' for about 24 hours. (A damp towel will help make the crust softer).
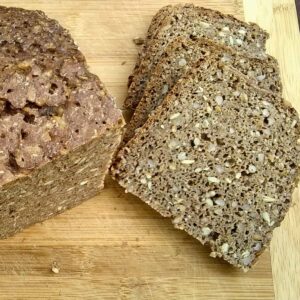
- Next day cut off a slice and taste it. It should be dense and chewy, but not doughy.
- I like to cut the loaf in half, place one of the halves on the cutting board with the cut side down. Then I slice it so I get half slices. This is so much easier than trying to get whole slices and whole slices are really huge.
Storage And Freezing
- Store the bread in a plastic bag or container in the fridge and slice as you need it, or freeze the whole loaf or slices. I prefer to slice all of it and freeze the slices. I usually keep a few slices in the fridge and replace those from the bread in the freezer when needed.
Notes
Tips To Make The Best No-Knead Fresh-Milled Seeded Rye Bread With Spelt
- I bake straight from the bulk ferment. It works well. However, the dough needs to be fully proofed at this point, and not overproofed. To achieve this, I let it ferment to about double in volume at room temperature, then I give it a cold treatment for at least another 24 hours. My favorite is 2-3 days in the fridge. It can go up to a week, but I find that it gets to be very tart and strong at that point and while it's still good, it isn't my preference. 2-3 days is my magic cold fermentation time. The flavor is rich and pleasantly tangy, a good amount of the sugars have been eaten, and the structure is just the way I like it. If I'm in a hurry, I'll bake it after a night in the fridge, but I normally plan ahead to include the longer fermentation.
- Don't forget time to soak the grains. It is important for better digestion and for reducing phytic acid before cooking them, to unlock the nutrients.
- I have used the soaked grains in the past without cooking them first. It is ok, but they are very chewy that. If that is something you like, you can surely omit the simmer process. But I recommend simmering the grains till they are soft. It also adds extra moisture retention to the bread. I use the grain cooking water in the bread dough and add more water if needed. If I have whey, I add some whey if more liquid is needed.
- This should be a pretty moist dough. You'll need the extra moisture in this bread dough to get the final texture I prefer.
- This is not a quick bread. However, hands-on time is minimal. Most of the work is done for you during soaking, culturing, baking and curing.
Sample Timeline With Rising Times:
Day 1:
9am: soak the whole grains in warm water. Take the sourdough out of the refrigerator and feed it.
9pm: Feed the sourdough again
Day 2:
9am: drain the grains (I just drain them with the lid on the pot, cracked open a bit to let the soaking water drain out). Then cook the grains in fresh water for an hour or so till al-dente. Set aside for another hour to cool. Place the pot with the grains in a bowl with cold water if necessary to cool it quicker.
11 am: mix the dough ingredients with a dough whisk or sturdy wooden spoon. Add the flour last. Cover and set it aside at warm room temperature for about 5-6 hours (or till about double).
4-5 pm: Put the dough with a lid on into the refrigerator or a cool root cellar for a couple of days.
Day 4
9 am: heat the oven with the Dutch oven in it.
9:20: Take the dough out of the fridge, loosen it from the sides carefully and dump it on a piece of parchment. Put it in the hot pot, close the oven door and let it bake for 20 minutes at 400℉.
9:40: reduce heat to 325℉ and bake for 2 more hours.
11:40: check for doneness, Temperature in the middle should be at least 205 degrees.
Remove from the oven and wrap in a damp or dry towel to soften the crust and to cure it for 24 hours
Day 5
Noon: Time to cut the bread and taste some!
Is it worth it? Ya betcha!
This bread is worth the time it takes. I actually find it less laborious than some artisan breads I have made in the past. There is little to do, other than prepping the soaker and mixing the dough, just a lot of waiting. Patience is the biggest skill you need for making this bread.
Enjoy Your Delicious No-Knead Fresh-Milled Seeded Rye Bread With Spelt
This is so easy to make, but requires some patience. It is so worth it though. This bread is unlike any that you are accustomed to if you live in the United States. Enjoy it plain, just topped with butter, salted goose grease or cracklings and lard. This bread is excellent toasted and topped with nut butter and apple butter. But it is especially good with cheese. I think this bread and cheese are a match made in heaven. They go together like milk and cookies. Perfect companions. If you are a cheese fan, you'll have to give this bread a try to go with your favorite hard cheese, soft cheese or cheese spread. So delicious! Sources of grain or flour and seeds:- Bulk organic spelt grain or spelt flour at Azure Standard*
- Bulk organic einkorn berries or einkorn flour at Azure Standard*
- Bulk organic khorasan berries or khorasan flour at Azure Standard*
- Bulk organic rye berries or rye flour at Azure Standard*
- Bulk 25 lb organic Kamut® berries at amazon
- 10 lb organic Kamut® berries or Kamut® flour at amazon
- 10 lb organic einkorn berries or einkorn whole grain flour at amazon
- 25 lb organic rye berries or 3 lb rye flour at amazon
- 5 lb organic spelt grain or 20 oz spelt flour at amazon
- 6 qt Cambro Bread dough proofing bucket
- 3 qt Saucepot
- Danish dough whisk
- Mockmill Electric grain mill
- Country Living grain mill Manual grain mill
- Sourdough baking kit
- Cast iron dutch oven
- Enameled dutch oven
- Flour sack towels
- Organic flour sack towels
- Parchment paper
- Cooling rack
- Redmond’s real salt
- Himalayan pink salt
- Celtic sea salt