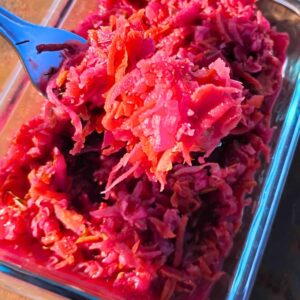
How To Make Fermented Coleslaw With Root Vegetables
This Fermented Coleslaw is super tasty and extra nutritious with added root vegetables. Preserve your garden goodness with increased health benefits!
Equipment
- Grater - Most of the time I use a box grater, but you could also use a food processor, mandolin, or a rotary grater.
- knife - or Feemster’s famous slicer from Lehman’s (or get it at Amazon) or other slicer, food processor, or mandolin for shredding the cabbage.
- cutting board
- Large bowl - You'll be mixing and kneading your cabbage in it, so make sure that it's spacious for working in.
- Half gallon mason jar
- Fermentation Lid - I recommend the use of a fermentation top or airlock. It makes fermenting so easy and maintenance free.
- Fermentation weight - My go-to favorite weight for mason jars is a glass fermentation weight. You can also use a rock or a plastic baggie filled with brine.
- Wide mouth funnel optional
- Scale optional
- Tamper optional - A pickle packer helps to pack down the slaw ingredients.
Ingredients
- 1 medium head of cabbage
- 2-3 large beets
- 1 rutabega
- 2 turnips
- 3 large carrots
- 1 large onion
- 4 cloves of garlic
- Bunch of Dill
- Caraway seeds
- Salt
Optional Spices
- 1-2 Tbsp Pickling spice mix
- Cilantro seeds
- Dill seeds
- Pepper corn
- Mustard seeds
- fresh or dried cayenne pepper, whole or crushed
- fresh or dried ginger
- fresh or dried turmeric
Other Roots
- 1-2 celery roots
- 1 horseradish root
- 2-3 radishes
- 2-3 parsley roots
- 2-3 young salsify roots
- 2-3 young scorzonera roots
- 2-3 parsnips roots
Instructions
- Wash your vegetables. Brush them lightly if necessary. No need to peel most, but do remove the tough skin around mature rutabaga or turnips, and especially if you purchased them and they are waxed.
- Weigh your bowl and zero it on the grams setting. Place all prepared ingredients into this bowl as you go.
Prepare your vegetables.
- Reserve 1-2 large outer leaves of cabbage to later cover your slaw in the jar.
- I like to slice cabbage with a 'krauthobel', a cabbage slicer, but this time I used my food processor since it was closer at hand. I don't like using it for this, but it worked ok on the cabbage, not so much on the roots.
- Grate or finely julienne your roots.
- Slice or chop the garlic.
- Chop the dill.
- Check the weight of all your ingredients combined when finished prepping them.
Salting
- You'll be adding 2% of the total ingredient weight in salt. So if your total weight is 1800 grams for example, calculate 1800 x .02 = 36 grams of salt.If you don't have a scale, use 2 tablespoons of salt for a half gallon jar of ingredients.
- Sprinkle the correct amount of salt over your vegetables and mix it in well. Let the veggies and salt stand for about 10 minutes or so.
Work The Slaw
- After a bit of rest, knead it well. You'll get some juices separating out, which is the goal here. Keep kneading till you have a fair amount of juice. You can also let it sit a little longer to draw more and knead again before stuffing it into your jar.
Bottle The Slaw
- Using a funnel, stuff your cabbage and roots mix into the fermentation jar and press down on it as you go. When finished, you should have a lot of juice coming up in the jar and be able to press the ingredients to be covered by the juice.
- Place a cabbage leaf or two over the ingredients and push it down to cover all ingredients. Then place a weight or a baggie filled with salt brine (make a brine by mixing 1 cup of water + 1 ½ tsp salt) over this to keep the ingredients submerged. Juices should come up over the ingredients. If you're not getting enough natural juices, you can wait a day to see if there will be more. If not, just add a little bit of salt brine to make sure everything is covered. You'll need at least 1 inch head space in the jar to allow for expansion as this fermentation gets going.
- Place a fermentation lid on top or your 2-piece mason jar lid and put a bowl underneath the container to catch any overflow should there be some. Then set it aside in a corner where you can keep an eye on it and keep it out of the sunlight.
Fermenting and Maintenance
- Now you're done for a while. Keep an eye on the fermentation for the next couple of days. You'll want to see bubbling, which confirms that fermentation is underway.
- If you used a 2-piece mason jar lid, burp it once a day. Just barely unscrew the band and let the gasses escape with a little hiss. Retighten immediately. Do this every day during active fermentation. This is not necessary if you're using a fermentation lid.
- The best temperature for fermenting is 72-85 degrees. Definitely keep it above 65 degrees during the initial fermentation period until your microbes get active and produce bubbles and a cloudy brine. Usually for about the first week.
- You can enjoy this gardenslaw after about a week. Open it and taste a little. If it tastes pleasant and you like it that way, put a permanent lid on it and place it into cold storage. A long fermentation will yield more probiotics and a more tart gardenslaw. So if you can wait a little longer, keep it going for 2-3 weeks total and then store it away.
Storage
- Store your garden-slaw in the refrigerator or root cellar. You could keep it at room temperature too, but it will continue to ferment and thus turn more sour as it does, and it might start getting soft and not as fresh and crunchy after a while. Eventually the microbes will run out of sugars and die off and so will your ferment. Cold storage will slow down this process considerably and this will keep the microbes alive for a long time. They get very sluggish and their appetite for sugars will slow down. I have some ferments that are 3 years old and are still fresh, crunchy, and delicious.