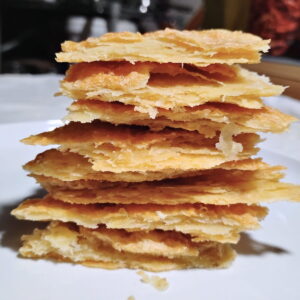
How To Make A Delicious Flaky Pie Crust
A delicious flaky pie crust with butter or lard, this is a must-try recipe! Rich, flaky, tasty, and easy, no electric equipment needed. The perfect pie crust for your best holiday pies.
Equipment
- A medium bowl - for mixing ingredients
- A few measuring cups
- Scale (optional). - I prefer weighing the ingredients
- Pie dish for baking
- Rolling Pin
- Parchment paper
Ingredients
- 12 Tbsp butter, lard, or both, 6 Tbsp of each
- 2 cups all-purpose flour (230g) - I use either all-purpose white flour or einkorn flour. whole wheat flour is great too.
- ¼ cup sour cream (60g) - full fat!
- 1 tsp vinegar - I use Apple cider vinegar, but any works
- 1 egg yolk - if you double the recipe, use one whole egg instead.
- 1 tsp salt
- 2 tsp sugar (optional) - use for sweet pies or omit.
Instructions
- Dump the flour into a medium sized bowl.
- Add the salt, and if you're making a sweet pie, the sugar as well. Mix it all together and place it into the refrigerator for a little while, especially if it's a hot day.
- Cut the cold butter into small chunks (I quarter the sticks lengthwise, then I just slice them into small cubes). Add to the flour.
- Mix the butter into the flour, and then start squishing the butter. Try to do it quickly and be careful not to over process or melt the butter bits with the warmth of your hands. Just work swiftly to create flour coated flakes by pressing the butter between your fingers into flakes or disks.
- Once all the cubes are flattened, I like to place the bowl back in the freezer for a bit, especially when it's 90℉ out. The goal is to keep the butter firm and from melting, which would be the death of flakiness.
- Make a well into the middle of the flour, add the egg, sour cream, and vinegar and mix it with a fork to combine before incorporating it in the dough. You can also mix the wet ingredients in a small separate bowl and pour it over the dry ingredients. I prefer doing it that way.
- Use a fork to blend all the ingredients. It will keep them cooler than using your hands. Just toss everything around to coat evenly. Once all the flour has been wetted, press the dough together with your hands, flatten, then fold it, and flatten again a couple of times. But make it brief so your hands don't melt the butter.
- Place the dough into the fridge to chill it for about 2 hours and up to 4 days.
- Now roll out the dough between 2 pieces of parchment. First sprinkle a light coating of flour over it and under it, roll it a little, lightly flour again and redo the parchment, roll it a little bigger, and keep going this way until it's the right size. Go easy on your use of flour, but use enough to keep the crust from sticking.
- Once the crust is the desired size, flour the top lightly, fold it in half and then again in half. So it looks like a quarter pie wedge
- Lay the folded dough onto the pie plate with the point in the middle and unfold it for perfect placement.
- Use a fork to poke holes into the bottom of the crust so it won't buckle.
- With a sharp knife, trim the excess around the edge and form a pretty scalloped edge if you want, or leave it rustic. I sometimes like to fold the edges inward for a rustic look after filling. If you're making a galette, place the dough on a parchment lined baking sheet. Fill the center and fold the edges over the filling, leaving the center open.
- I like to put my pie crust back into the refrigerator or freezer for a few minutes before filling, to keep the butter nice and cool when it's hot outside.
- Fill your crust with pie filling and bake it according to your recipe.
- If your recipe specifies that you use a pre-baked pie crust, you'll want to blind bake your crust. Line it with parchment after poking holes all over the bottom. Fill with rice or small beans (about 2 lbs), and bake it for 20 minutes at 400℉. Remove the rice or beans and parchment and bake for another 10 minutes. If you'll be filling it with an unbaked filling, bake the crust till it's a golden color to be sure it's cooked through.